The N64 is Nintendo’s first console to fully support 3D graphics and has a library of iconic games. Use on a CRT is easy and looks great, but due to it’s 15Khz analog output and early 3D graphics, getting a good experience on a modern flat-panel TV can be challenging. This guide (below) and video (above) should show you everything you need to know to get started, as well as go over other accessories and tips you might need!
As a note, please assume all links embedded in this post have affiliate codes; Most do not, but I’m constantly updating links to which stores have them in stock and use affiliate codes when available.
Introduction:
25 years after the console’s release, the Nintendo 64 still has a strong following and new gamers are discovering it every year. If you’re just discovering the console for the first time – Or, you haven’t plugged one in since you were a kid, getting it working on modern TV’s can be confusing and there’s a lot of stuff you have to worry about that just doesn’t exist with modern HDMI consoles. This guide will show you everything you need to know to connect an N64 to your TV, as well as other tips that show how to get started and what accessories you’ll need.
Before We Begin:
Before we get into the details, I just want to skip to the end and say if you already own an N64 and want an easy way to get started, simply grab any CRT you can find that still works, connect the yellow composite video cable it came with and start playing your cartridges. It’s easy to get caught up in fancy mods and accessories, so I just wanted to politely remind everyone that playing it the same way you might have a quarter century ago is still awesome.
There’s also services like Nintendo’s Switch Online that let you play the games on modern hardware and even ways to emulate them in high definition! If you’re just looking to try some N64 games, you might want to look into those other options, but this video is going to focus on original hardware only.
Also, while the main focus of this video is getting it connected to your TV in the best way that fits your setup, I also want to highlight a few tips and accessories as well. These are projects we’ve been following on this website and if you’re not subscribed to the podcast, you might not have heard of them. Or maybe you have, but I’m happy to highlight them here…so, let’s jump in!
Jumper Pak / Expansion Pak
I’ll start us out with an easy one: The plastic door on top of the N64, contains the console’s jumper pak. If this isn’t plugged in (or not plugged in all the way), the console won’t boot and that’s usually the first thing I suggest people check if they have issues: Just use a soft piece of plastic to pull it out, then reseat it and try again.
Also, Nintendo made an accessory called the expansion pak, that replaces the jumper and doubles the internal RAM from 4MB to 8MB. Most of the library will play exactly the same regardless of which is used and only a few games actually require it. The most common feature the expansion pak unlocks are higher resolution modes…but sometimes those modes are interlaced resolutions, which aren’t the best to use on modern TV’s, in most scenarios: https://nintendo.fandom.com/wiki/Nintendo_64_Expansion_Pak
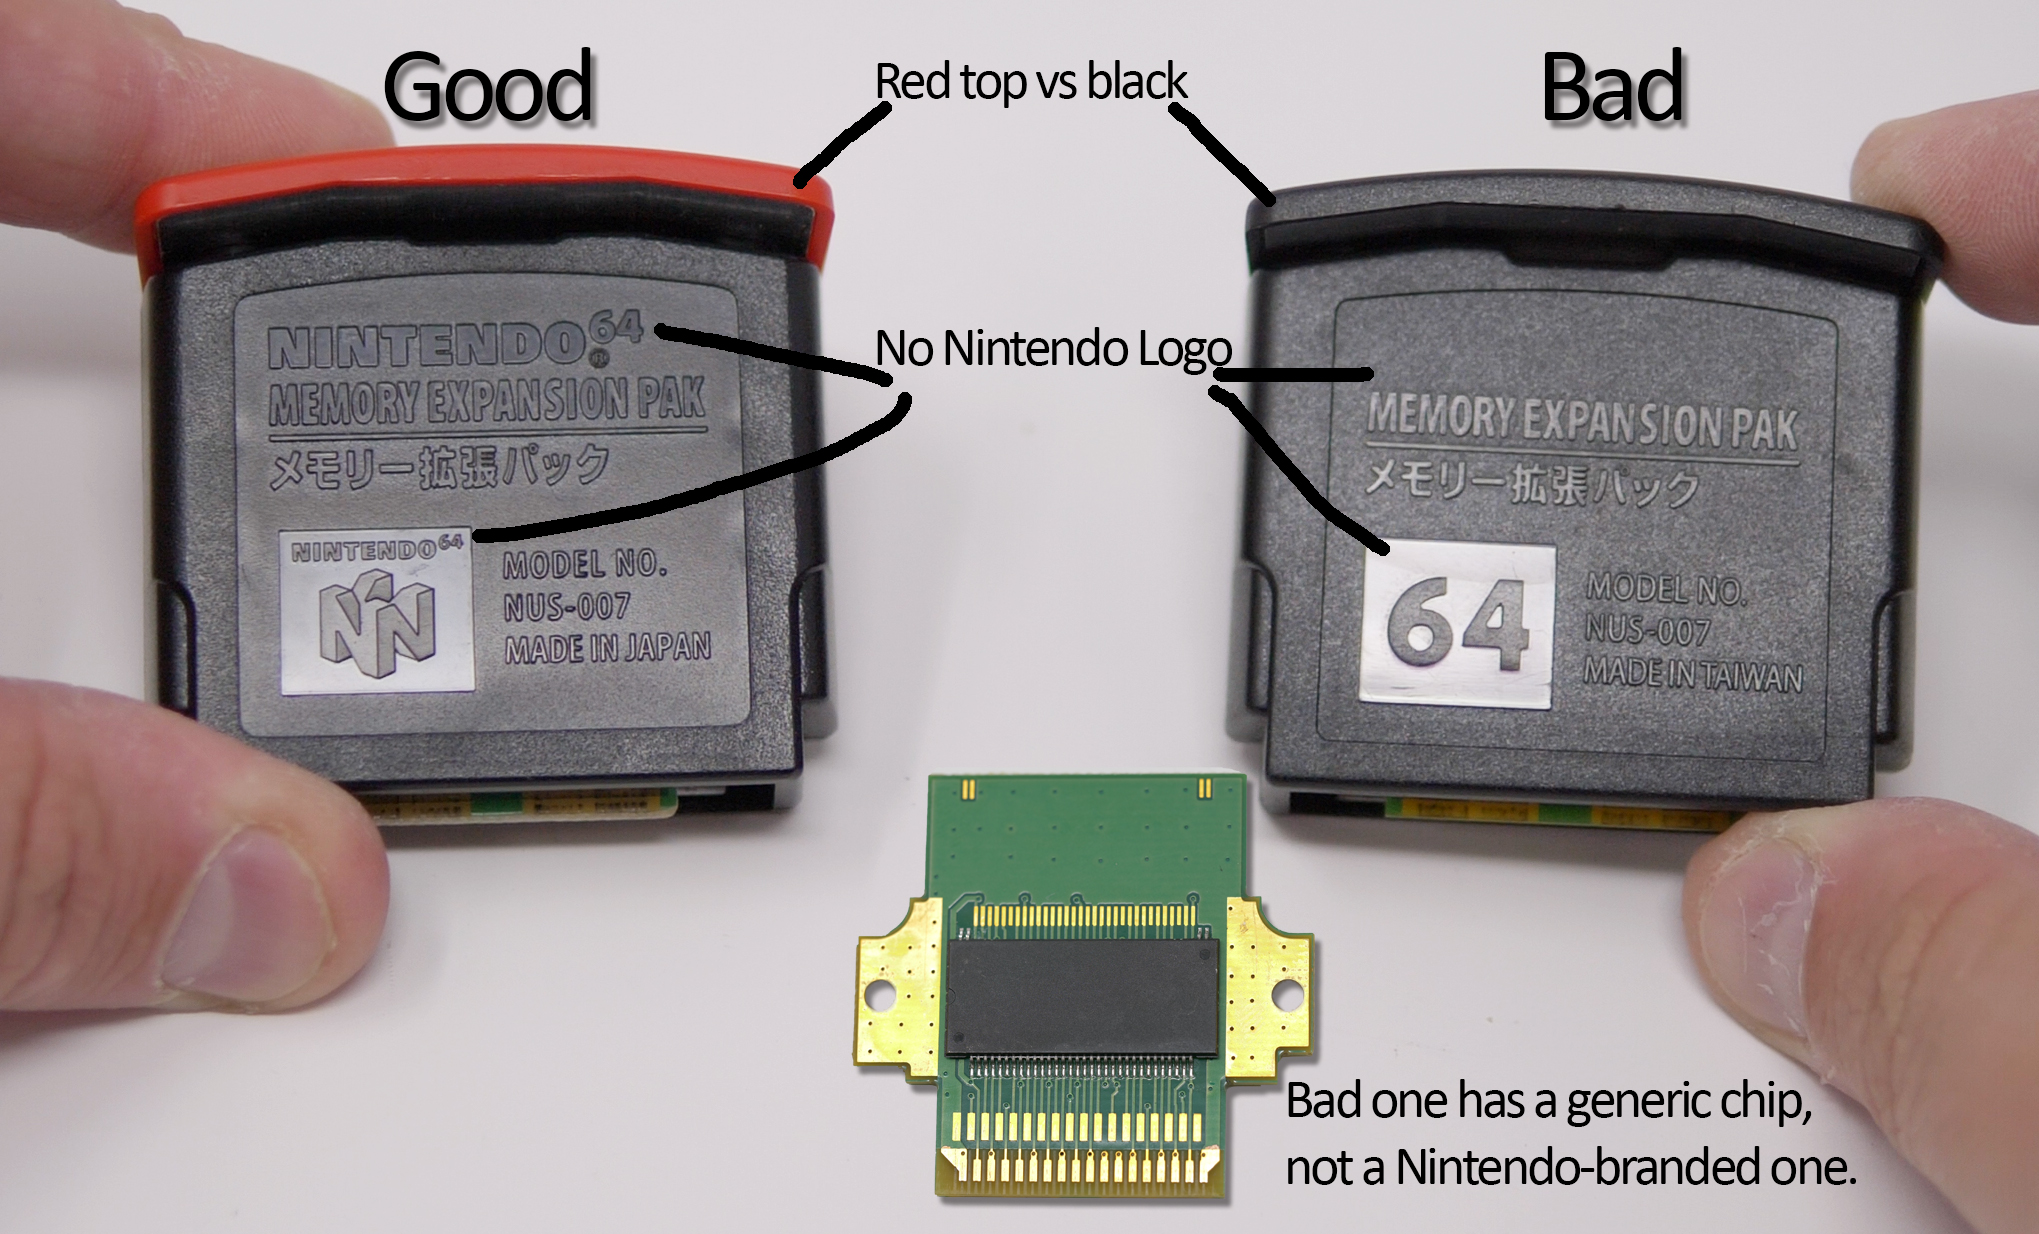
If your N64 still has the original jumper pack, I wouldn’t worry too much about hunting one down…unless you specifically want to play some of the games that benefit from it. If you do decide to use one, just make sure you’re using an official Nintendo one with the red top and Nintendo logo!
PSA: Stay away from fake/3rd party N64 Expansion Pak’s! I thought my Everdrive 64 from @krikzz was having problems, but it turns out I just had a crappy expansion pak!
Always use the official Nintendo one…or just the standard jumper pak! More info in an upcoming video. pic.twitter.com/ERliAVPCwN— Bob from RetroRGB (@RetroRGB) October 21, 2021
I’m sure some 3rd party are find and I think a few were even officially licensed by Nintendo and use their chips…but it’s up to you if you want to take the chance. I’ve seen low quality 3rd party ones cause games to crash and ROM cart’s might not even boot at all!
…and if you want more info on what the extra memory does to the games that support it, check out this video from Stop Skeletons From Fighting.
Memory Cards / Controller Pak
Now, onto memory cards, or, as Nintendo calls it, the Controller Pak. Many games require this to save and while I’m sure a lot of the original N64 controller pak’s are still working, after twenty five years, their time is probably limited…and at the very least the battery will need replacing. You can get used ones on eBay and most are probably fine: https://ebay.us/f9GcfT
While there’s mods available to upgrade or fix original memory pak’s and plenty of junky 3rd party solutions, there’s one new high quality option available: The Forever Pak 64. These come in injection molded cases to match your console’s plastic and contain modern technology that doesn’t rely on a battery to contain your saves. Check out how good it matches!:
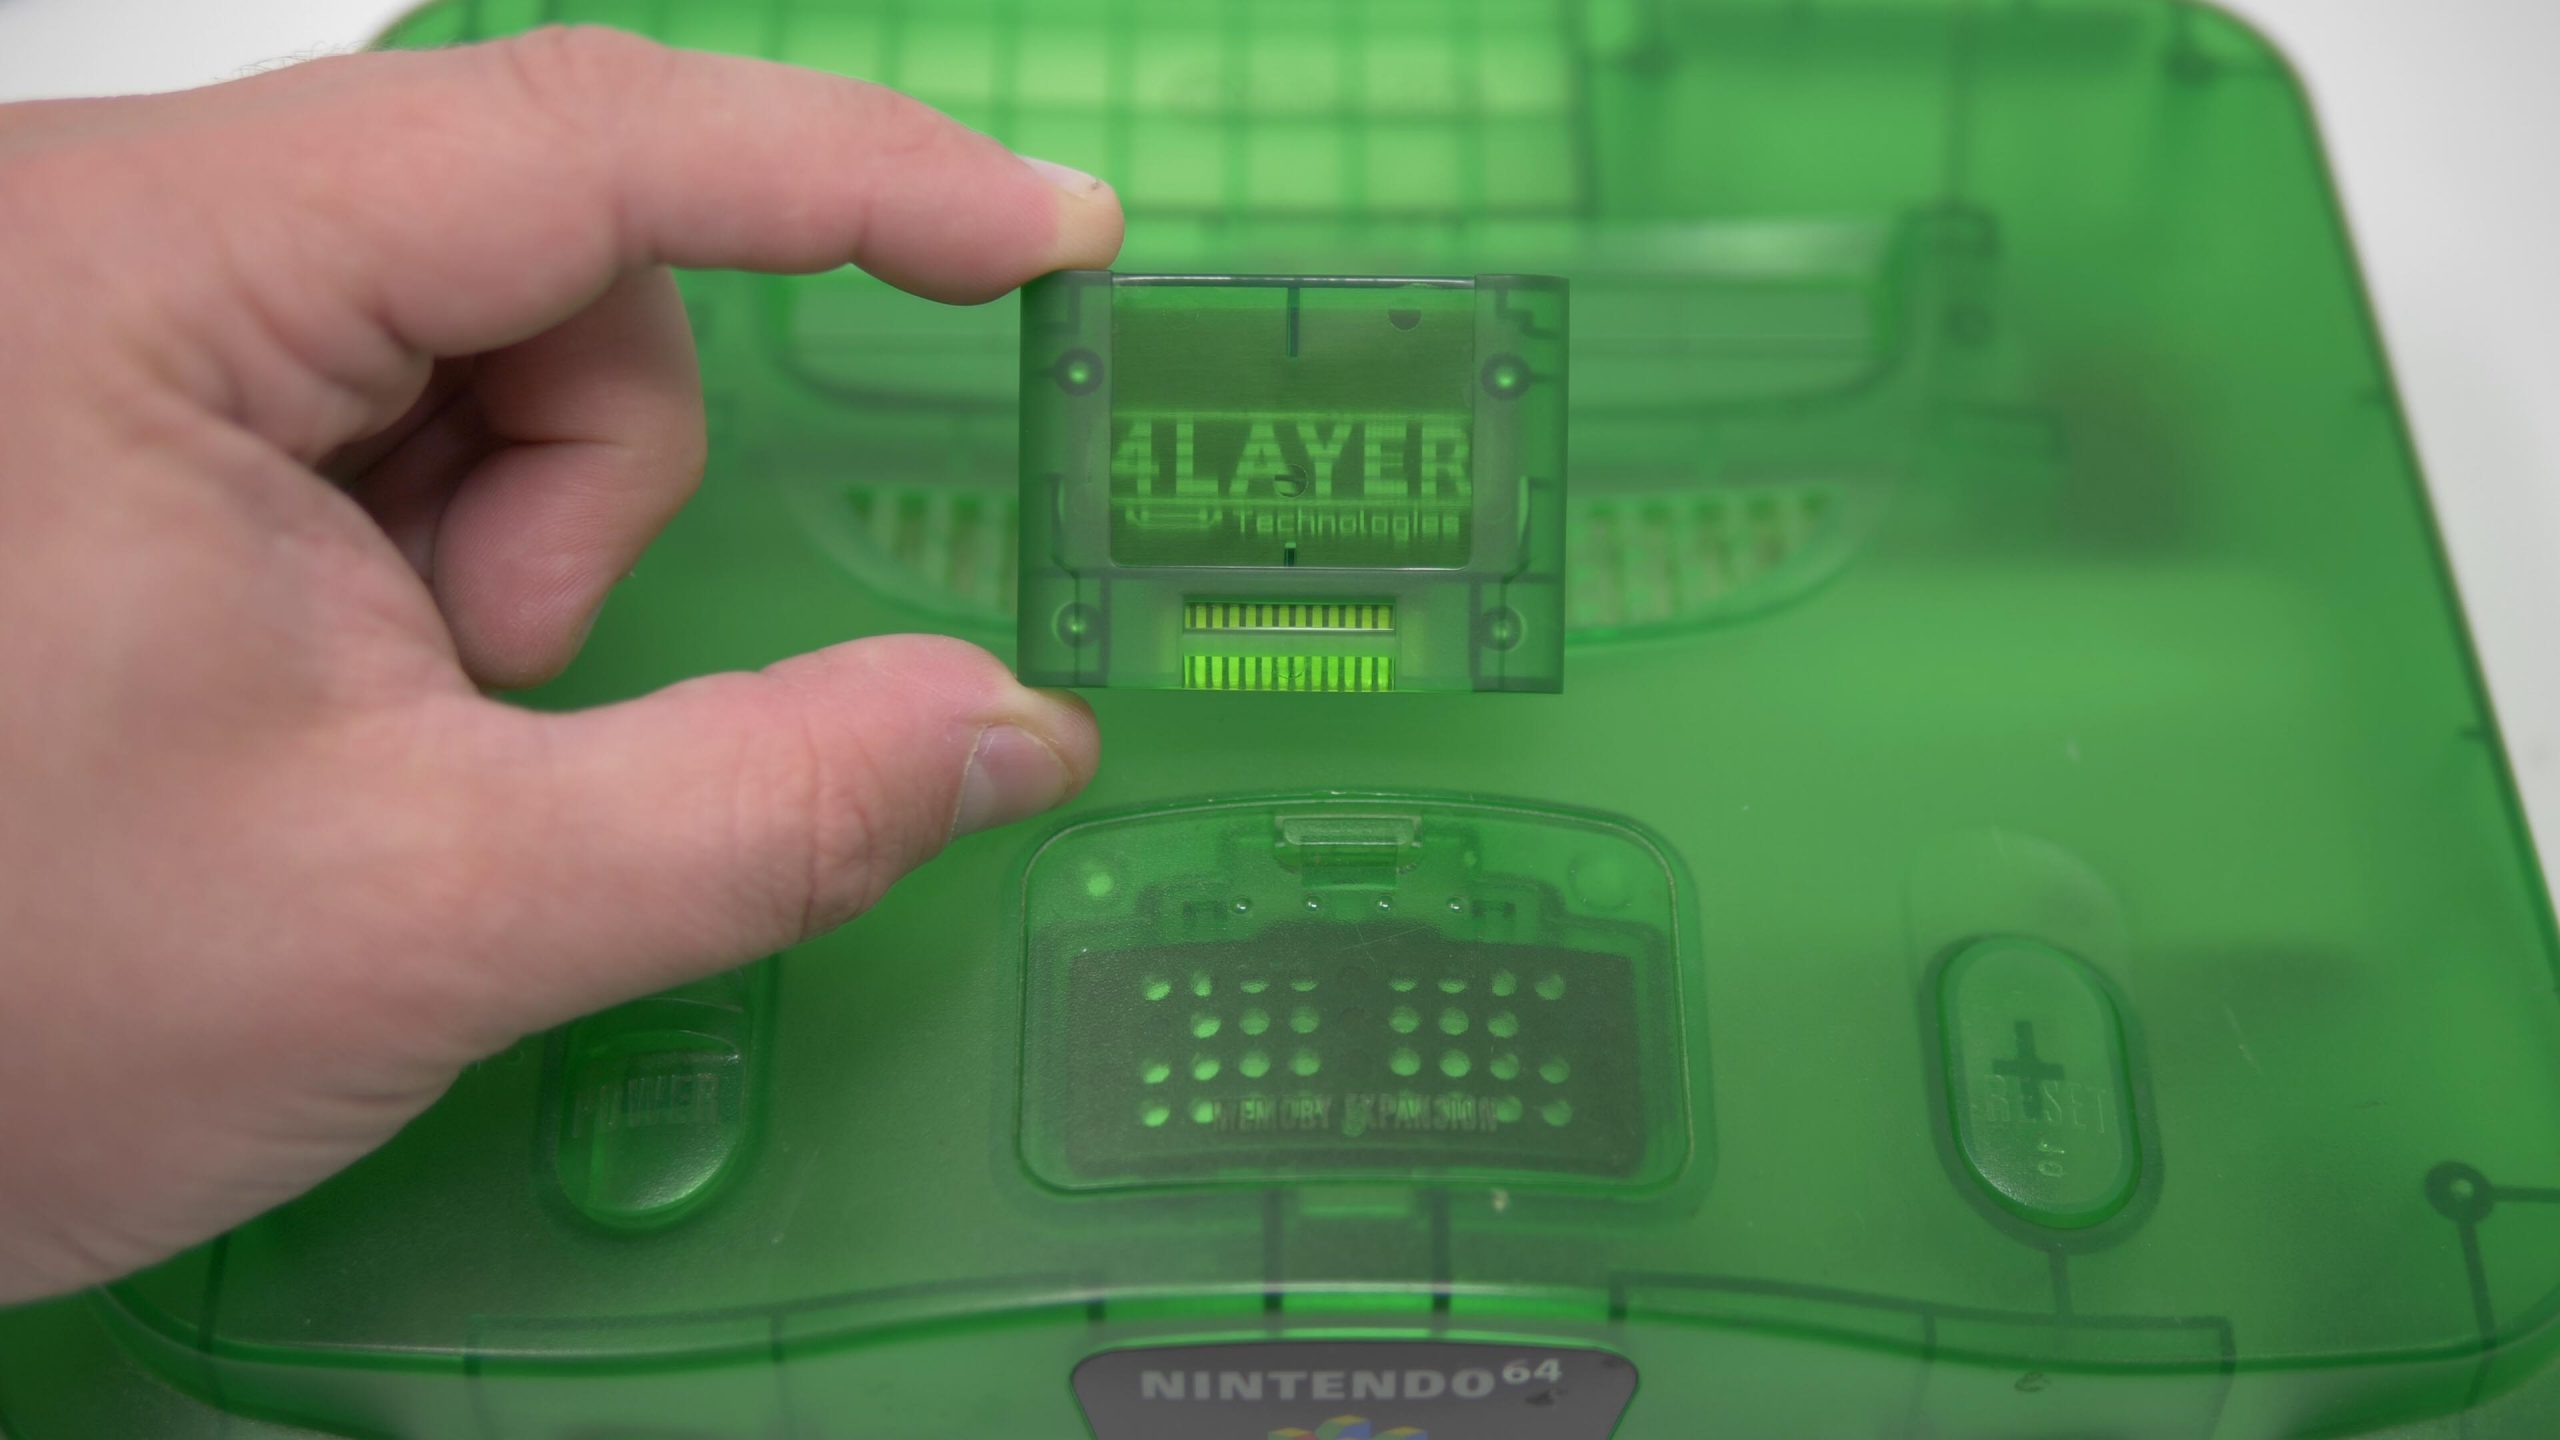
Since the N64 can only address a limited amount of save data at a time, the Forever Pak doesn’t offer any more storage than the original, but that would be the case with any replacement memory pak. Also, it’s a bit more expensive than ones you’d find on eBay or Amazon, but at thirty dollars, I’d still call it an inexpensive solution that’s much higher quality than the alternatives. Tito from Macho Nacho productions recently did an in-depth video about them, which has all the details you’d need to know about it – I highly recommend watching!: https://www.retrorgb.com/forever-pak-n64-memory-card.html
Cartridge Tray
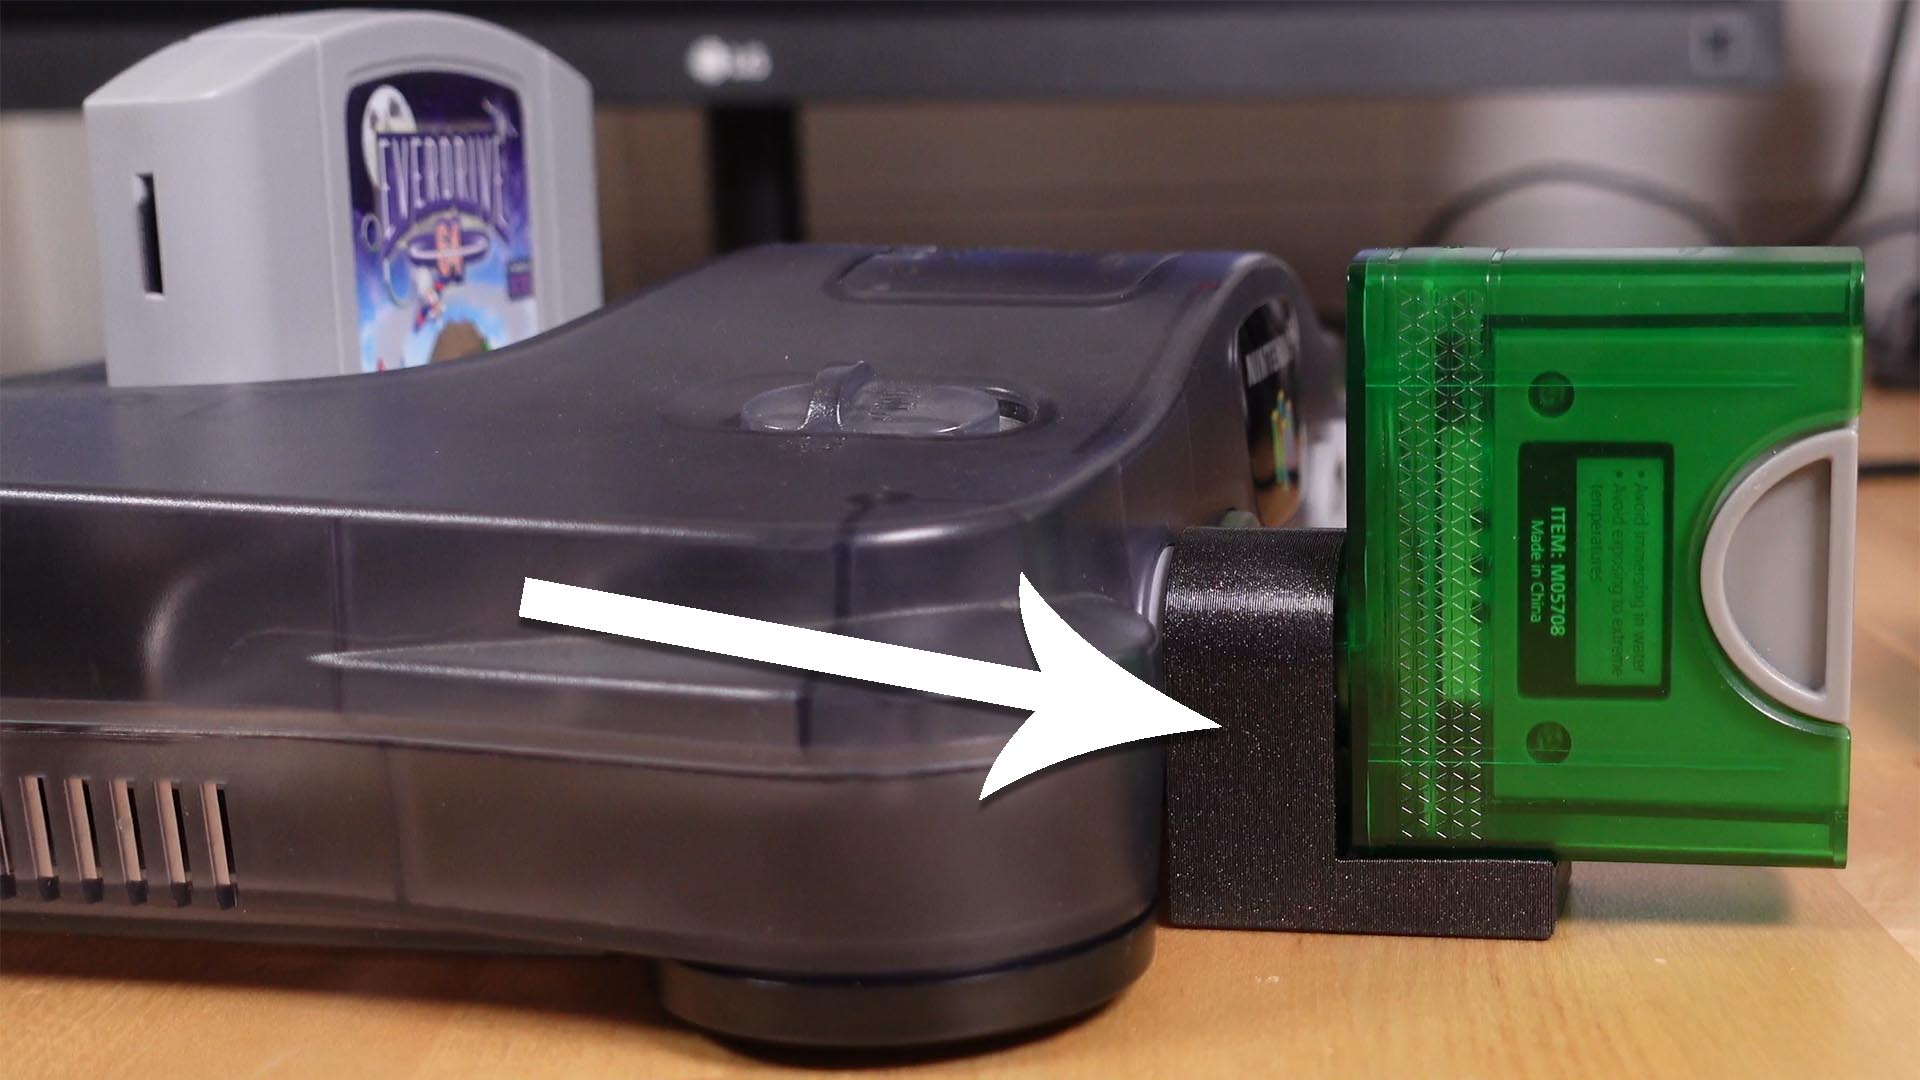
Here’s another easy tip I thought was worth mentioning: If you want to play Japanese games on North American Consoles – Or Vice Versa – They won’t fit! Nintendo produced slightly different cartridges for those markets, I guess as a way to try and prevent games from getting imported.
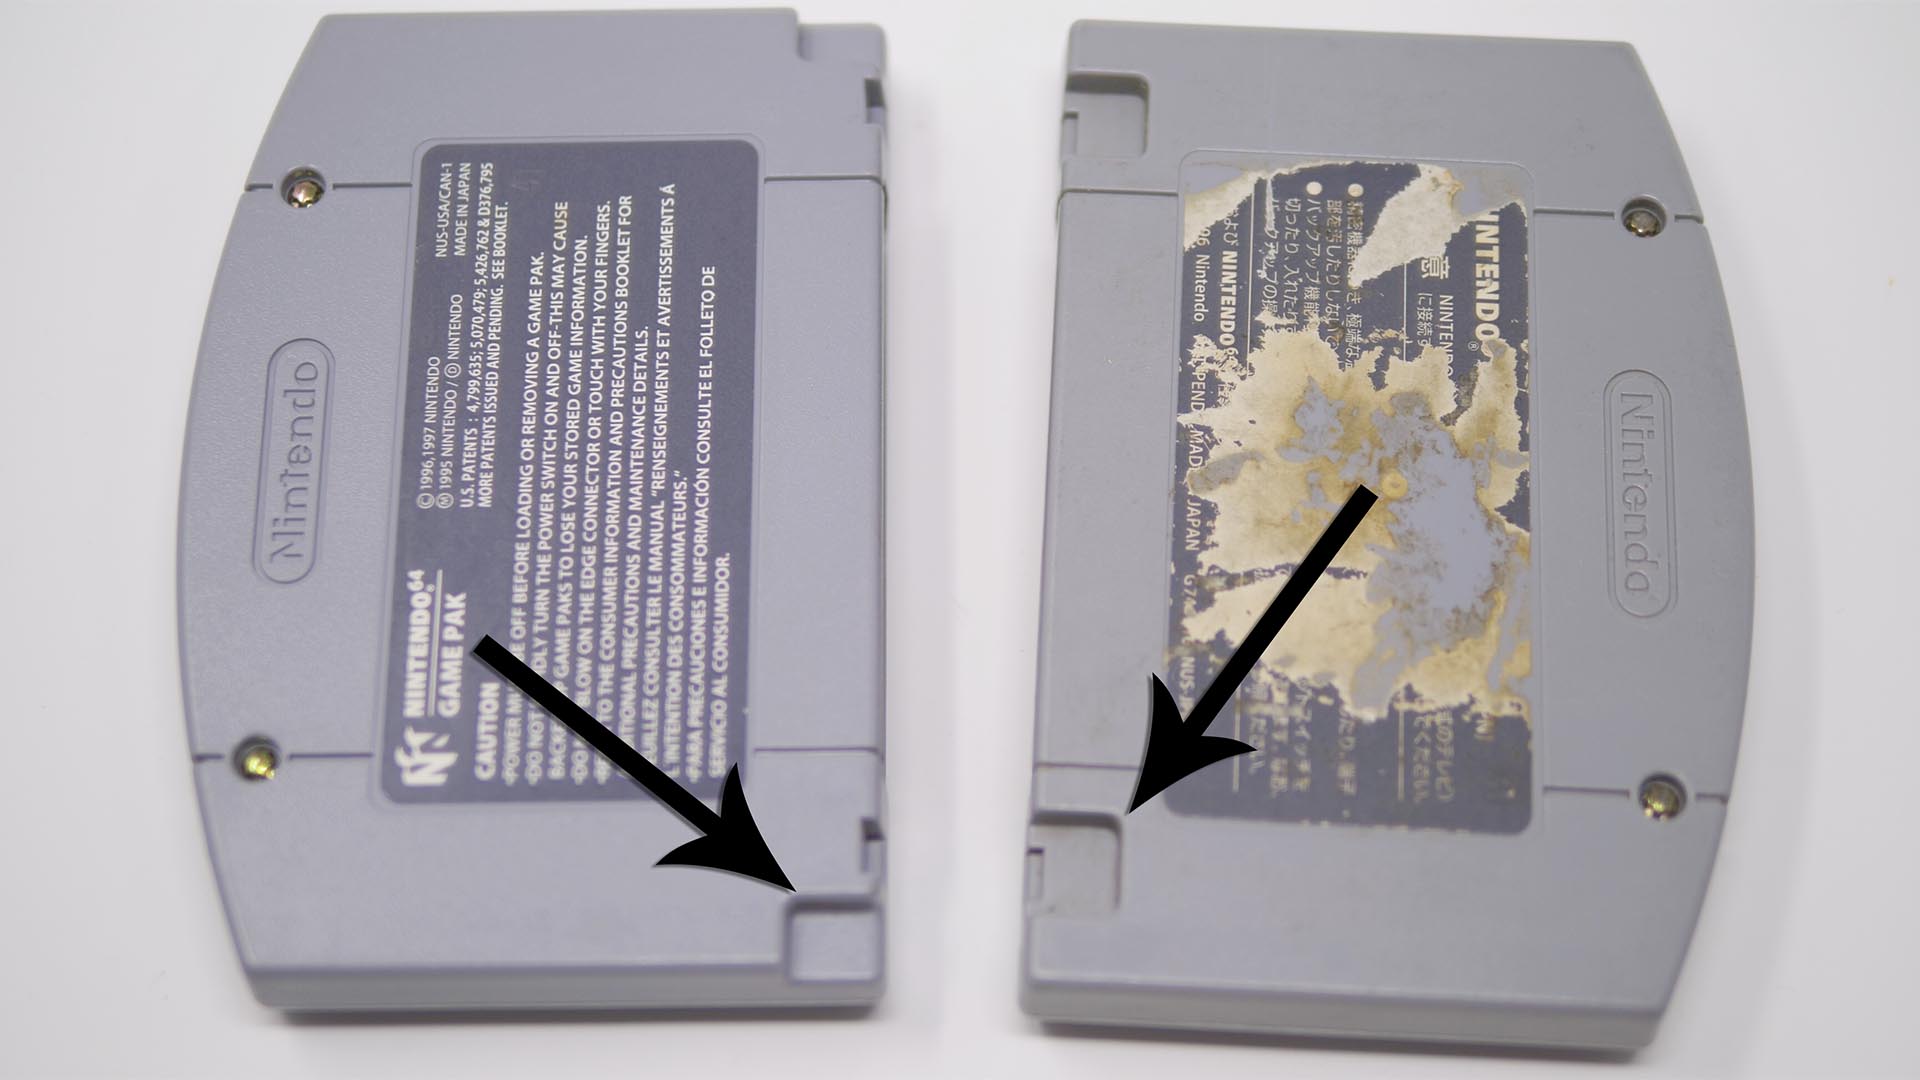
My favorite way around this is to replace the original cartridge tray with a universal 3D printed one that Greg from LaserBear designed. He sells them in multiple colors to match the consoles and he even provided the files for people to print their own!: https://www.retrorgb.com/3d-printed-n64-region-mod.html
Now, this won’t magically allow you to play 50Hz European PAL games on US consoles, but you can at least swap between US and Japanese games. While sure, you could probably just cut the original trays, I really don’t like cutting plastic on original consoles.
ROM Carts
If you don’t want to use your original cartridges, but still want to use the original console, an excellent option is using a ROM cart – A device that lets you put games on a Micro SD card and play on an original console exactly like if the original cartridge was inserted.
My favorite for the N64 is the Everdrive 64 x5 from Krikzz. It’s just over $100 and plays pretty much the whole library of N64 games and homebrew.
The only disadvantage to the x5, is you have to hold reset and go back to the menu to make sure your save games write to the MicroSD card. Krikzz also offers a higher end x7 version that doesn’t require a reset to save, as well as offers developer features and a real time clock to use with games like animal crossing.
Using a ROM cart isn’t just about being able to leave your original cartridges on a shelf – There’s an entire scene of developers who edit N64 games to have new features, as well as translate Japanese-only games to English. You can even patch with cheat codes and try things like deblur tweaking to sharpen up some games. I could probably do a video just on N64 rom patches, but for now, I’ll say this:
Unless you already own every N64 game you’ll ever play and have no interest in patches, at least consider getting a ROM cart. All of my game collector friends still scout game stores for their favorite carts, but usually end up playing on a rom cart, just for convenience.
Controllers
One last accessory I’d like to talk about are the controllers, because even if you prefer the originals, you might need an analog stick replacement. Or, if you’re one of the people that doesn’t like the trident controller at all, you might want to look into newer 3rd party options. Here’s the problem though: Everyone’s hands are different, so giving controller recommendations really aren’t the easiest thing to do and I’m not an N64 controller expert anyway.
What I would suggest, is that you try to find a reviewer that loves the N64, that plays the same exact type of games that you want to play, because I imagine someone who plays Goldeneye, might not want the exact same things as somebody who plays something like, Super Smash Bros. Overall though, if you do decide to get one of the newer wireless controllers, there is one recommendation I can definitely give: Look into 3D printed braces that prevent the receiver from sagging. Todd from RetroFrog designed some brackets to hold them in place, which you can purchase, or just print yourself for free if you have a 3D printer. It’s weird we need to worry about this at all though – I mean, how did multiple companies make receivers without strain relief that could put a lot of pressure on the controller ports.
Maybe you don’t need the braces…but for $7 – or free if you can print your own – why take the chance? Sorry I couldn’t be more help with this one, but like I said before, I’m not an N64 controller expert and I would much rather just be honest about that, then try to fake it through my own review and recommend something that isn’t the best fit for your needs. There’s plenty of other people out there that do excellent N64-related reviews though, so please give those a look and see if you can find one that solves whatever solution you need.
Connecting to a TV
Okay, now onto the main focus of this video: How to play N64 consoles on modern displays. I gotta start out by repeating what I said at the beginning: Just grabbing any old CRT and connecting the composite video cables is an excellent way to experience N64 games. I think game dev’s figured out how to use the blurriness of composite video to blend the low-resolution 3D graphics and as a result, I truly think any CRT experience is great: Composite on a small consumer-grade CRT takes advantage of the blending and looks great…and so does RGB on a professional grade monitor. Basically, if you have a working CRT, you’ve got all you need.
Now, I totally understand that most people watching won’t want to deal with the hassle of CRT’s and probably already have a really nice flat-panel they want to use…but, unlike CRT’s, it’s not as easy as just plugging in the cables that came with your N64.
First, even if your modern TV still offers analog inputs, it’ll be really laggy and the video will be processed wrong. I’ve demonstrated why this happens in a few other videos (including both of the ones linked in this paragraph) and as a result of my testing, I strongly recommend not connecting your N64 directly to any flat-panel. As a result, you’ll need to use a scaler to get the signal into a flat-panel’s HDMI input. Some excellent entry-level options that scale to 480p are the RAD2x and RetroTINK Mini – Each designed by creator Mike Chi and perform pretty much identically.
The RAD2x simply plugs into the N64’s multi-out and outputs HDMI. It’ll also automatically detect if you’ve done an RGB mod – more on that in a second, but it’ll still work with all N64 consoles. Overall, you couldn’t possibly find an easier solution.
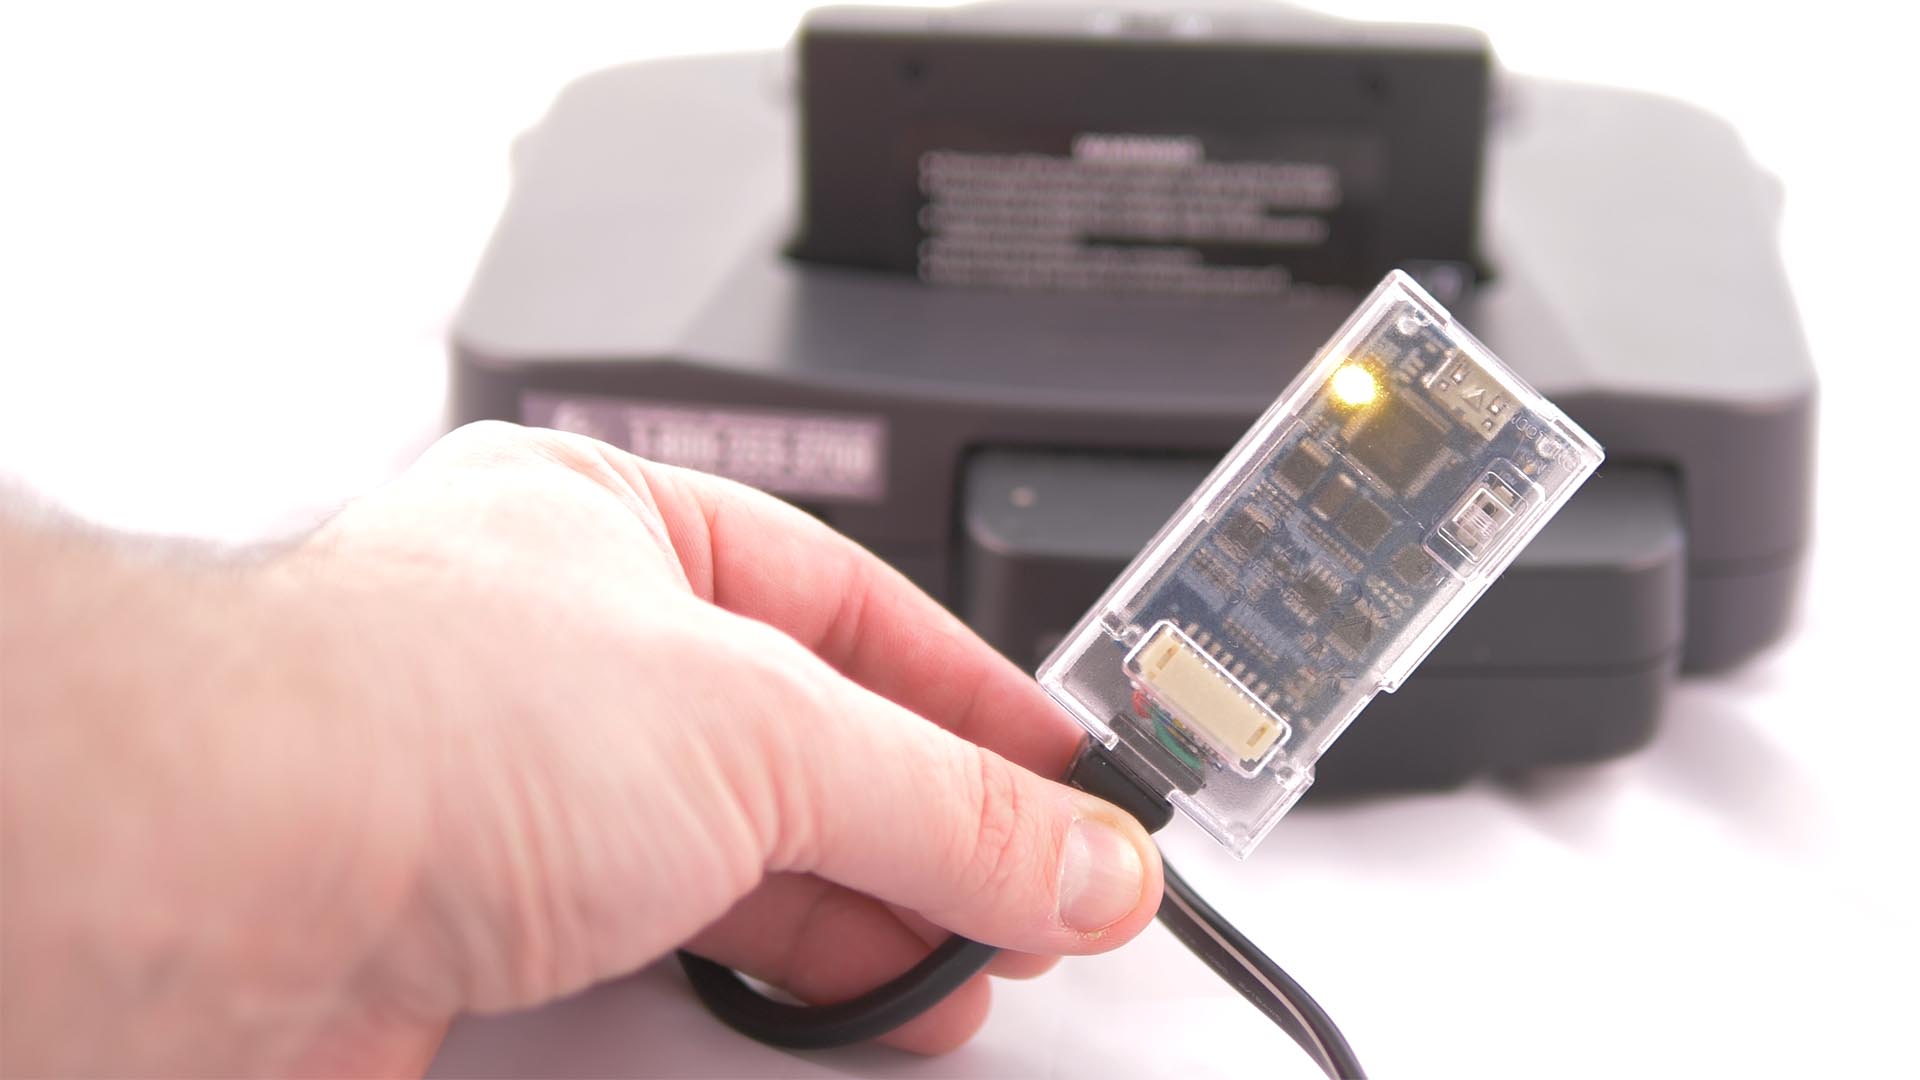
The RetroTINK Mini requires a cable and power – so, it’s not as streamlined a solution – BUT, it has the advantage of working with any console that outputs composite or S-Video. And you can just power it from most TV’s USB ports, so it won’t even take up a wall plug.
![]()
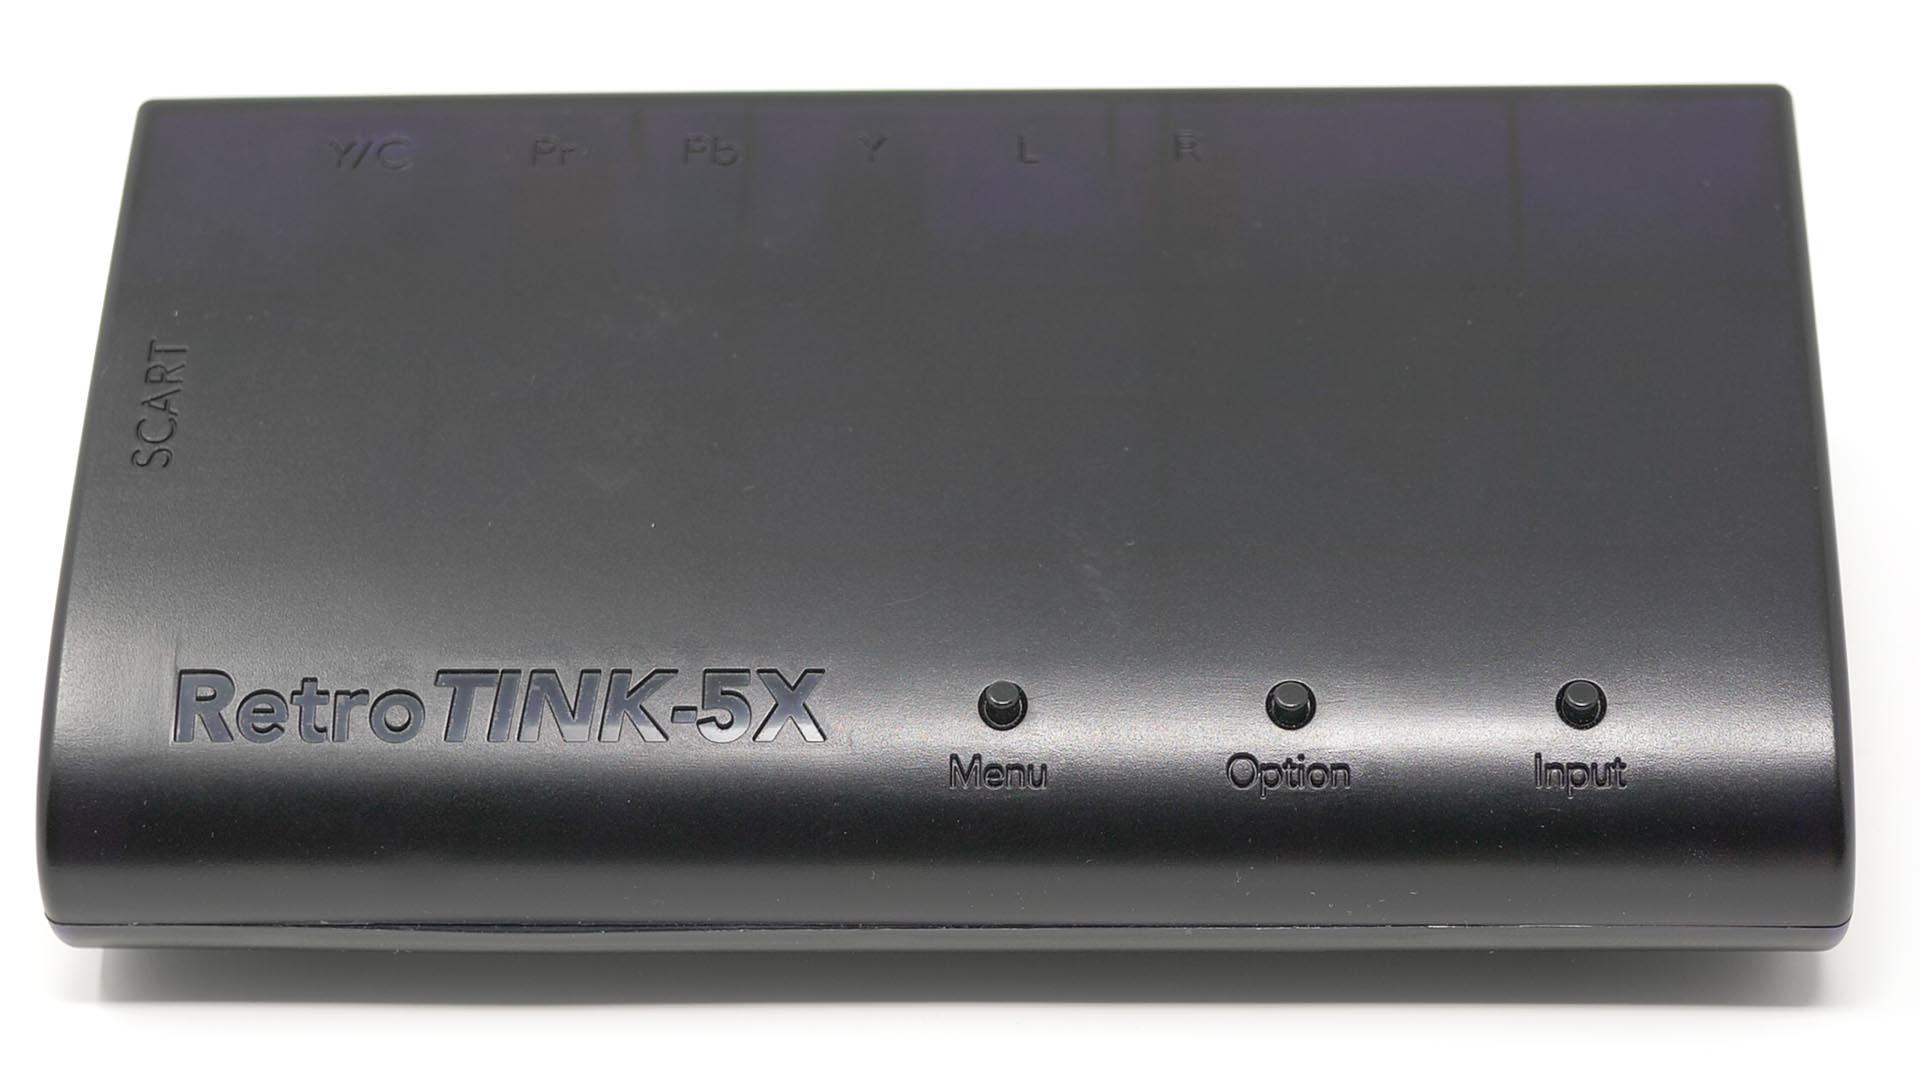
If you don’t mind spending some extra money, the RetroTINK 5x can output much higher resolutions and offers a ton of features. Now, to be clear, you don’t need to spend more money on a fancy scaler for a good N64 experience, but if your TV does a bad job scaling 480p, upgrading to the RetroTINK 5x will make a big difference. It even supports higher quality signals like RGB and offers a ton of video options. While there’s new options coming next year, the RetroTINK 5x is currently the best plug and play scaler on the market today and should be a safe investment.
N64’s Supported Video Signals
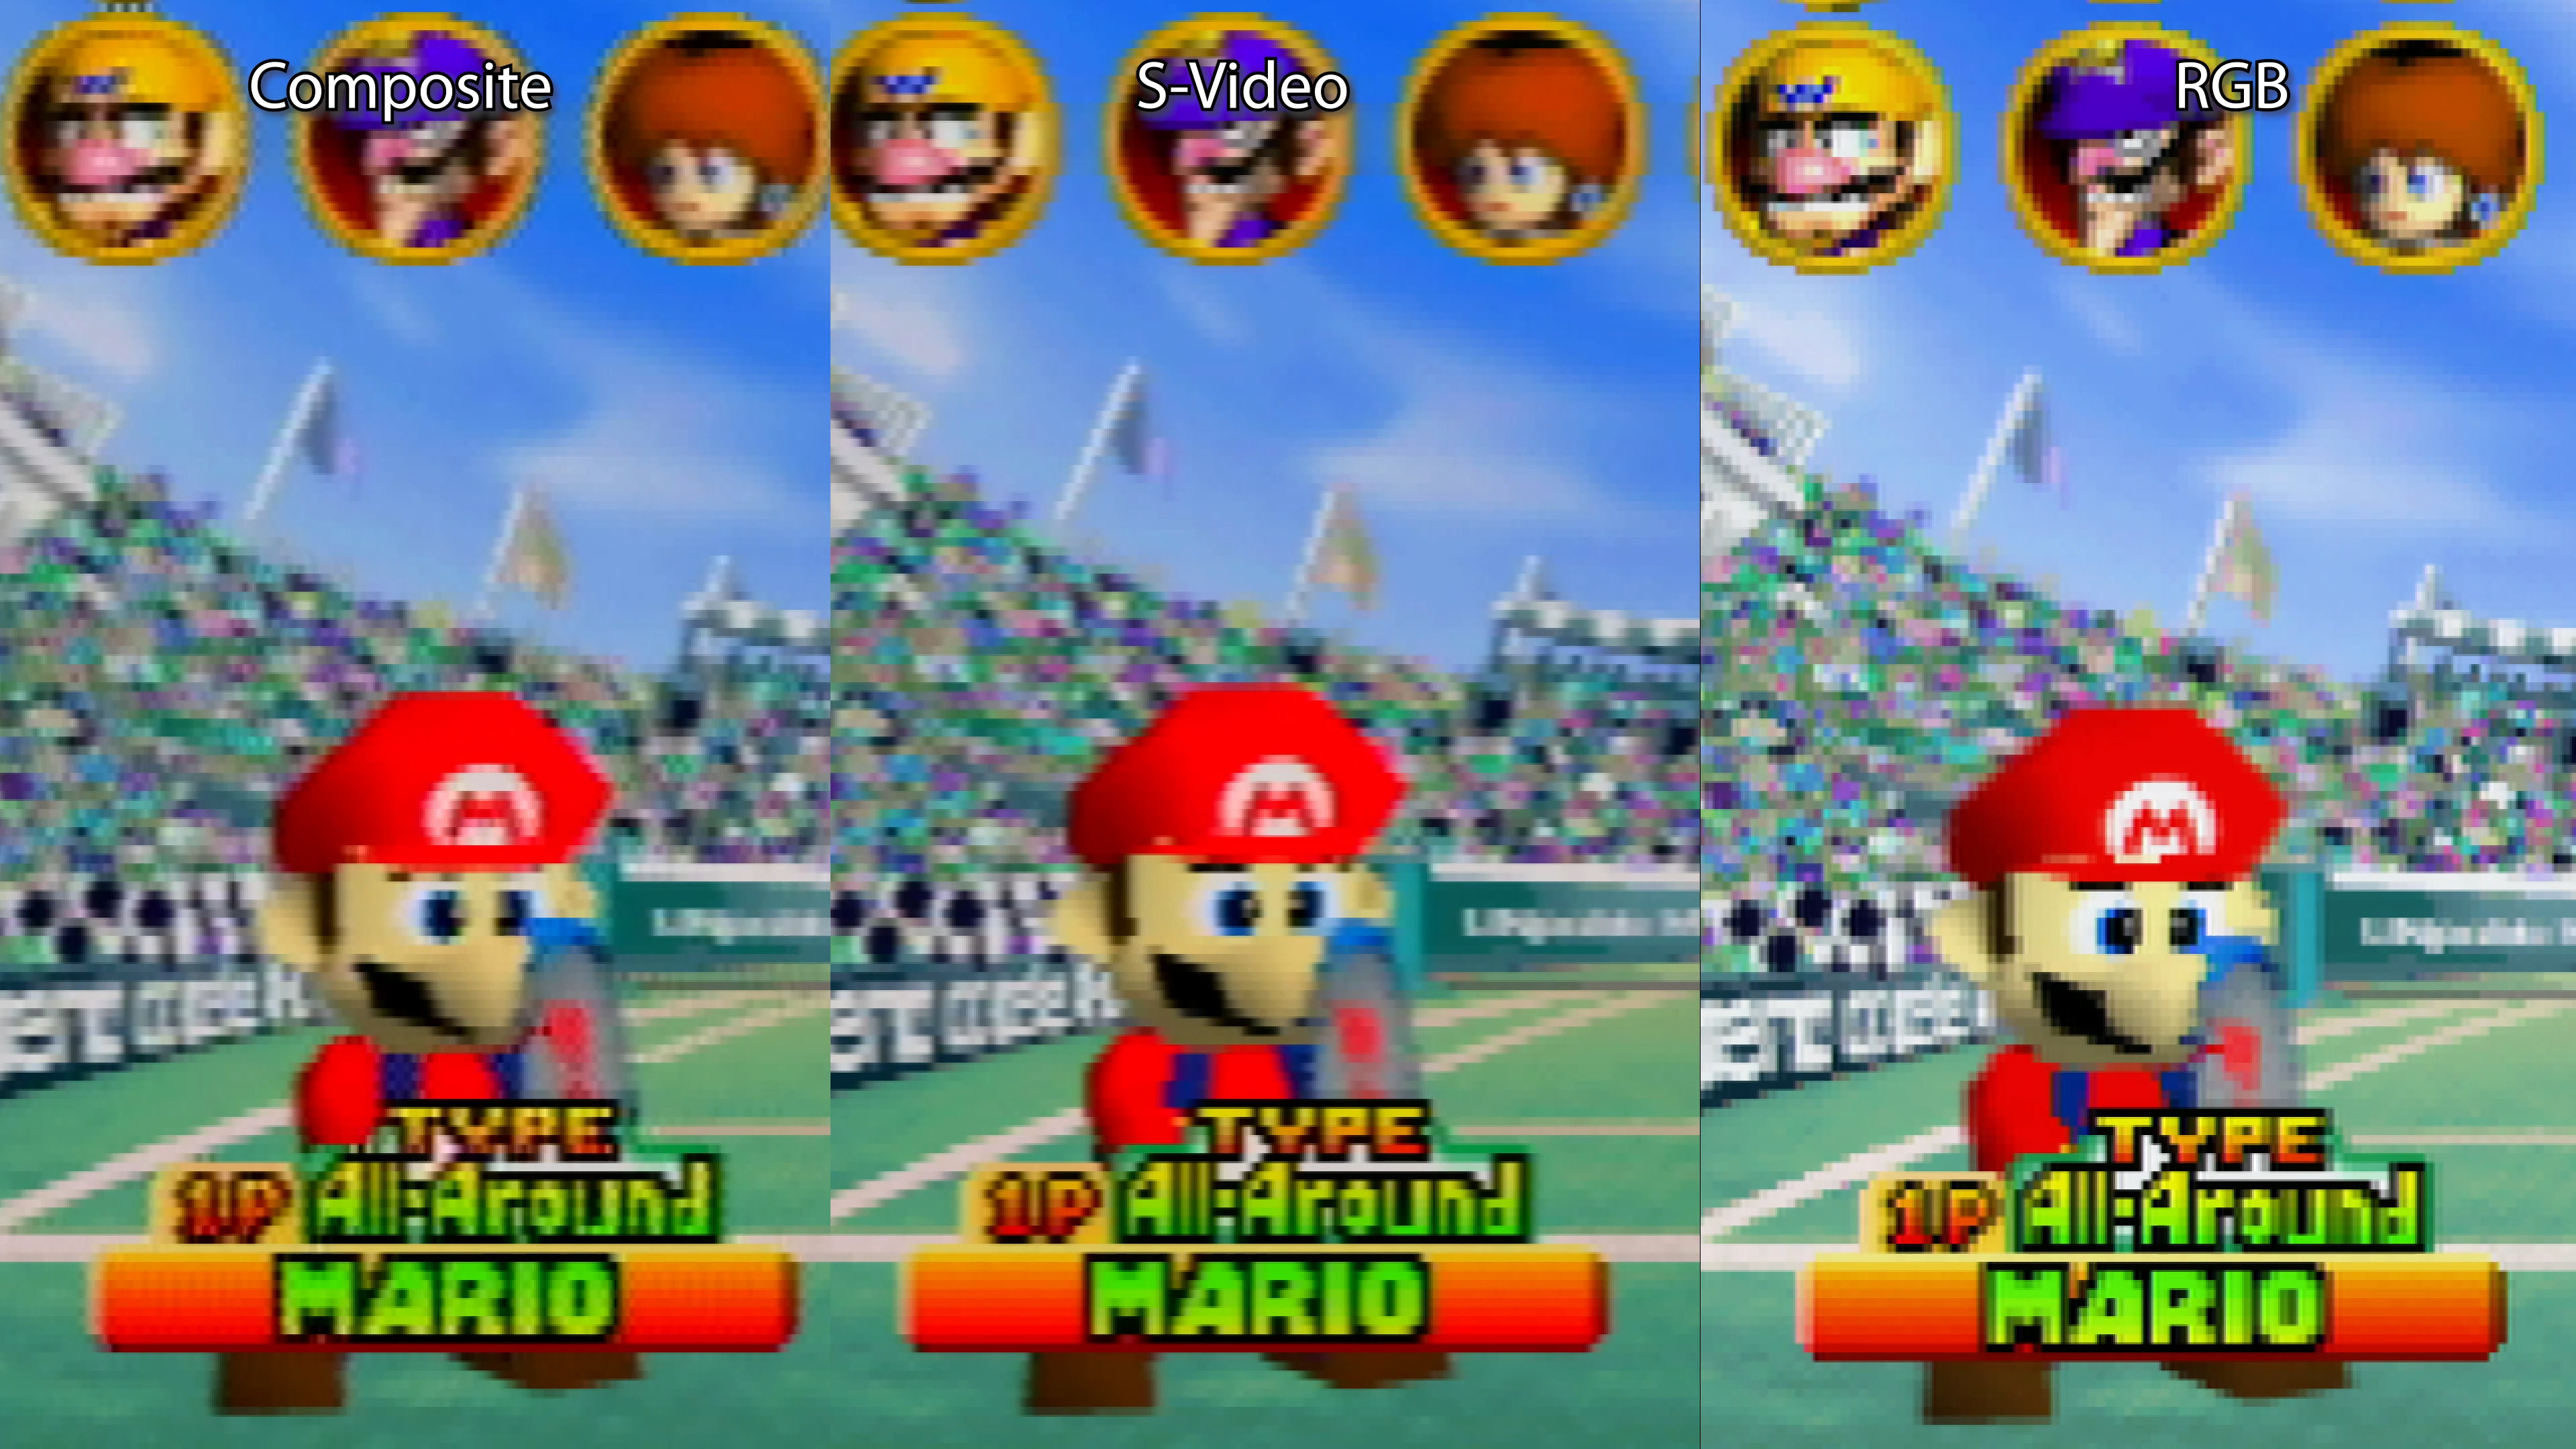
Before we go any further, we have to talk about video signals, for just a moment. See, the Nintendo 64 only outputs composite video on every console and while all NTSC consoles can output S-Video, some PAL consoles are composite only. There’s nothing wrong with using composite video, but if S-Video is available on your console and TV or scaler, buying a quality S-Video cable will get you more sharpness and the colors will be more defined. Buying a cheap, unshielded cable will probably be worse than composite, so please check the links on RetroRGB to make sure you get a good one.
All NTSC N64’s output S-Video without a modification, all that’s needed is a good cable:
Retro Gaming Cables NTSC S-Video Cable
Retro-Access NTSC Coax S-Video Cable
Insurrection Industries NTSC S-Video Cable
Some PAL N64’s only require a cable, however others may require a mod to enable S-Video.
Consoles4You PAL S-Video Cable
If you’re a sharpness enthusiast, you can go one step further and install an internal modification that gets you RGB output. The difference from S-Video to RGB isn’t that big, but if you’re playing on a high end scaler, or something like a broadcast monitor, you might prefer the look. Some older N64’s only require a pretty easy mod and the boards are more affordable too; I prefer the ones from Voultar and Bori and while there’s others out there, some are terrible, so please be careful which you buy.
The picture below is a snapshot from the main video. While it’s a decent example of sharpness and color, it’s not that great of an overall-example: You really need to watch video of this, to see the interference composite video can cause (look around the circular icons) when viewing on flat-panel TV’s; It’s a much bigger deal than just sharpness. Click for full-sized:
As a side note, I’d definitely say the easy RGB mod is worth doing if you own an OSSC, as that scaler doesn’t accept composite or S-Video and doing the easy RGB mod is actually cheaper than a converter.
Now, if the motherboard in your N64 isn’t compatible with the basic RGB mod, there are other RGB mod available, but they’re really complicated to install – If you don’t have the experience, or the right tools, definitely do NOT try this yourself. It might still be worth the effort though, if every other console in your setup is RGB or component. Doing an RGB mod would simply keep all your cables the same, so you can route them all through one switch and get a small boost in quality.
Internal, Digital-to-Digital HDMI Mods
If getting the best quality from your N64 is your end goal and your target display or monitor has an HDMI input, I’d strongly suggest skipping the RGB mod altogether, and go directly to a digital to digital HDMI mod, because they’re about same level of difficulty anyway. Let’s check out two that are available now.
There’s now two internal HDMI kits available that are true digital mods; This isn’t someone gluing in a cheap, laggy HDMI scaler and filling it with glue like you see from many eBay modders, these are devices that tap the N64’d digital video and audio signals and convert them to HDMI. Please be warned that these are both complicated installs and beginners should not try this themselves. Unless you have the experience and proper tools, definitely send your kit and console to a professional modder.
The first of the two HDMI kits is called the UltraHDMI and was released a few years ago. It’s a great option that offers excellent quality output, but they’re almost impossible to get. If you already own one, rest assured it’s a great device…but if you’re looking to upgrade today, there’a a new HDMI kit that’s definitely a step up.
The latest Nintendo 64 HDMI kit to be released is called the N64 Digital and it offers a bunch of cool features. I recently did a livestream with the team that made it and we went over all the little details, but I still want to show the basics of it here.
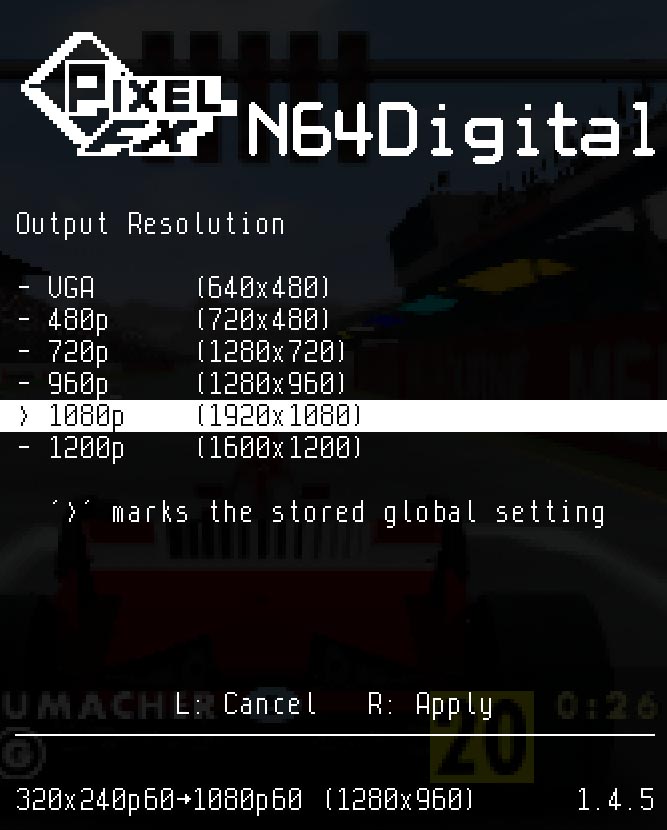
The first time you connect an N64 Digital to your TV, enter the menu by hitting L Trigger + R Trigger + DPad Right + C Right. Now you’ll want to get into the video settings and set your resolution to match your display. If you’re using a 4K TV, or any display higher than 1200p, try 1200p mode and give it a moment. If it works, cool. If not, just back down to 1080p and you’ll be fine.
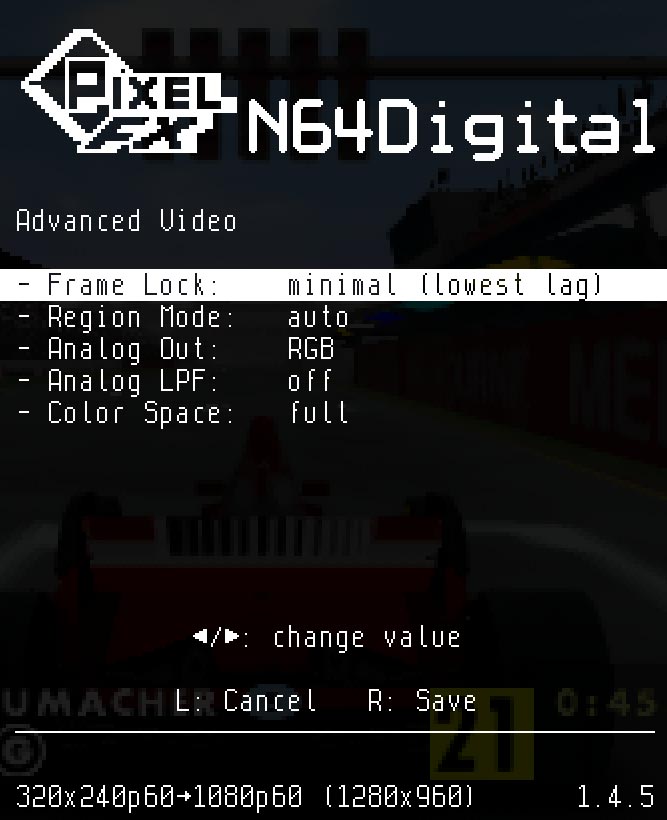
Depending on your TV or monitor, you may want to enter the Advanced Video menu and try different Frame Lock modes. I was able to use the lowest lag setting on a very sensitive TV and I never once dropped signal. I’d start with lowest lag mode and if you don’t have any problems, just leave it and never think about it again. There’s even some analog video output options too, as the N64d adds RGB and Component video as well, directly though the multi-out! Also, depending on your setup, you might need to set the colorspace manually: Using “auto” worked perfectly on all displays I used, but needed to be set manually for capture cards:
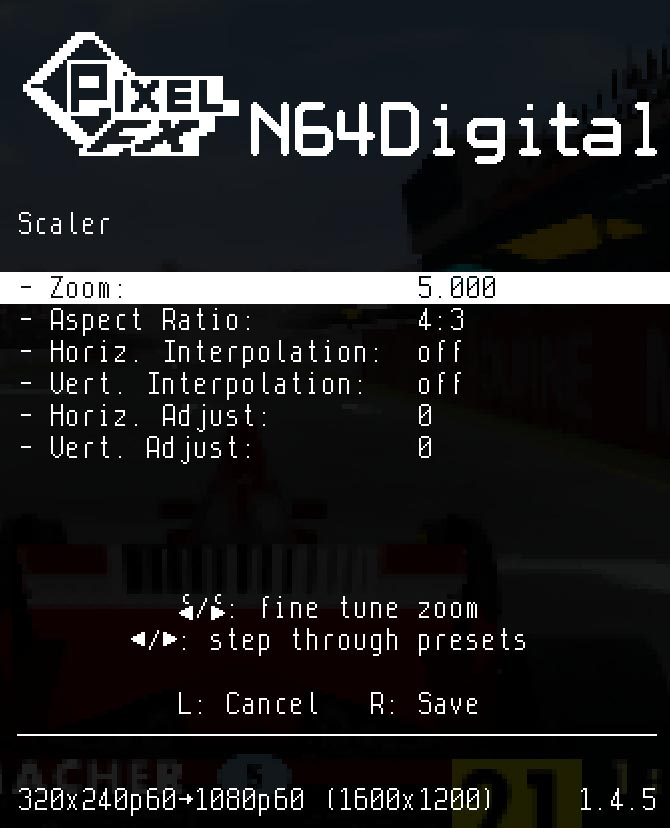
Now, those settings only need to be set once and you can pretty much forget about them afterwards, but one setting you’ll probably use all the time is the N64d’s custom zoom feature. Luckily, because of how the N64 Digital scales the video, there’s no real concern about “integer scaling”, just set it to fill the screen. Every game is different though, so you’ll want to tweak this with each one to get the most out of your display:
You can even safely zoom a bit farther if you’d like, as N64 game developers would take CRT overscan into account and didn’t put any important information near the edges of the screen. I have a whole other video dedicated to this and always use my scalers in 5x mode for this reason. Check that out if you’re interested:
One cool bonus is Everdrive 64 users on the latest firmware will have these settings saved per-game, so you’ll be able to set it once and the N64 Digital will remember each time you load that game again! People using original cartridges or other ROM carts still have to do it manually, but it’s honestly a really quick and easy process that’s worth getting used to.
Smoothing Filters
One cool option that the N64 digital offers – as well as the RetroTINK and RAD2x products is a smoothing filter. Now, you might be wondering why I’m talking about smoothing out an image, when most retro gamers spend a lot of effort making the image sharper. Well, to demonstrate, let’s connect the N64 Digital to both a CRT and flat panel at the same time (and you’ll definitely want to click on these for full-sized views and zoom in):
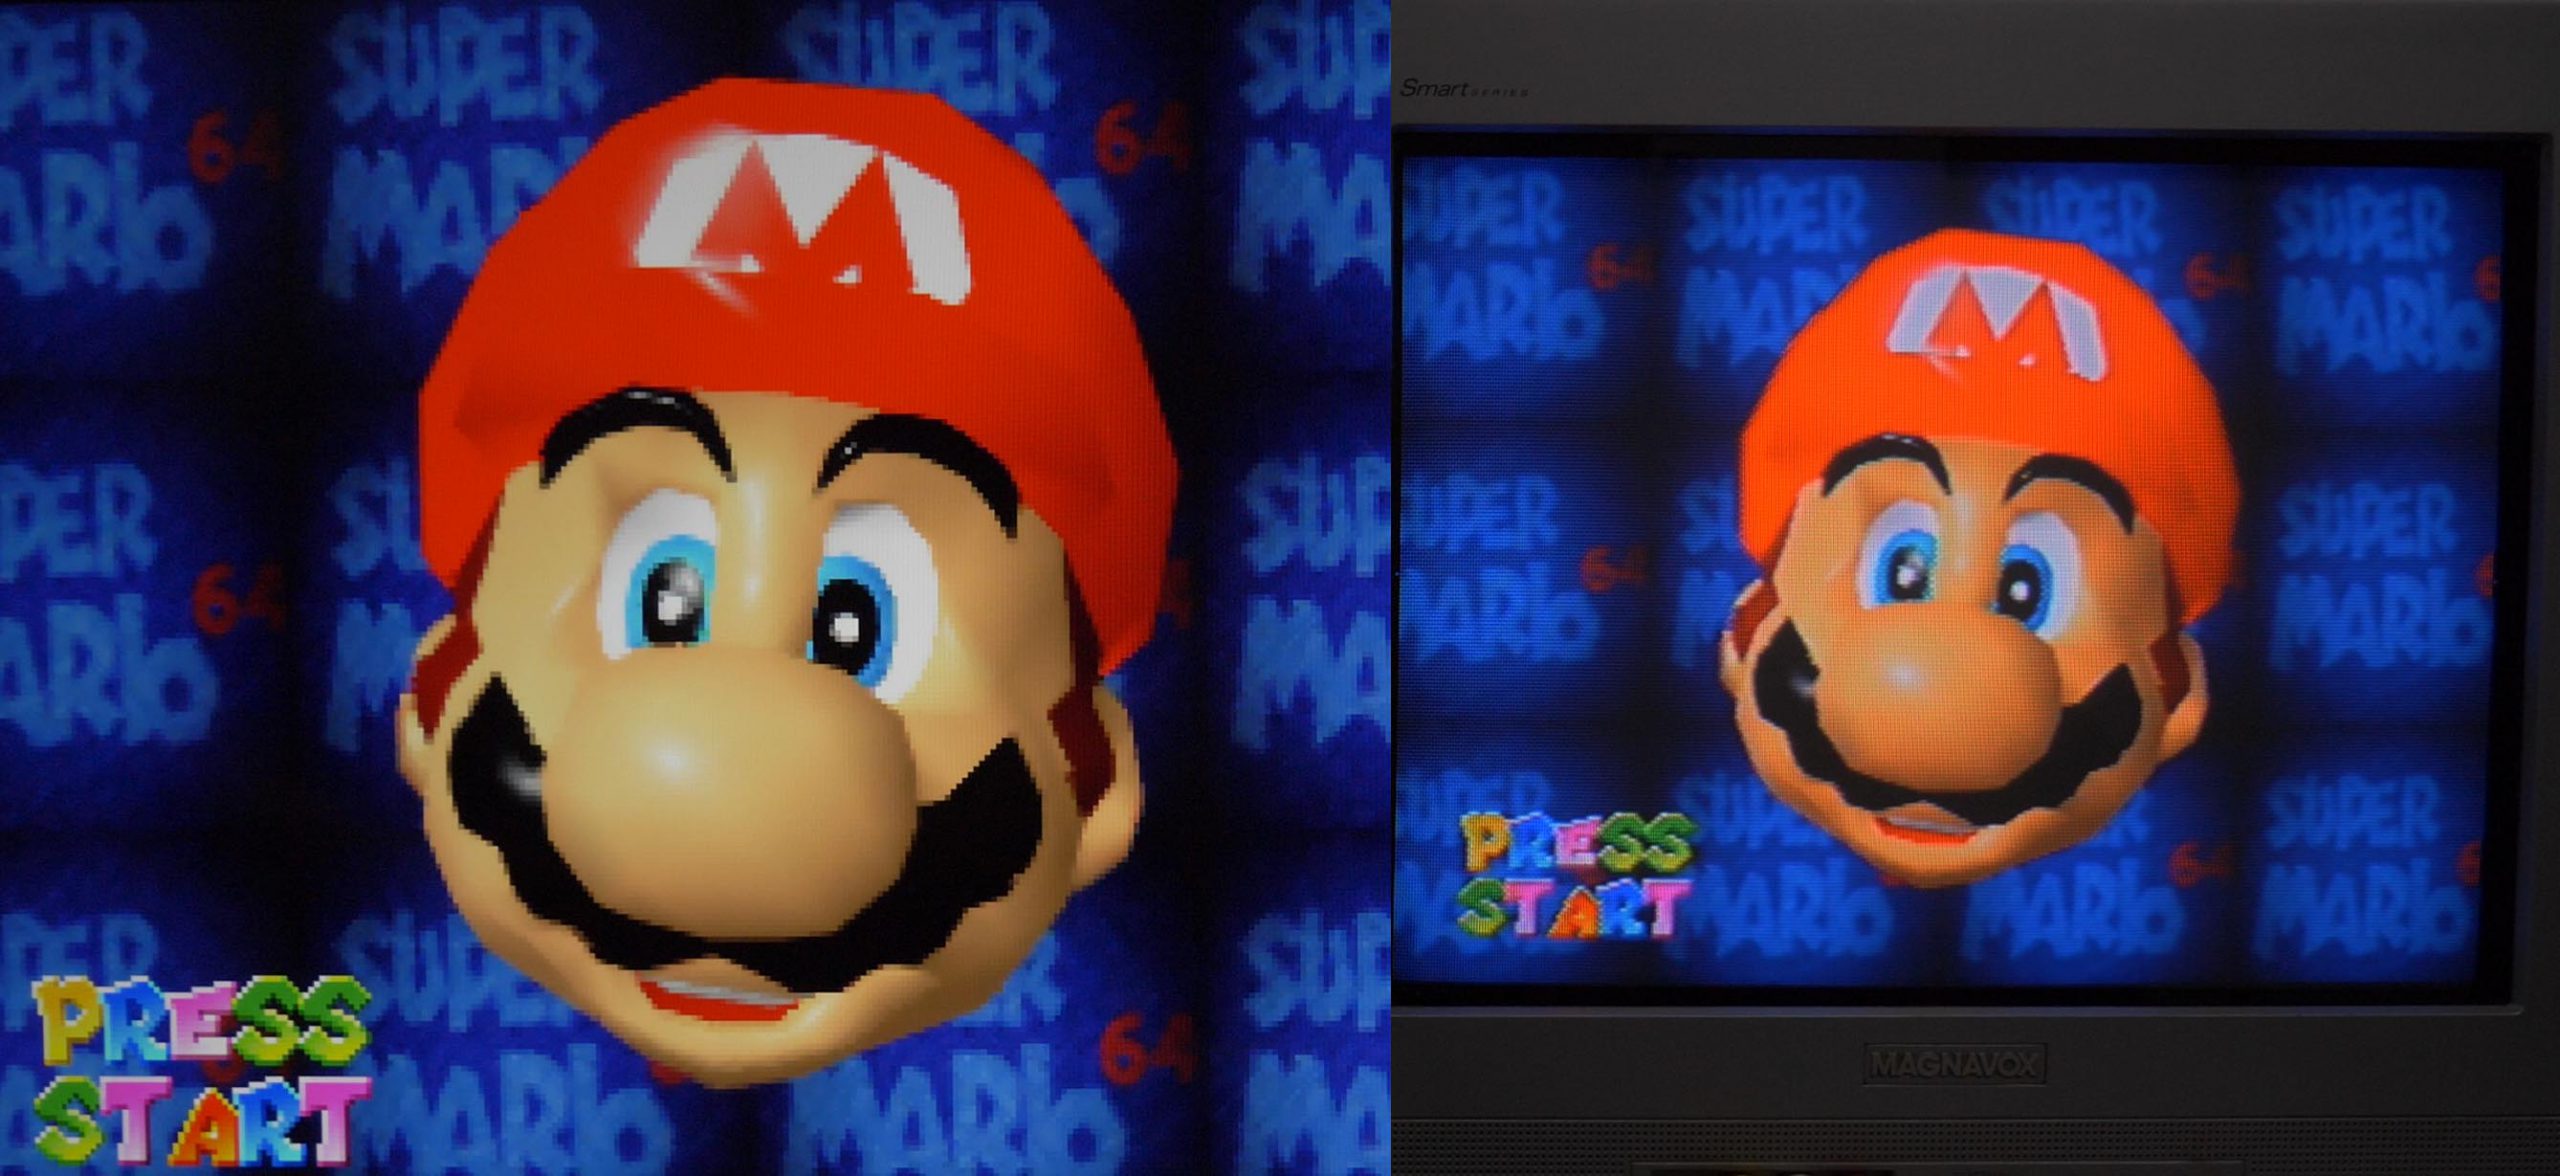
With smoothing off, the digital screen looks awesome…but those low resolution graphics really stand out. Now check out what happens when I turn on the N64 Digital’s smoothing:
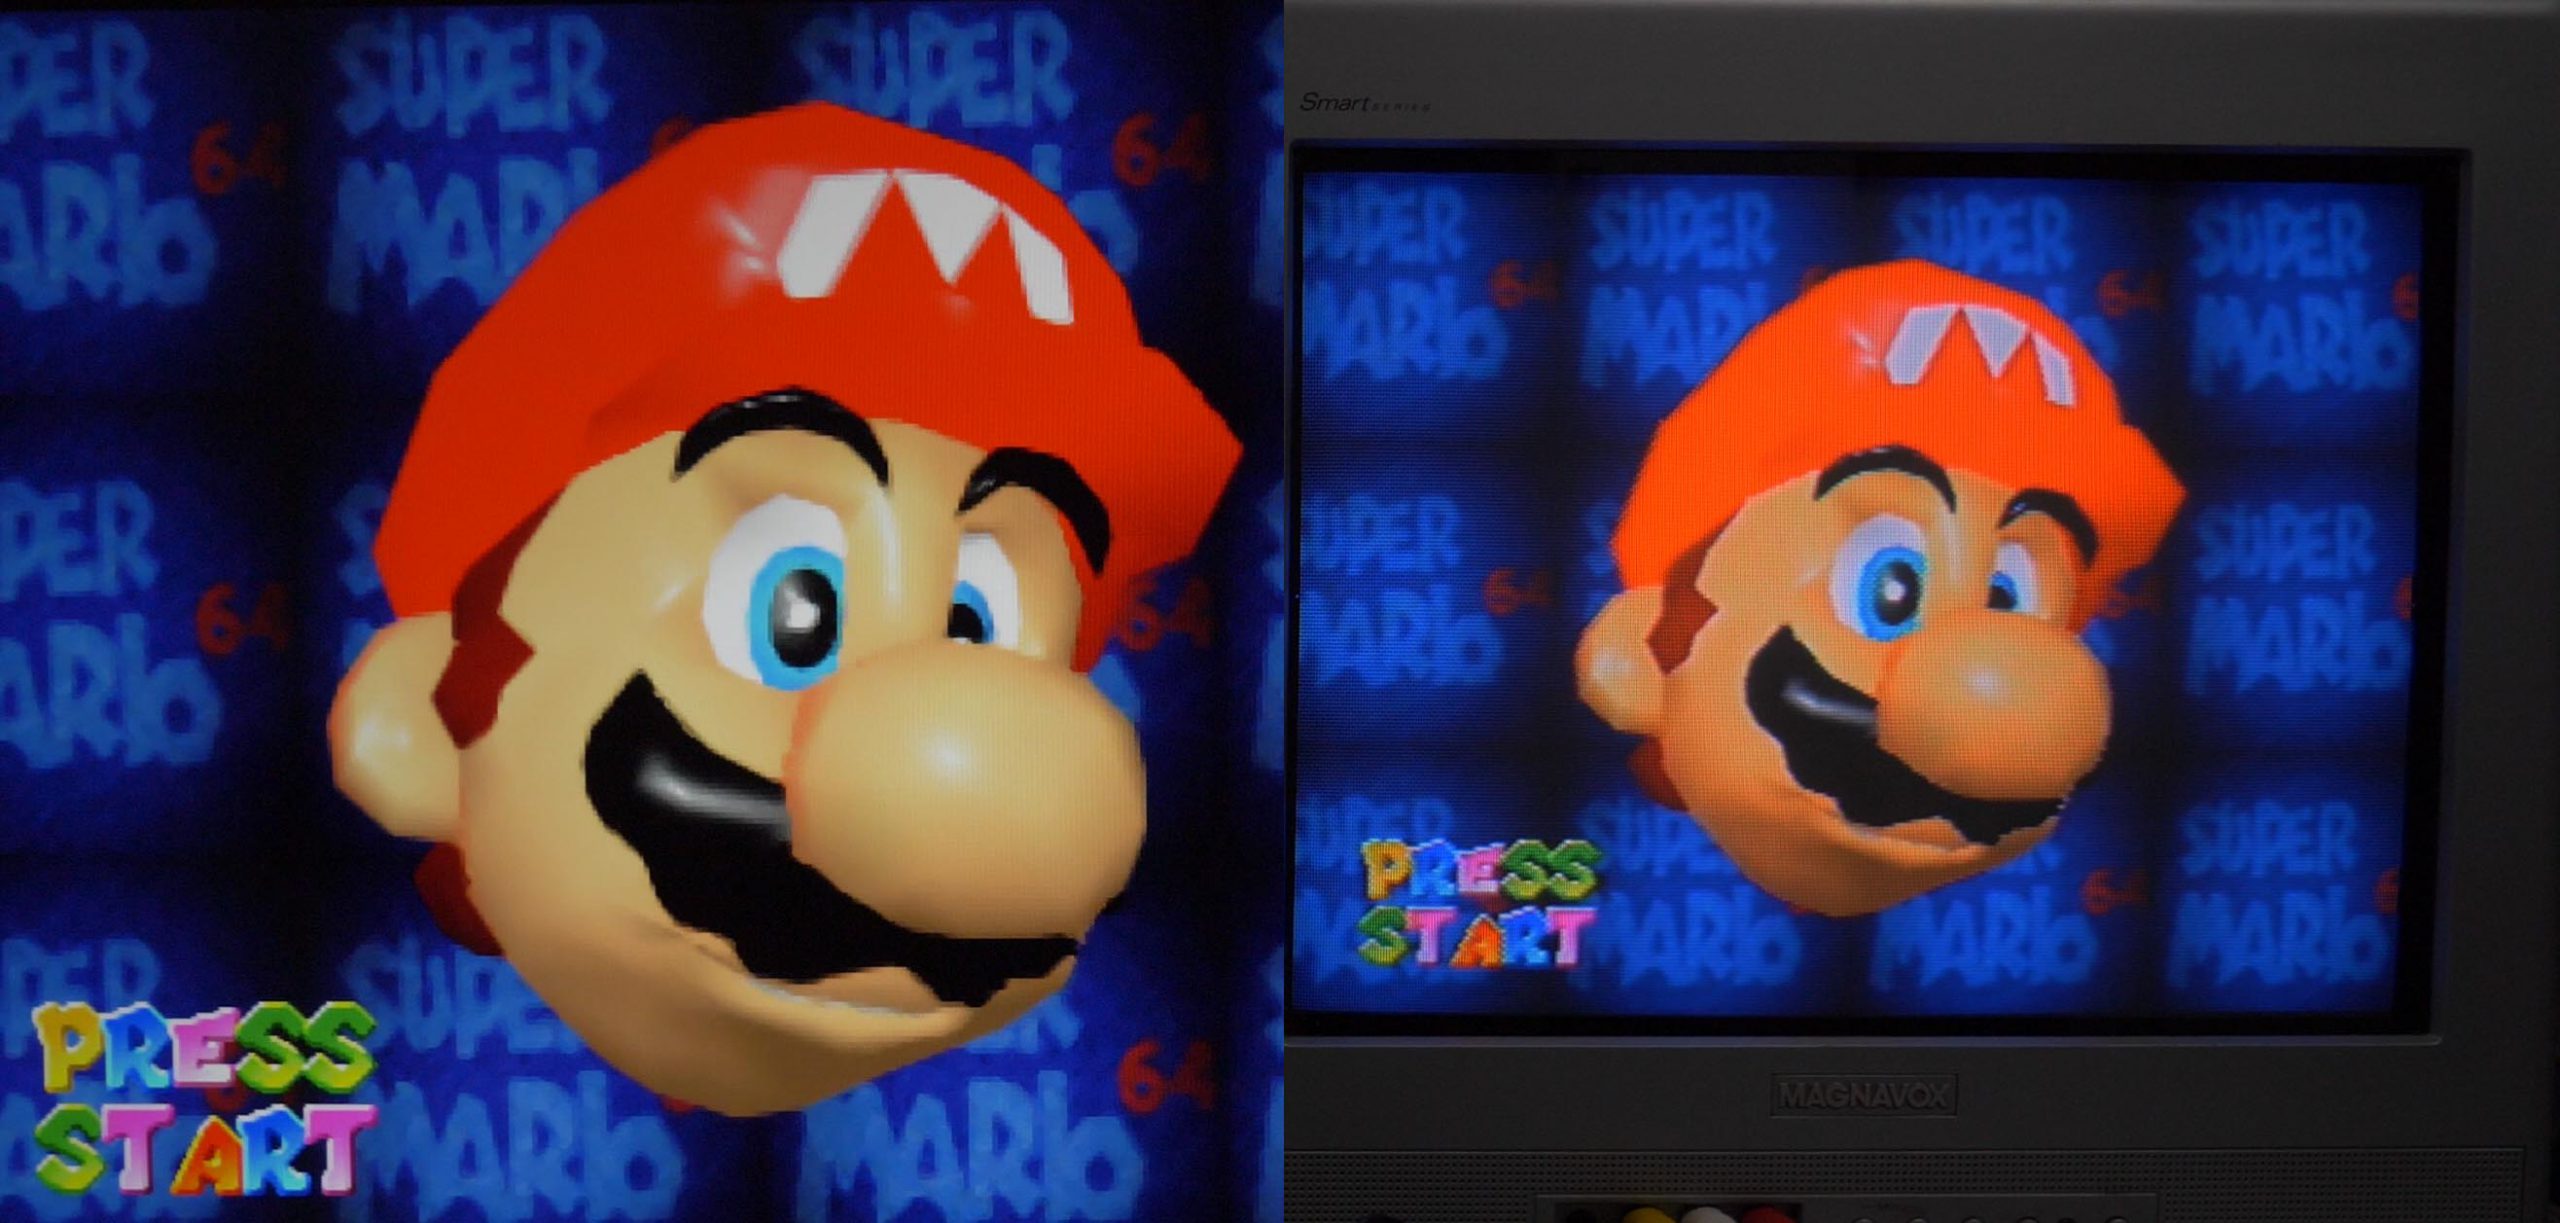
While it doesn’t magically render the video in HD, I think the smoothing filter really provides a look that’s closer to a CRT – the original intended look – all while retaining the advantages of a flat-panel.
The RetroTINK’s filters are good as well. One thing to note about the TINK 2x line of products – which include the RAD2x – is the final look will totally depend on how your TV scales 480p. Some TV’s just do a better job scaling lower resolutions, but others won’t look as good as you see here in the bottom left. Price doesn’t seem to be a factor either – I have a $250 TV that scales 480p beautifully, but I’ve seen very expensive monitors do a much worse job. I really think if you’re on a budget, it’s worth taking the risk though, as all the TINK 2x’s are great, zero-lag devices.

mClassic / mCable Anti-aliasing
I guess I should start out by saying I do like the mCable…when used properly. What I don’t like is the deceptive marketing that implies this is a magical device that makes all games look better. And I REALLY don’t like how both Marseille and certain YouTubers portray it as a retro gaming device: It can be useful, but only if used properly in specific situations. Here’s one “good” example, using an Xbox:
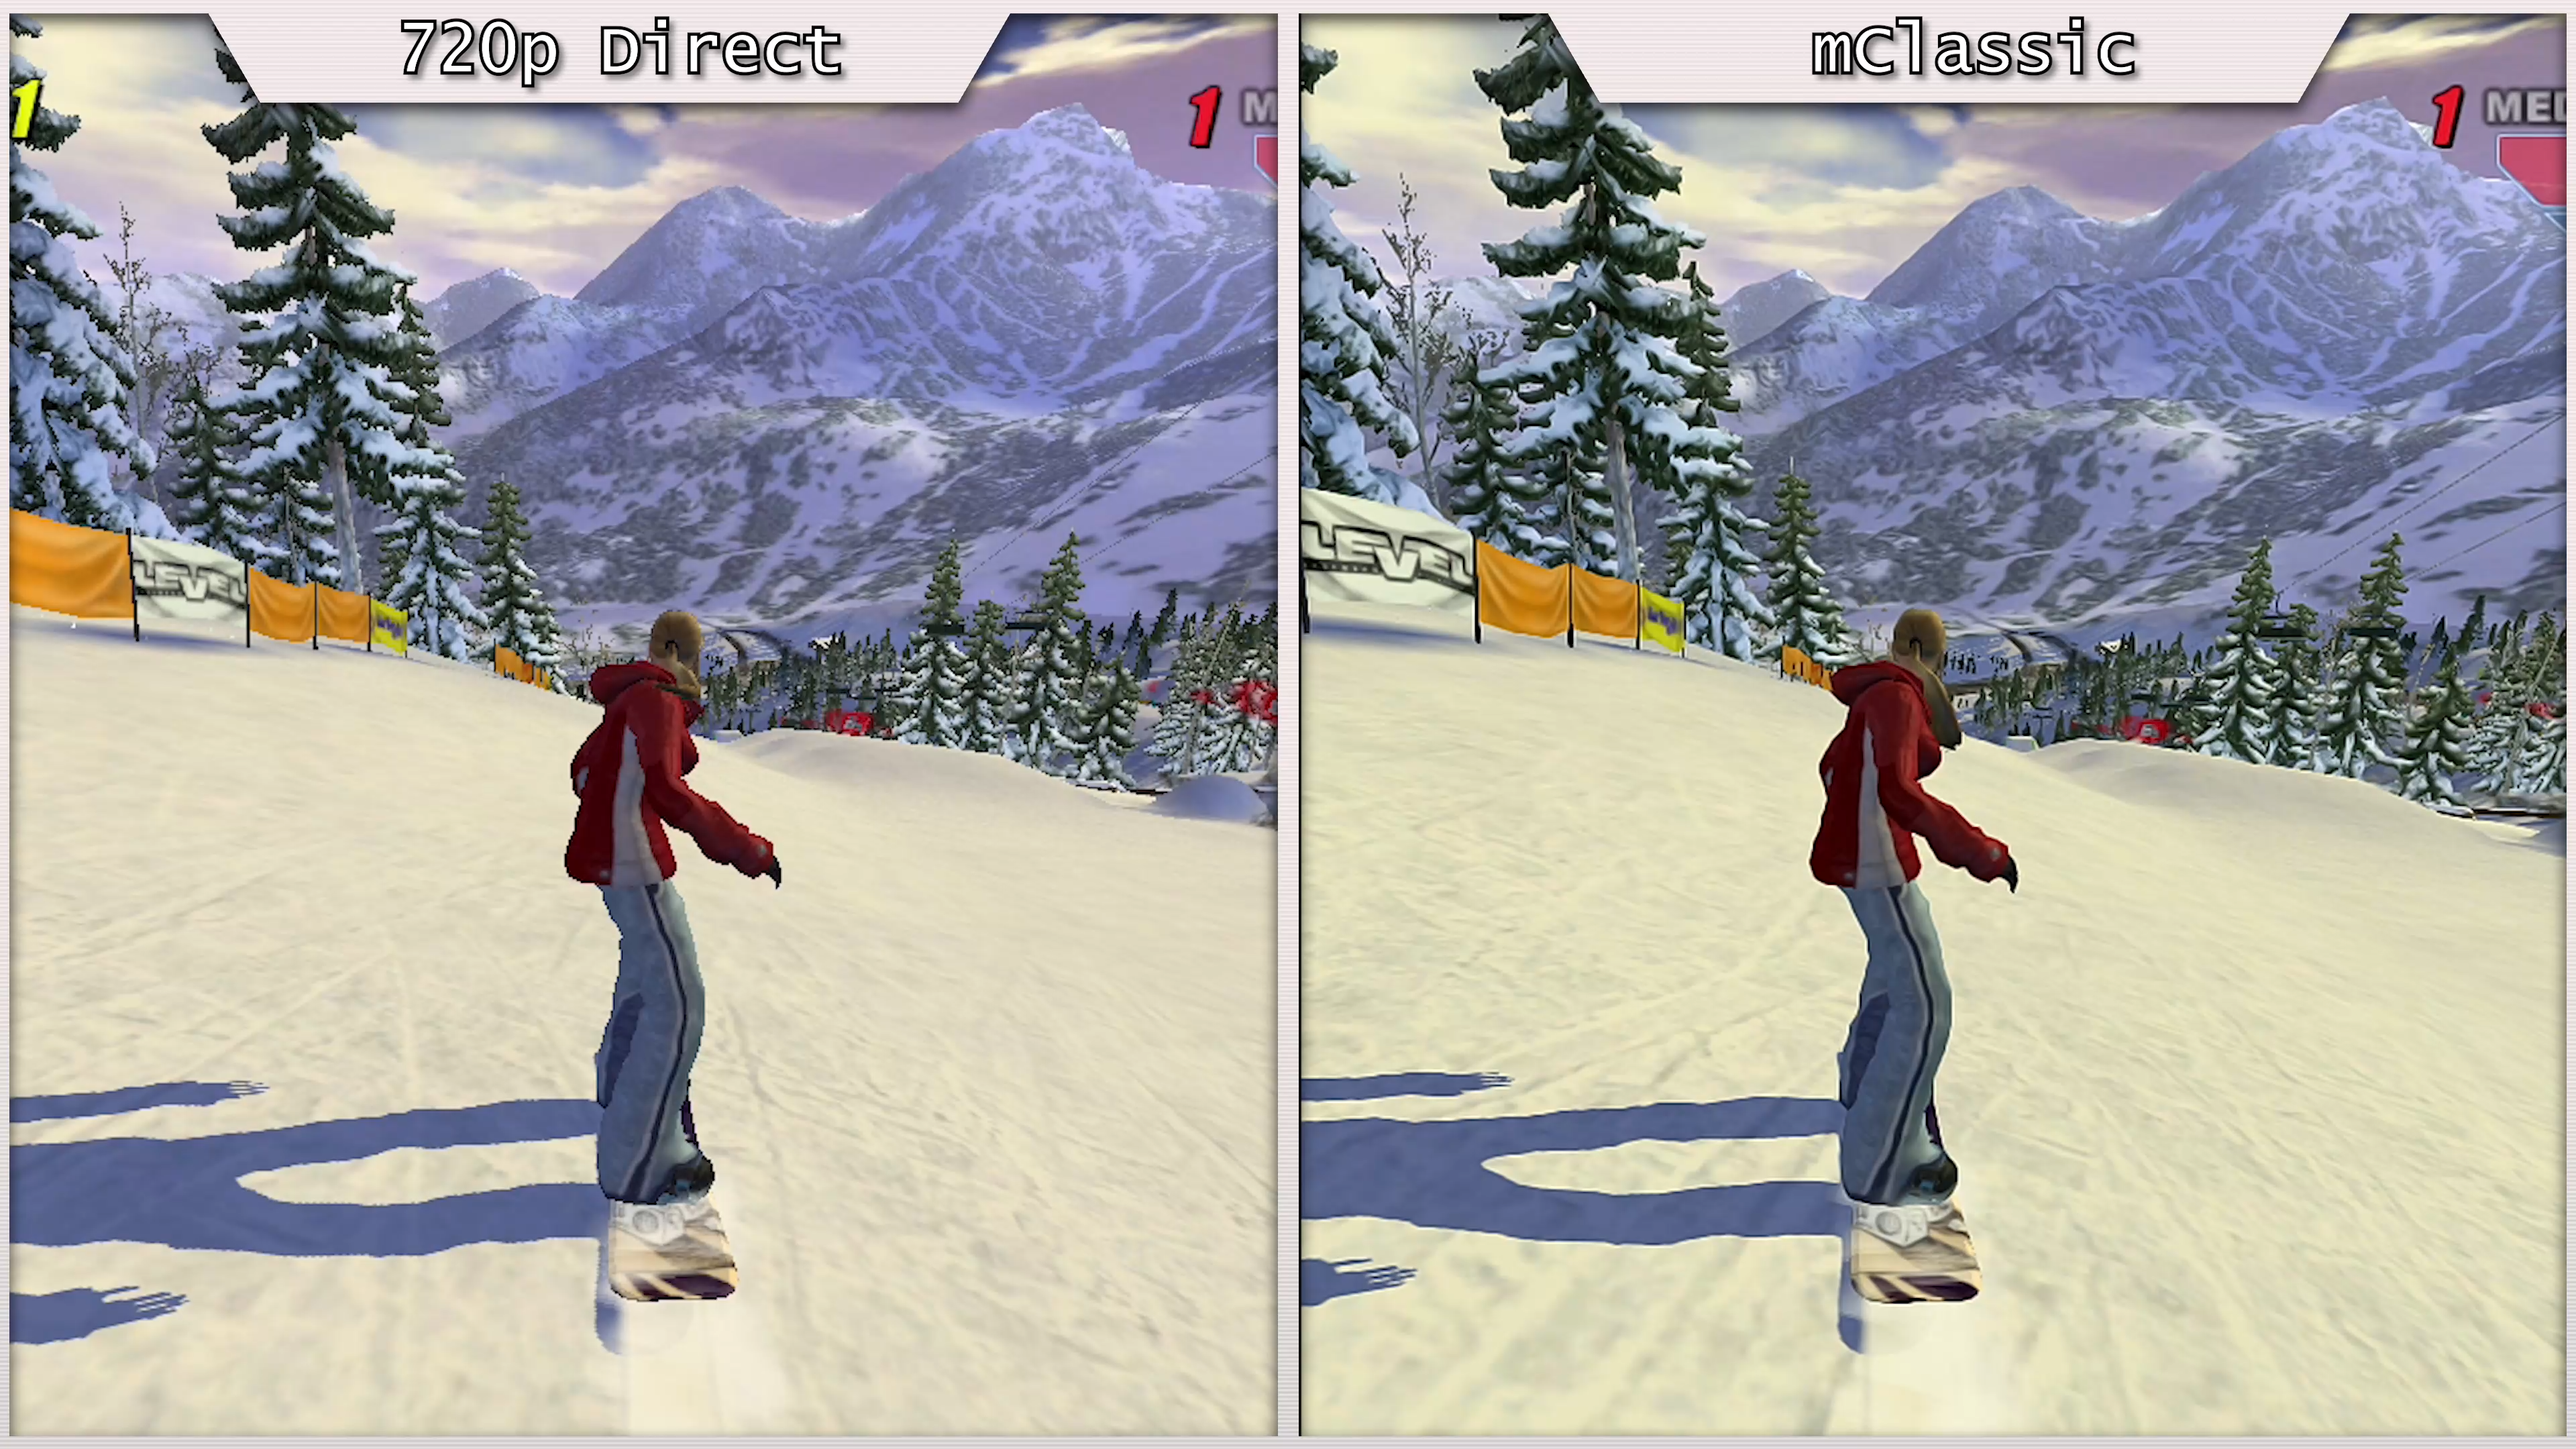
Alternatively, the low-resolution 3D graphics the N64 outputs does not pair well with the mCable, in any resolution:
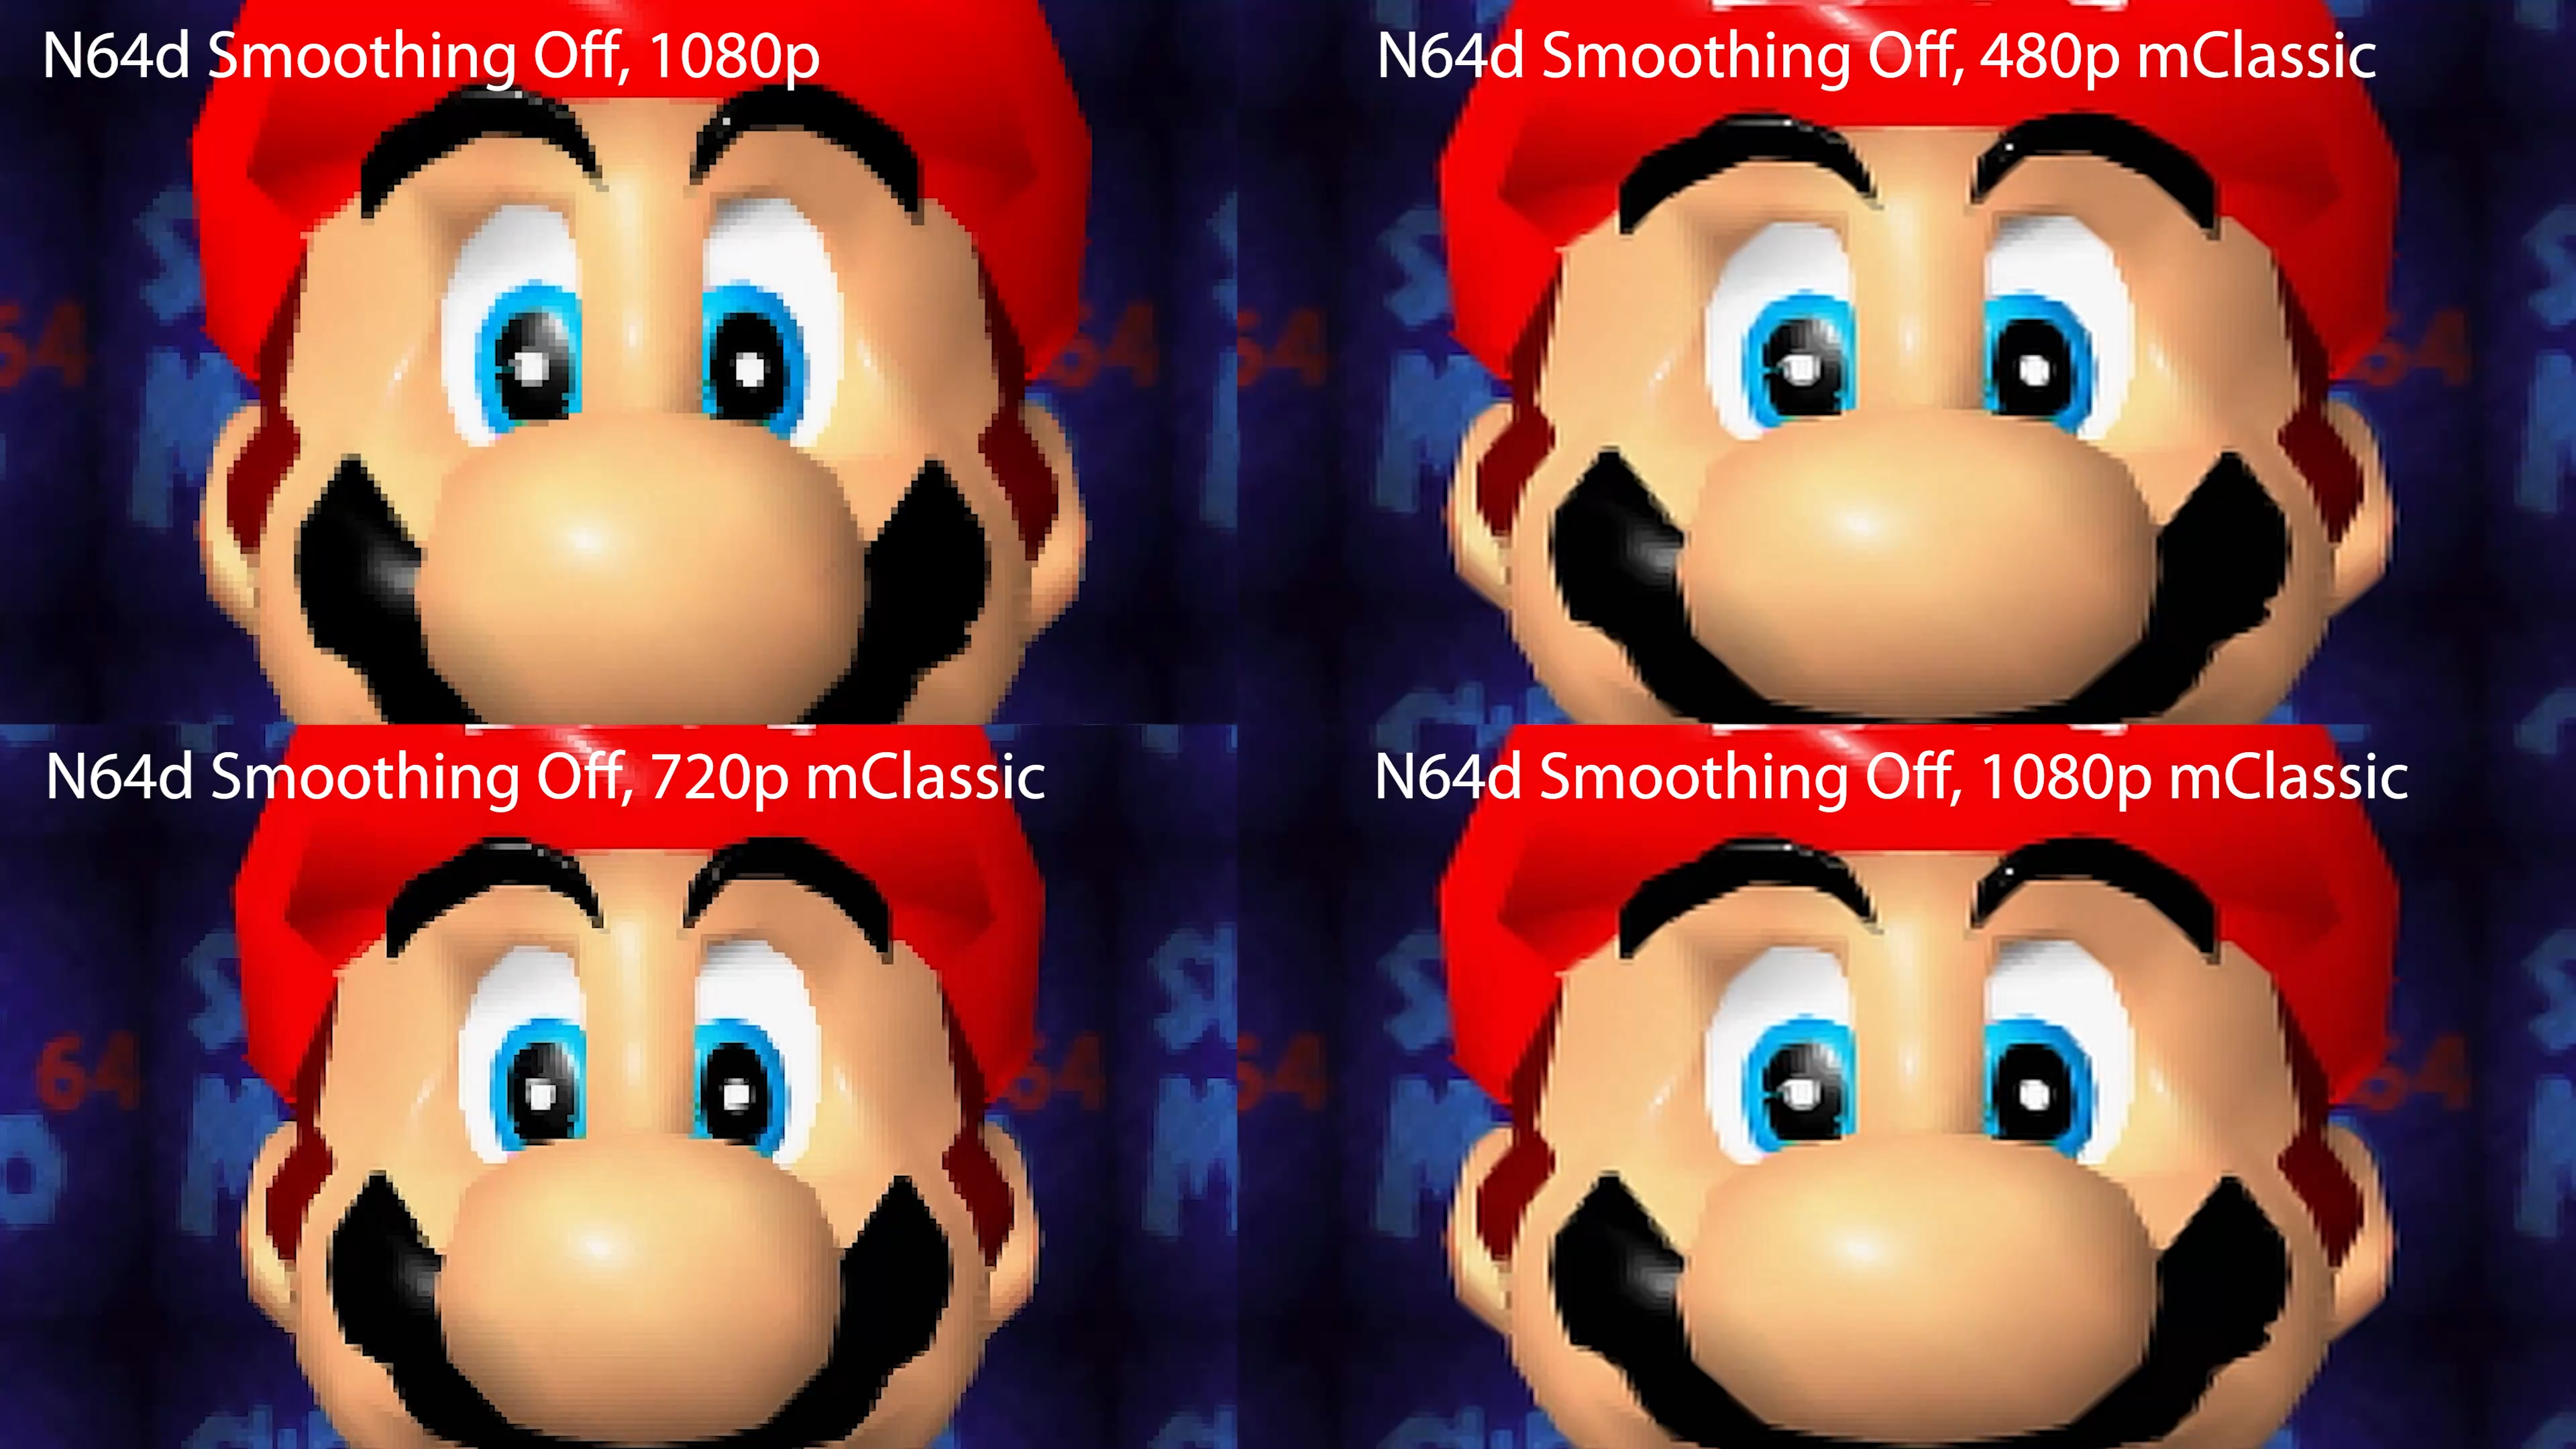
If you turn on the N64d’s smoothing filter and try to use the mCable, you do get an interesting effect:
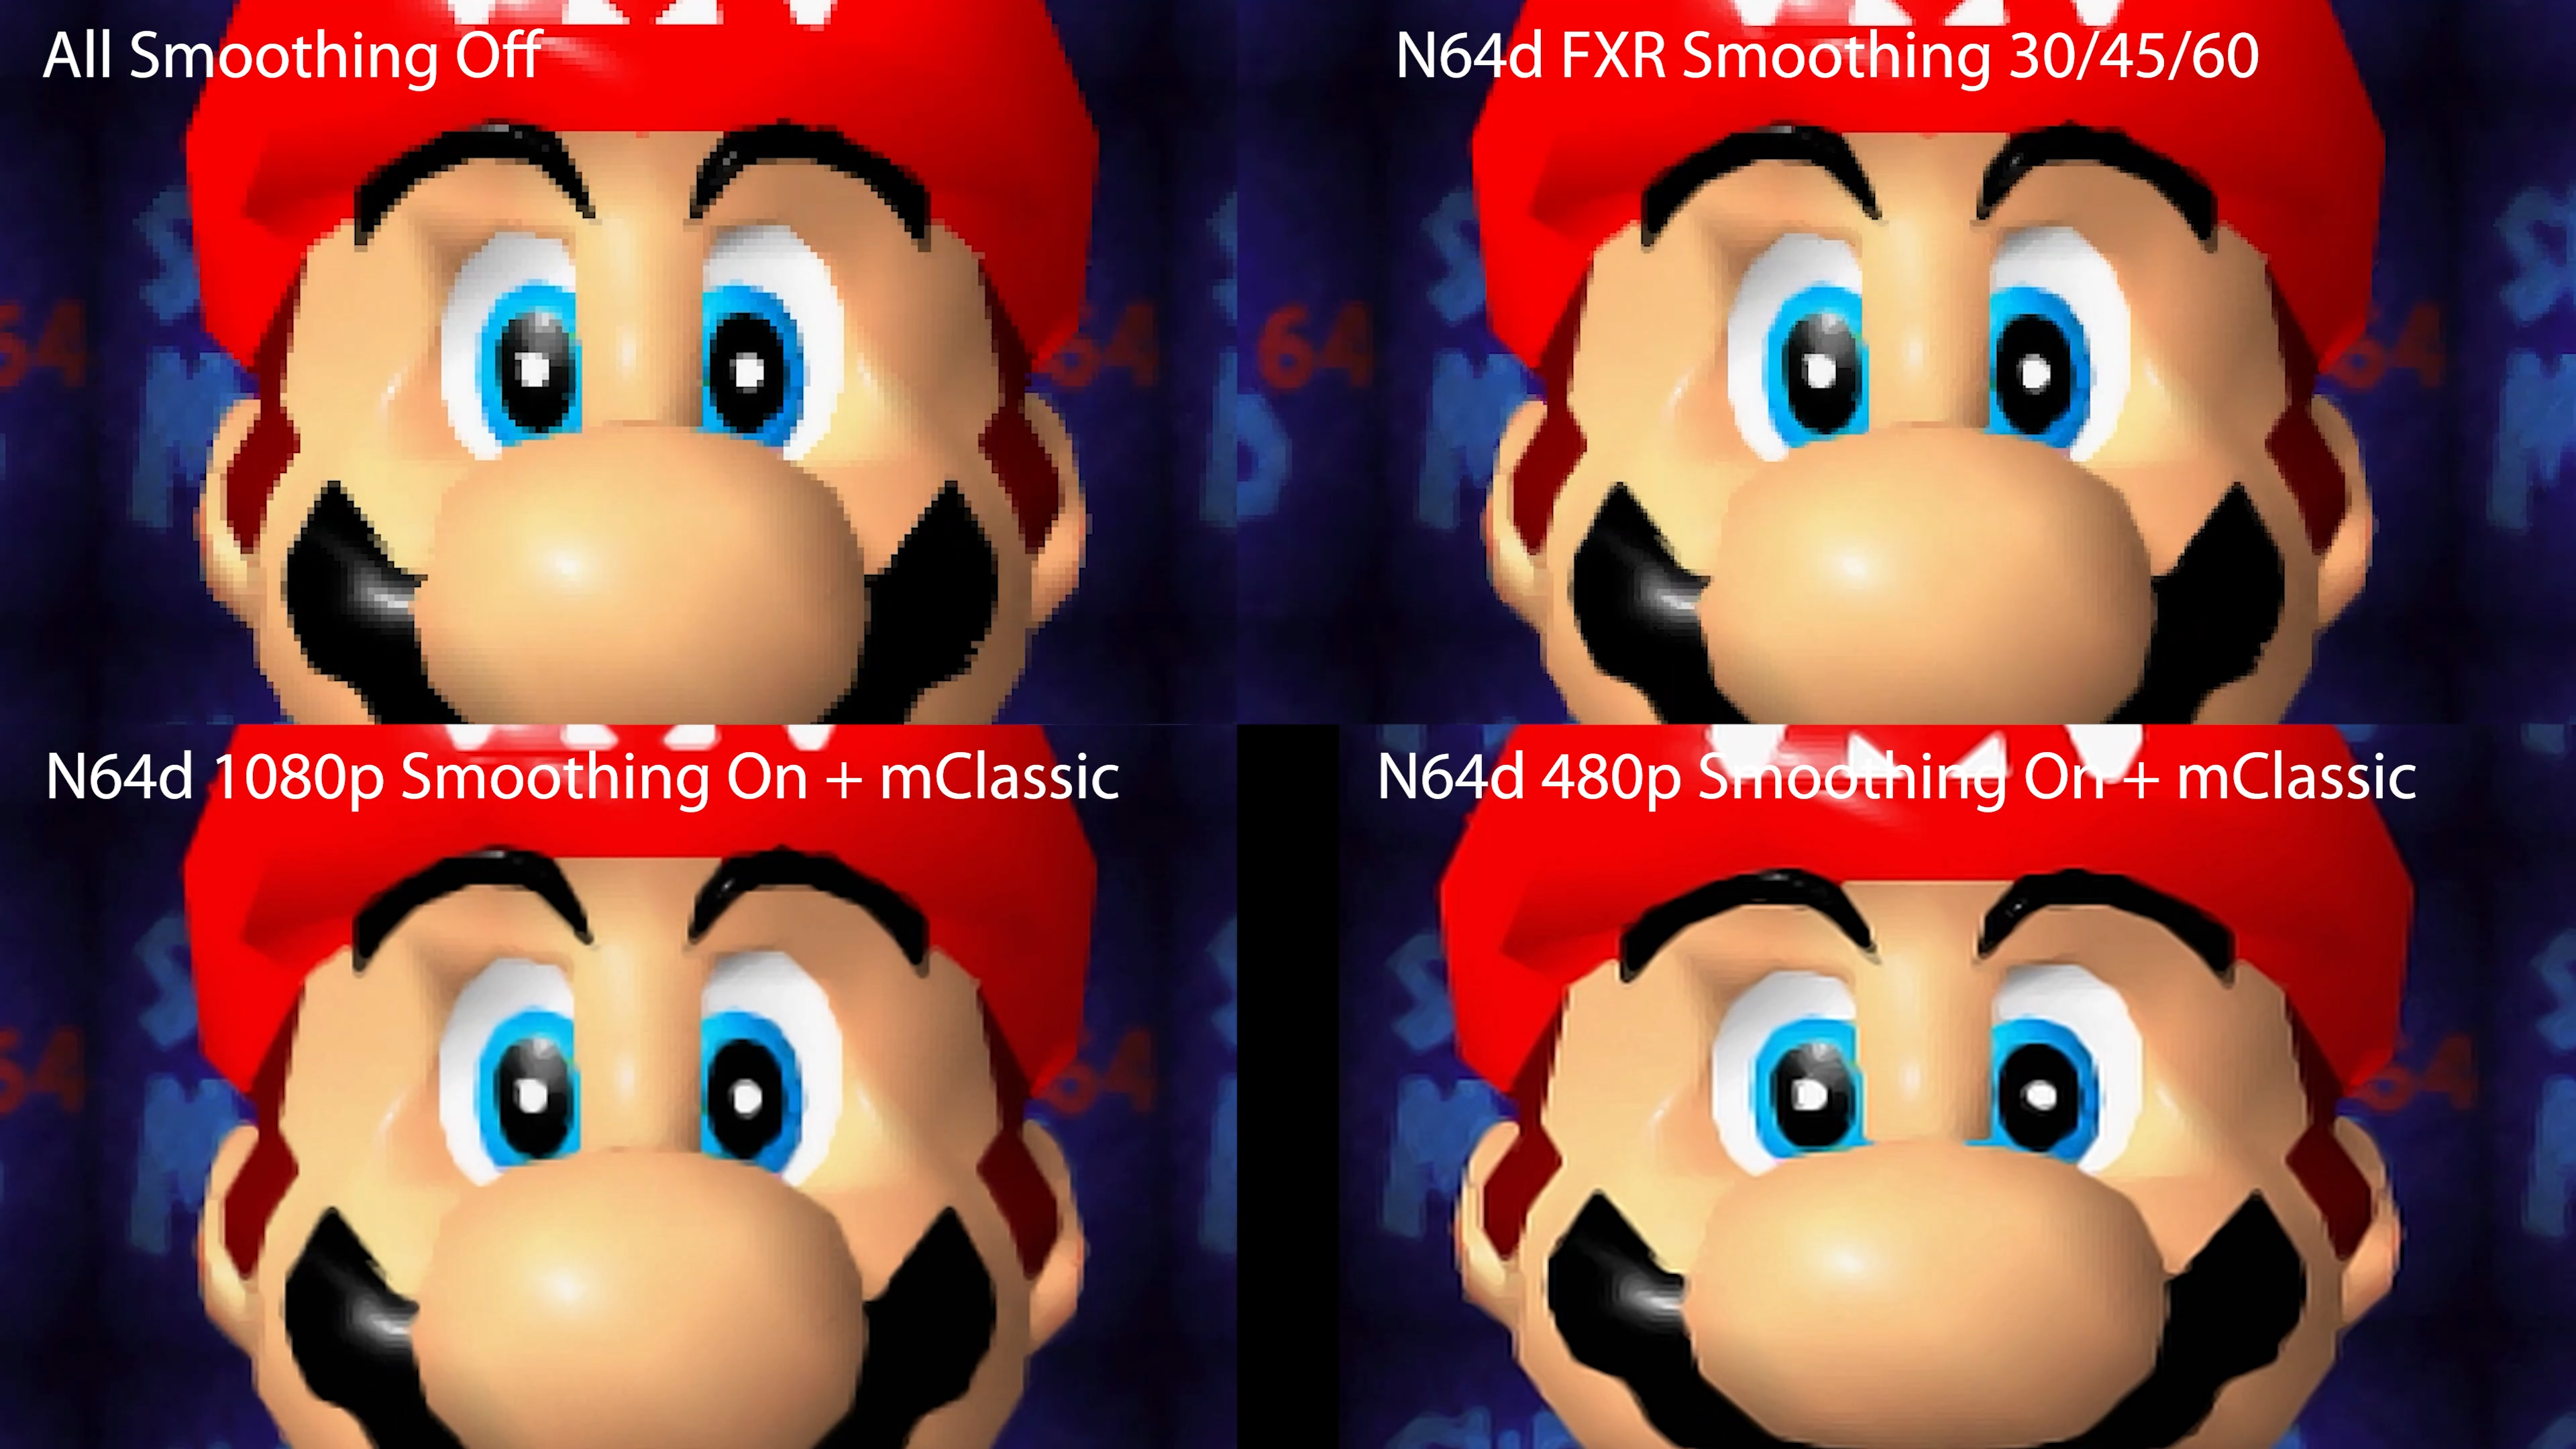
It’s my very strong recommendation that you should not buy the mCable just to use with the N64. If you already own one and enjoy it for other content, try setting the console or scaler’s output to different resolutions and see what looks best on your TV. At the very least, they don’t add any lag: https://www.retrorgb.com/lag-testing-the-mclassic.html
Scanline Emulation (not just horizontal lines anymore!)
Both the RetroTINK 5x and N64 Digital have one more feature I strongly recommend checking out: CRT scanline emulation. I need to be clear that these are NOT the basic horizontal black lines we’ve previously seen advertised as “scanlines”, these are a much more accurate representation of the different types of CRT screens you’d see.
Now, scalines never look good in pictures or videos due to compression, so please don’t judge them based on what you see here. You’ll really need to see for yourself and I think you’ll be pleasantly surprised…but I’ll still show one example here: First, check out F-Zero from the N64d without any extra features turned on. The game looks kinda messy next to a CRT, as you can really see how developers used the way a CRT works to blend the images:

Now we’ll turn on the smoothing filter – Better, but not perfect…especially the track:

BUT, if we also turn on a slot mask scanline filter, with boost on to compensate for brightness…it’s not bad. It’s not exactly like you’d find on a CRT, but in my opinion it really helps the look.
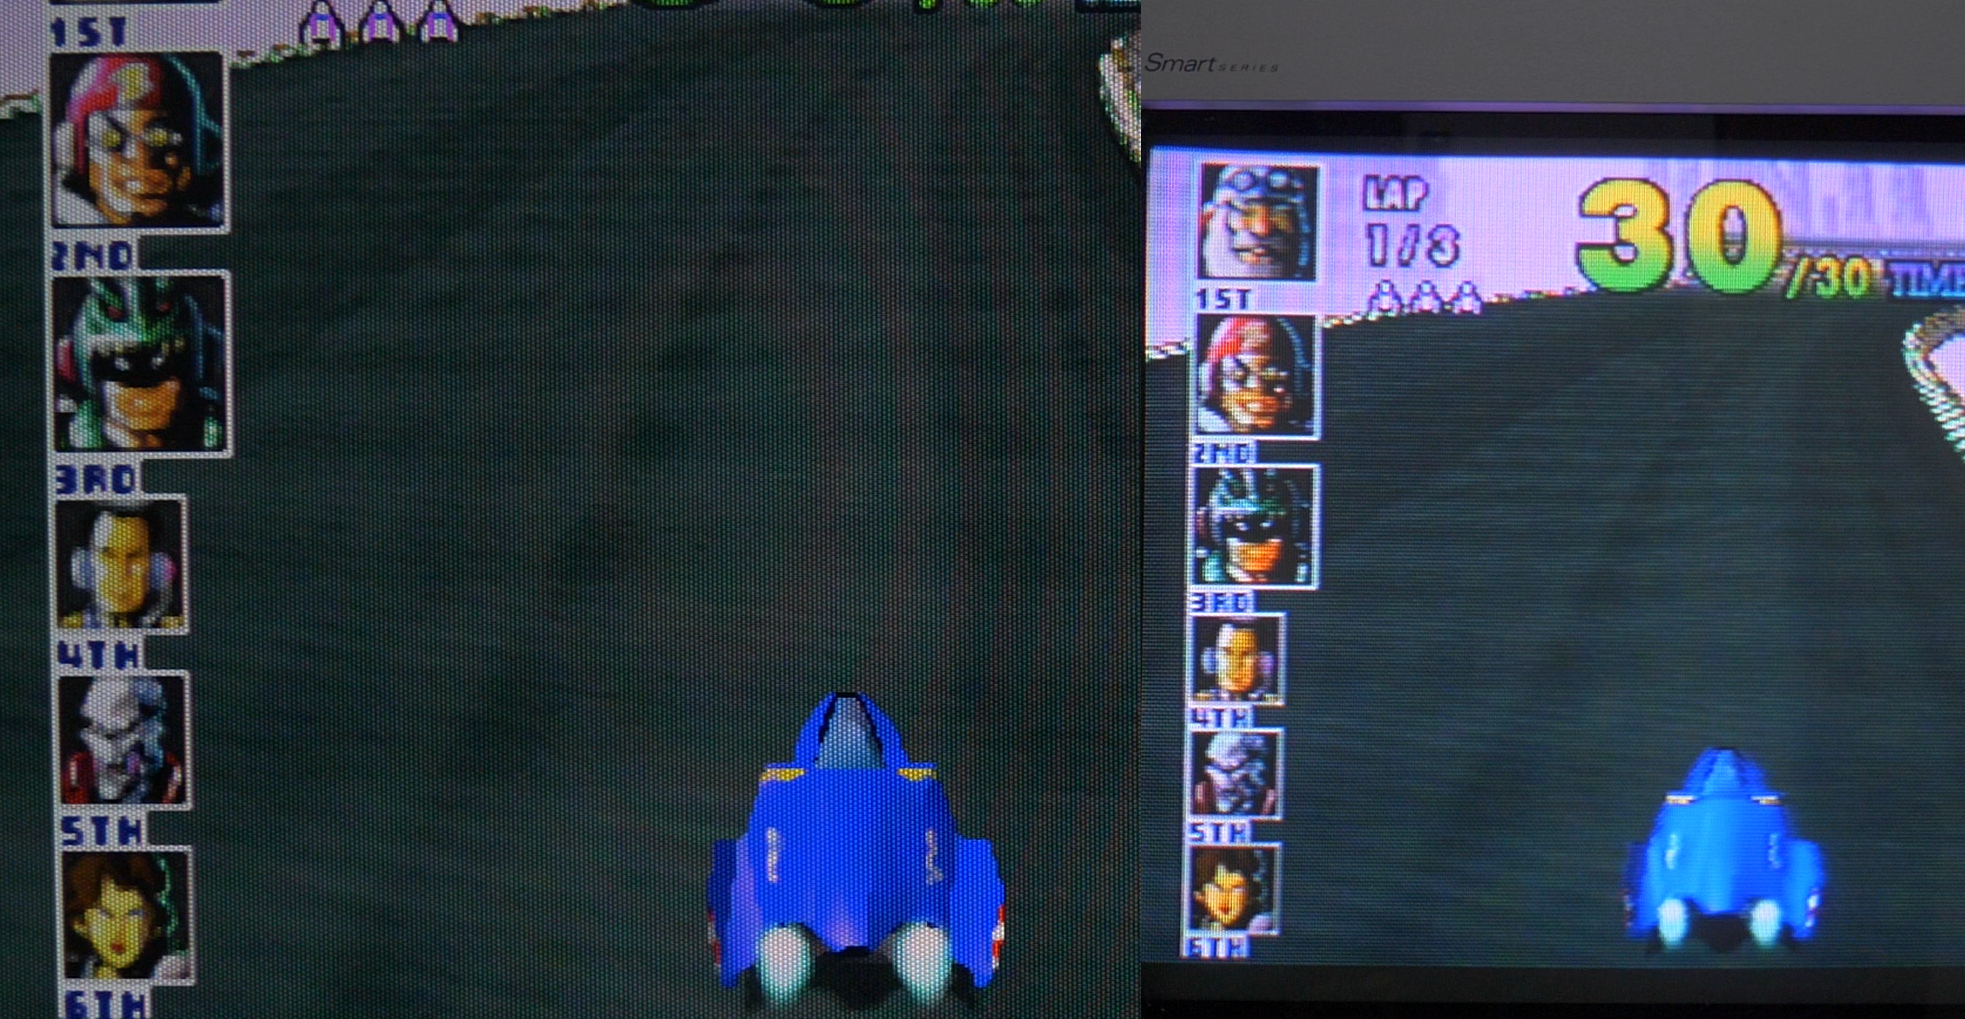
As a note, I used the “Slot Big” scanlines on the N64 Digital for the above left picture, because I wanted them to stand out in the video. I’d actually only recommend using the “big” scanlines on large TV’s – On a 21″ monitor like this, the smaller scanlines would have a more accurate look to the 13″ CRT next to it. Gotta cater to YouTube these days though, as no one reads written posts anymore…right? 🙂
One last thing: If you grew up in the flat-panel era and never really used CRT’s, I imagine this might all look like a big mess to your eyes and that’s totally fine. If you do have experience with CRT’s, these filters provide a really accurate look, that could be something you’d be interested in.
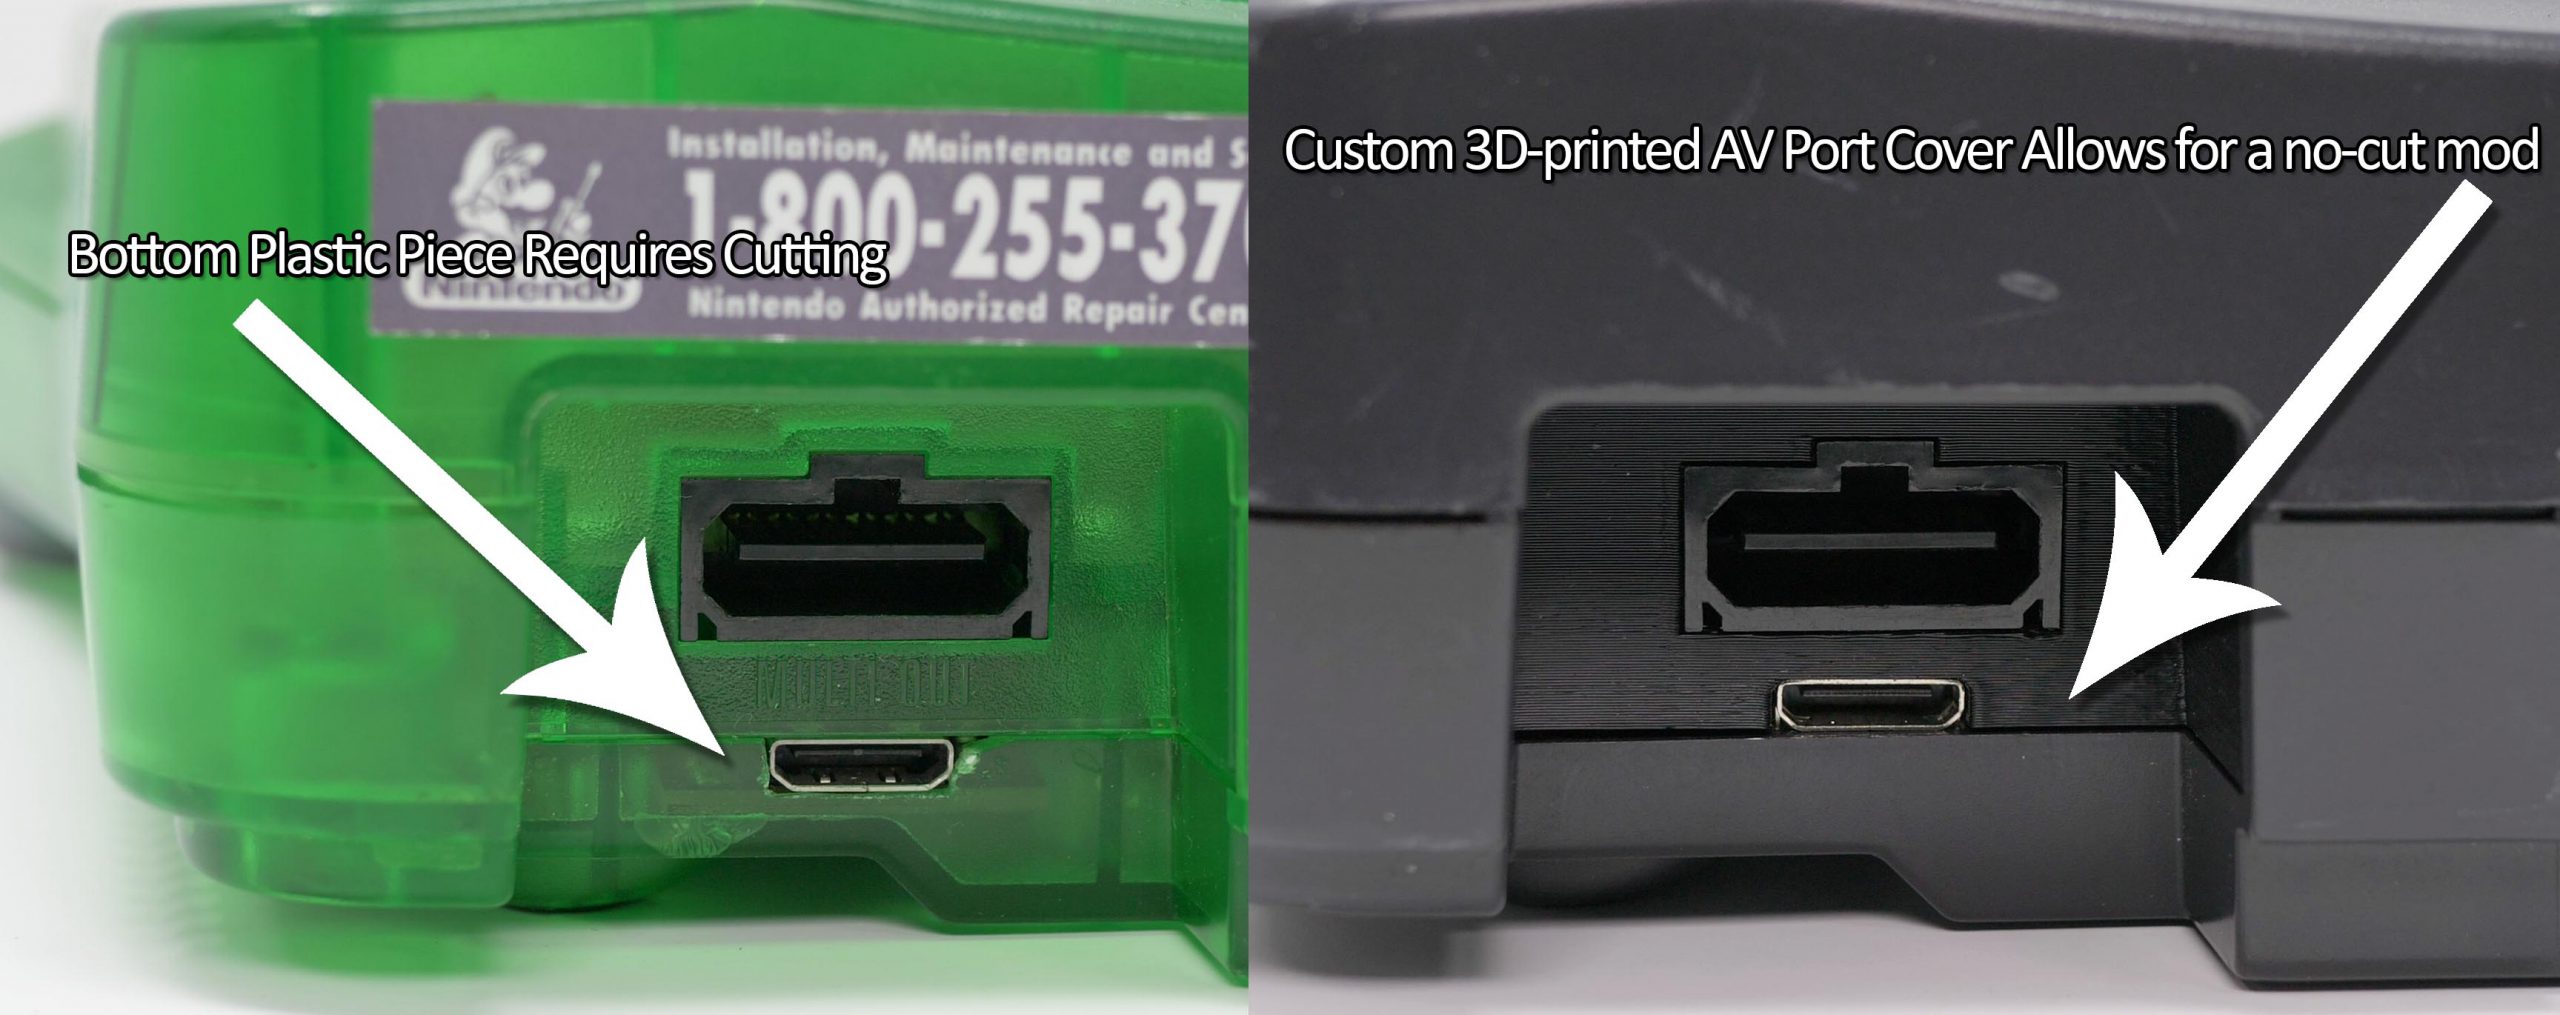
No-Cut HDMI Mod / Full-sized HDMI Port
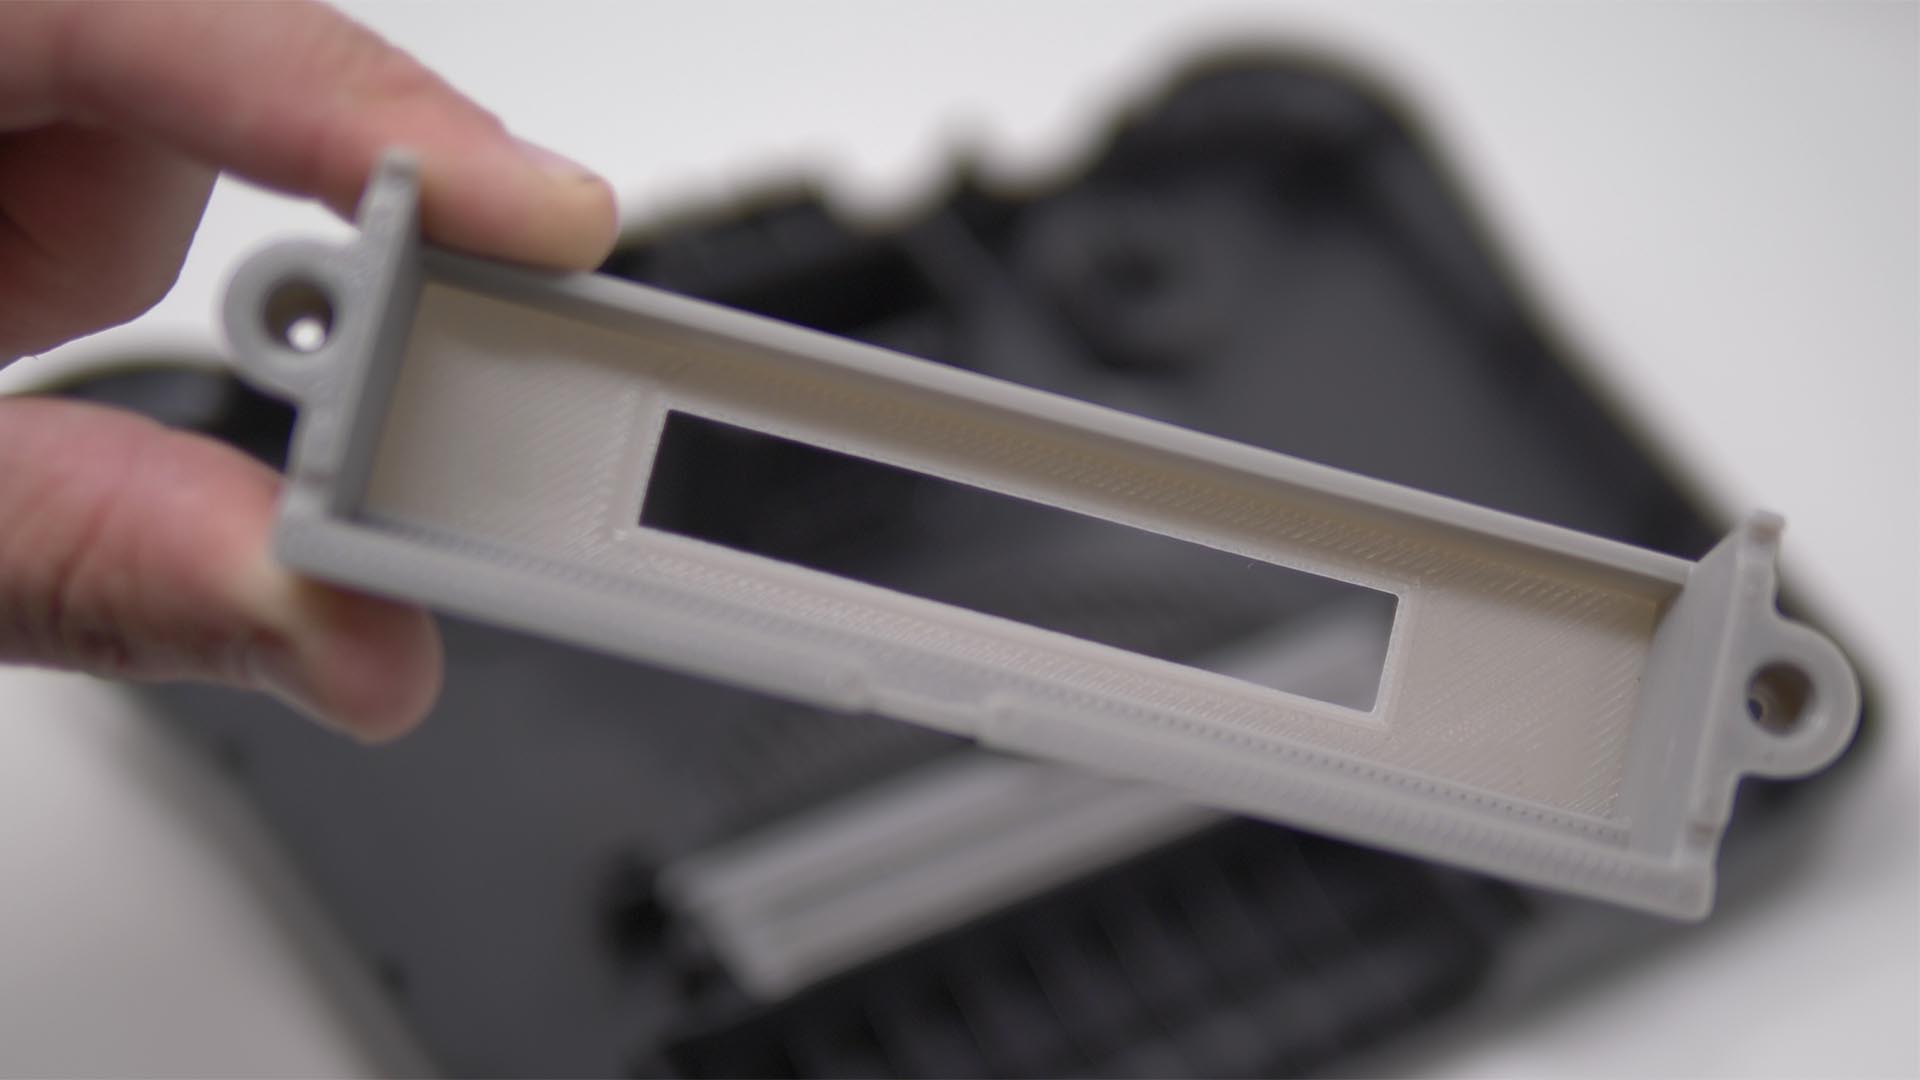
One last thing to mention about the internal HDMI mods, is they require that you cut the plastic of the console. I really hate doing this, because eventually, some other mod will be released, rendering that hole useless, ruining the look of the console. Luckily, Greg from LaserBear has us covered again!: https://laserbear.net/shop/ols/products/n64-digital-no-cut-mod
Greg designed a kit that allows you to install the HDMI port without cutting any plastic on your console, by replacing the original rear multi-out cover with a new one. You can put the original aside – maybe keep it next to the old cartridge tray – and save it in case you ever change the mod:
Adding the no-cut kit does make it hard to connect both an HDMI and analog cable at the same time…but Laser Bear has another solution for that: An HDMI extender that converts the output to a standard sized HDMI jack, that has proper strain relief so the weight of teh cable and adapter won’t damage the kit. And since the N64d also adds RGB output to your N64, this kit will allow dual RGB + HDMI output, with no plastic or cable cutting required:
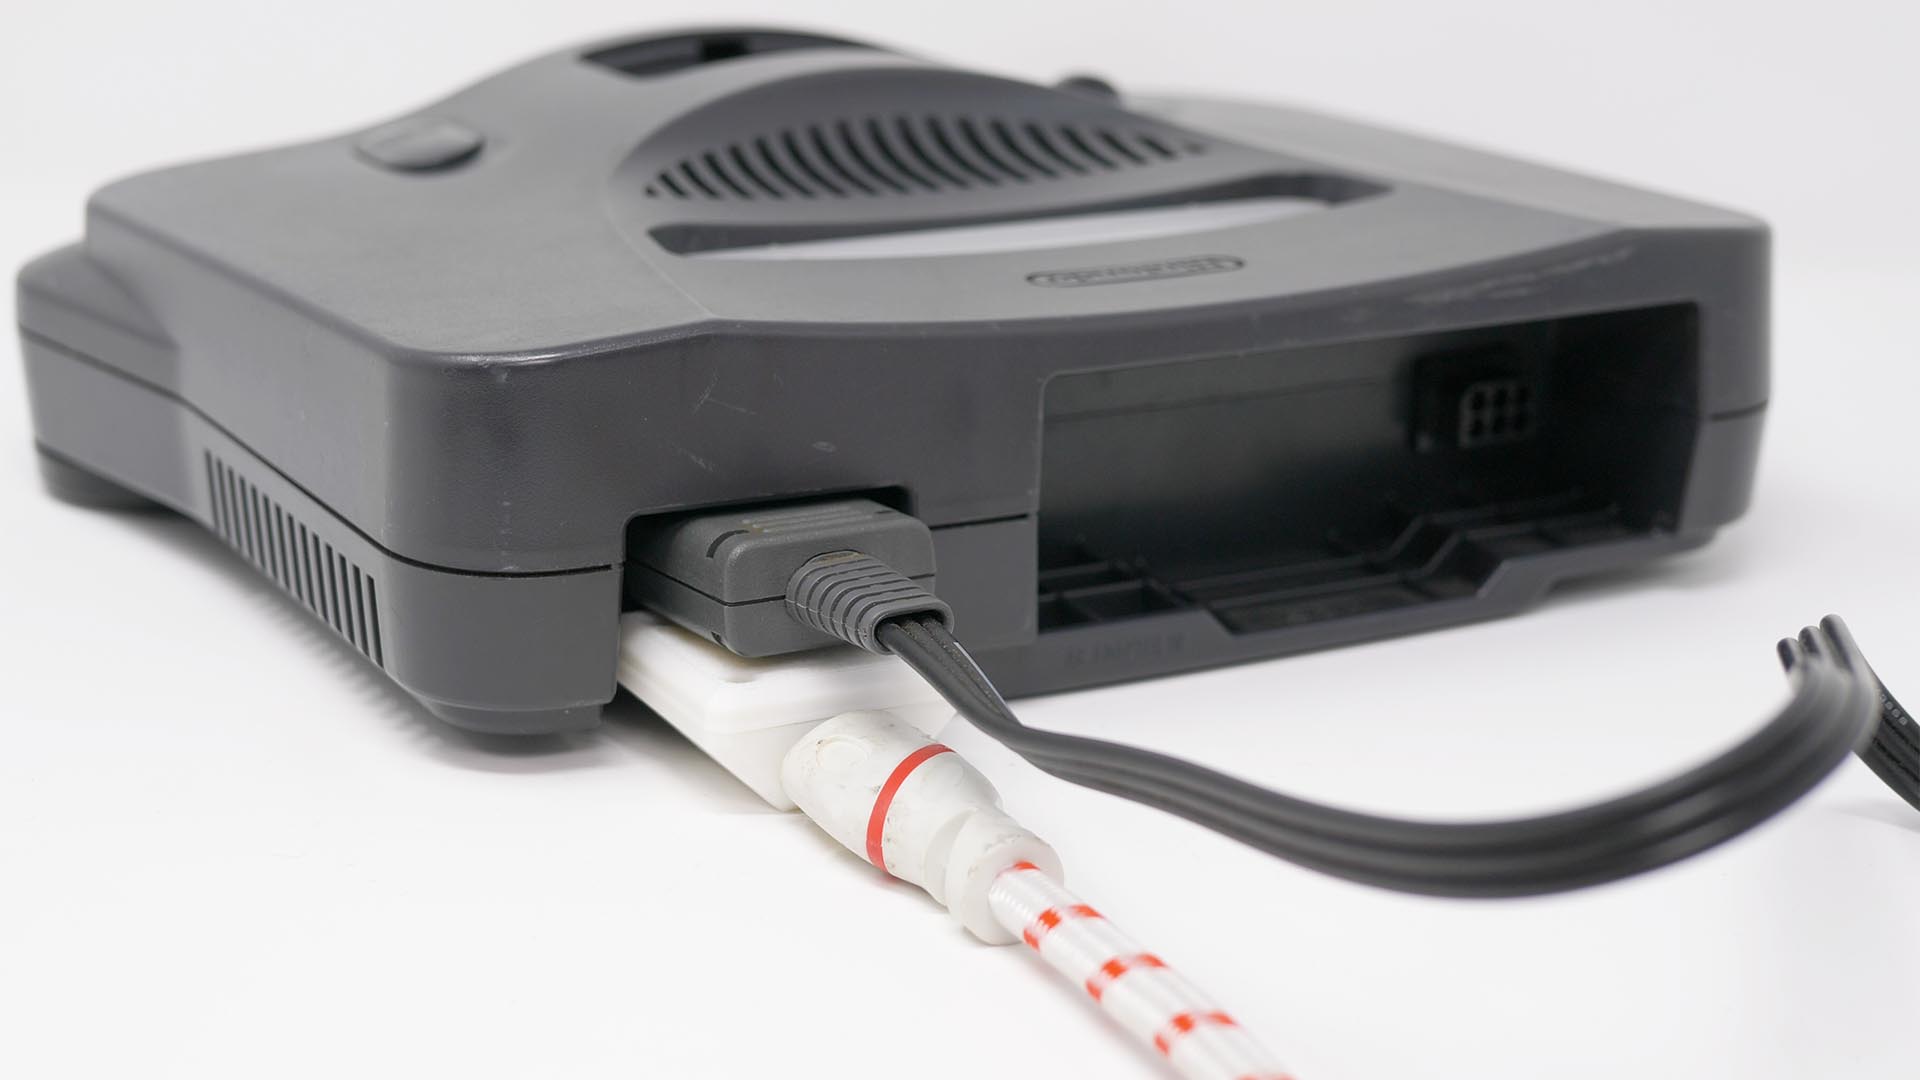
I’m a huge fan of preserving original plastic when possible, so please seriously consider this if you decide to install the N64d. Heck, even the HDMI size conversion makes it worth it, in my opinion.
Conclusion
Choosing which output option is right for you, totally depends on your setup. If you have multiple classic consoles that all need to be connected to a flat-panel, connecting all through a switch, into a scaler might be the easiest overall setup. If the N64 is your absolute favorite console, or if it’s the only analog console that needs a mod to get HDMI, you should seriously consider the N64 Digital. If you’re talking strictly about output quality, it’s the best solution and probably will be for a long time. It’s a bit unfair to compare a true digital output designed specifically for one console to a device designed to digitize any analog signal that passes through it, so I just wanted to add that perspective: The N64d might be the best quality N64 output, but it might not be the overall best choice for your setup and budget. And if you’re still unsure what option is best for you, maybe start out with an emulated solution and go from there.
As far as the other accessories, hopefully my brief overview was good enough to give you an idea if they’re something you’d be interested in. If you want more info, please check out all the posts here on this website, as we try and highlight all the cool new stuff constantly being released. Also, check out the weekly podcast, that keeps everyone in the loop of new products and updates in the retro gaming scene – It’s available as a video and everywhere audio podcasts are found!
Here’s links to everything discussed, all in one place, just to make it easier:
N64 Expansion Pak’s: https://ebay.us/f9GcfT
N64 Expansion Pak Compatible games: https://nintendo.fandom.com/wiki/Nintendo_64_Expansion_Pak
Video on enhancements: https://youtu.be/n17SDFZSu_o
Forever Pak 64: https://www.retrorgb.com/forever-pak-n64-memory-card.html
Universal Cartridge Tray: https://www.retrorgb.com/3d-printed-n64-region-mod.html
ROM Carts / Everdrive 64 x5: https://www.retrorgb.com/romcarts.html / http://bit.ly/everdrive64x5
Wireless Controller Brackets: https://www.retrorgb.com/wireless-n64-receiver-3d-printed-bracket.html
RetroTINK 2x Mini / Why you need a scaler at all: https://youtu.be/16z_C7-Gom4
RAD2x HDMI Adapters: https://www.retrorgb.com/rad2x.html
RetroTINK 5x: https://www.retrorgb.com/the-retrotink-5x-has-arrived.html
N64 S-Video Cables: https://www.retrorgb.com/n64.html
Which RGB Mod for your N64: https://www.retrorgb.com/n64rgbcompatible.html
N64 Digital HDMI Mod: https://www.retrorgb.com/n64-digital-deep-dive-featuring-pixelfx.html
mClassic / mCable: https://www.retrorgb.com/lag-testing-the-mclassic.html
No-cut N64 HDMI: https://laserbear.net/shop/ols/products/n64-digital-no-cut-mod / https://laserbear.net/shop/ols/products/n64-no-cut-dual-video-adapter
Patreon: https://www.patreon.com/retrorgb
