Retro Cart
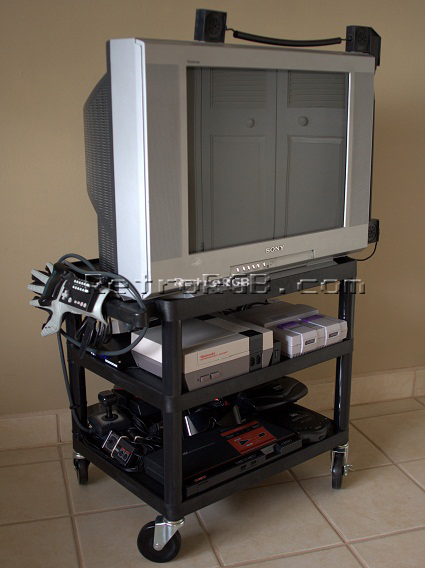
Here’s how this came to be…
As described in the about me page, I only like older videos games. When the Wii first came out, it was neat to play all my old favorite games via the Virtual Console on my huge plasma TV. After awhile, I wanted to find a way to make playing them feel more like I did as a kid. Last year, that notion lead me to discover a Retro Game Adapter for the Wii. It was nice to play the old games with their original controllers, but it still wasn’t the same. I decided the only way to really enjoy older games the way I used to is to get the actual games and systems from when I was a kid and pair them up to a 4:3 CRT.
I started searching eBay and began to find some systems and games for sale. I was able to find great deals on some and within a few days the packages starting arriving. Now that I had the systems (more on them later), where could I put them?
At first, I had the idea of getting a big CRT, sticking it in the corner of the room and hooking systems up to it. One huge problem: I live in an apartment and have no space for that. I’d love to have a room dedicated to this stuff, but that’s just not reasonable for most people, including myself. I started thinking about other ways and eventually came up with putting it all on an A/V cart.
I looked around and was shocked at how expensive these things were. Most were over $300, but I found two that were reasonable. I ended up deciding on the cheaper one, since I wasn’t sure if it would even work.
It arrived with three sets of “poles” that were different lengths. Choosing what sets to install would determine the height. The smallest ones would be good for the top shelf, but the other two sets were way too tall: You’d have to tilt your head back and look up while playing, which would be uncomfortable. So…I did what my friend and former co-worker Axel always does when he doesn’t like something he bought: I brought it to Axel’s house to modify it:

Axel’s garage and basement are equivalent to an auto shop (including lifts) and a machine shop, so I knew he’d find an easy way to modify them. We used one of his table saws to cut the longest ones in half and it only took about two minutes. It would have taken me an hour with a hand-saw!
After I got the poles / mounting height figured out, I needed to decide what TV to use. I had two older CRT’s at my mother’s house, but neither felt right. The bigger one was way too top heavy and the CRT was tilted backwards (obviously designed for people who would put their TV’s on a shorter TV stand), once again causing you to tilt your head back while playing: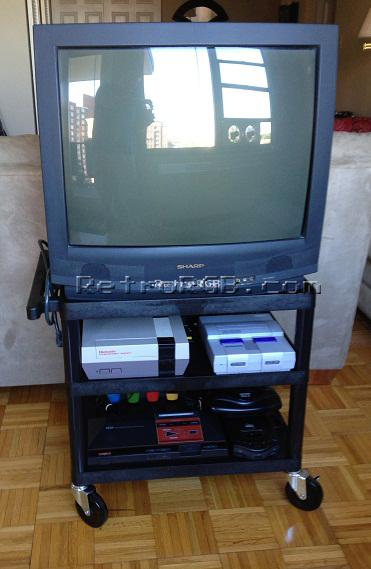
The second one didn’t work for two reasons. First, it was a bit too small. Second, since it had a VCR and DVD built-in, there was too much space on the bottom, making it too tall:
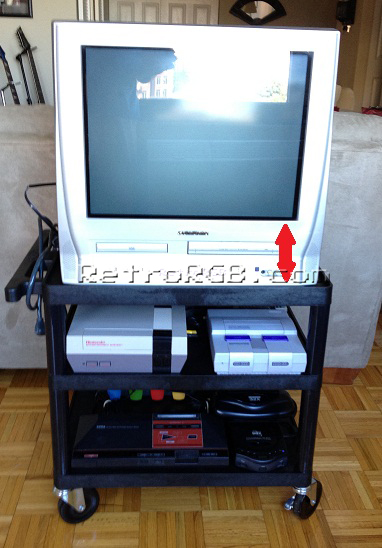
I really needed a TV that had the speakers on the side, allowing the CRT to be close to the bottom, which would be at the perfect height to play while sitting. On a whim, I went downstairs to my friend Smev’s apartment (he lives in my apt building) and asked to check out his bedroom TV. It looked perfect. I asked to borrow it and to my horror, it wouldn’t fit. The edges wouldn’t fit inside the lip of the cart, causing it to dangerously teter.
Well, keeping in the spirit of Axel, I thought I’d try modifying the TV. I grabbed my trusty Swiss Army Knife, got out the mini-saw and hacked notches into the bottom of both sides of the TV:
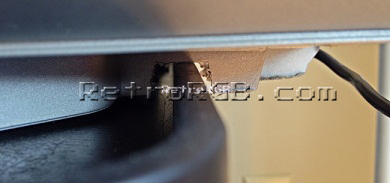
IT FIT LIKE A GLOVE!!! Luckily, Smev agreed to trade TV’s with me, so I was all set to start adding the systems and wiring.
As you can imagine, I was completely anal in the way every single wire was run. Everything was ziptied and run along the inner lines, hidden as much as possible. Here’s the full tour (keep scrolling down), starting with the front:

The top shelf houses the original NES, the Power Glove Control Box and the original non-oxidized SNES, which Justin was nice enough to trade me for some games:
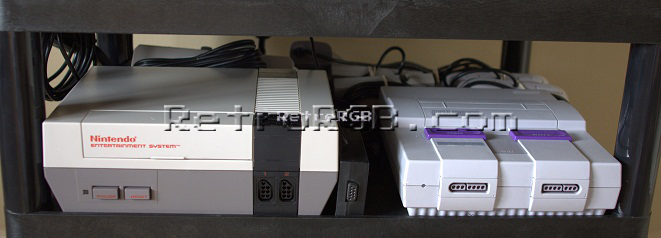
Originally, I planned on the bottom shelf consisting of the original Genesis and original Sega CD. That combination would have been too tall for the cart, so I thought an original Genesis and 2nd gen Sega CD would work as well. Either way, I wanted the original Genesis, so the Power Base Converter would fit nicely, allowing me to play Sega Master System games.
To my surprise, one of the first things I bought was a Master System, since it was too good of a deal to pass up. I figured I might as well keep it, but then I’d be limited for space. I then remembered something from my childhood…something I’d always coveted, but never owned: The Sega CDX. It was the only official Genesis / Sega CD combo system ever made (there were other versions, but none from Sega) and when it came out, it was expensive. I never thought I’d actually own one, but thanks to an excellent eBay deal, now I do.
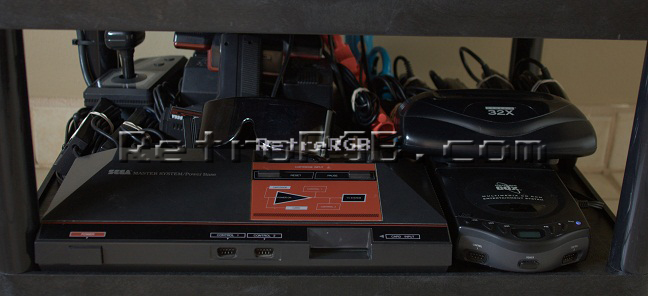
Finishing off the system is the Sega 32X. It sucks.
Unless you really want one to own as a collector, or have some fixation with one of the few good games released for it, I would never recommend getting it. I bought mine to play Night Trap 32X and Virtua Racing Deluxe…but in hindsight, the regular Genesis and Sega CD versions of those games would work just fine. Seriously, look how much better the CDX looks without that mushroom-turd looming over it:

On to the side view:
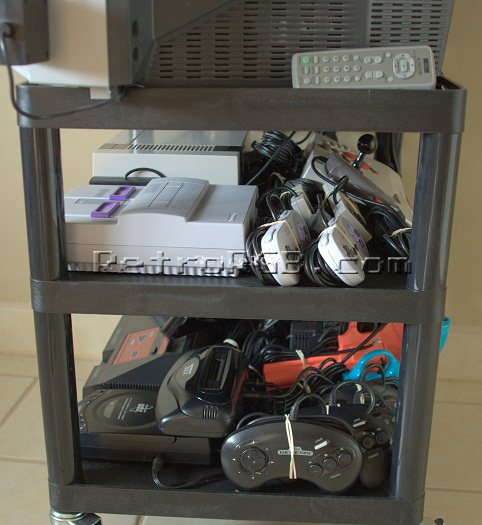
This side shows a good look at the Genesis controllers, as well as the Konami Justifiers (behind the Genesis controllers). As far as I know, the Justifiers are the only light guns that allow two players to play at the same time. They were originally designed for Lethal Enforcers, but work with a bunch of other games. Also, they look really bad ass 🙂
The back view shows some more details. As you can see, everything is ziptied and neatly layed out:

On the top, you can see the NES and SNES controllers, as well as the Zapper. Also, I used the NES Advantage to cover the wires going into the video switch.

On the bottom, I used the Power Base Converter and Master System Control Stick to cover the AC unit. I realize I’m a total geek, but I like it when things look good from all sides, not just the front. Also, you can see the back view of the Justifiers.

Finally, the other side view:
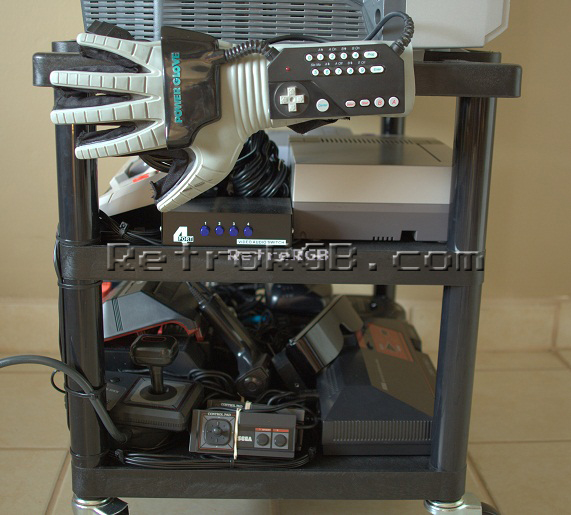
This side shows the Sega 3D Glasses, which have become my favorite thing to use on this cart. I now own every 3D SMS game released and although some are terrible, there are a few really cool ones. It’s funny, but when I started this whole project, I assumed I’d use the SNES more than any other system. I guess in the long run, I probably will, simply because I’ll play Zelda and Metroid every few years on it…but as of now, it’s the Master System that I’ve been loving and its because of the awesome light gun and 3D games! Outrun 3D and Missile Defense 3D are my favorites. Playing Outrun in 3D is amazing, but Missile Defense 3D is light gun game in 3D!!! How could you get any better than that!?!?!?
Also shown is a better view of the Master System Control Stick and the original Master System controller with the cord coming out of side and the stick build into D-pad. The newer “NES-like” Master System controller is behind that one.

This view shows the A/V switch that allows you to switch between systems (a very handy tool)…but it also shows what in my opinion is the pinnacle piece of the cart: The Power Glove! First and foremost, it really is as bad as AVGN says it is. Seriously, he’s not exaggerating one bit. It’s to the point where it’s pretty much useless…but I still think it looks awesome mounted to the side of the cart! Also, as silly as its sensors are (the three things mounted to the side and top of the TV), I really don’t mind leaving them on. Mounting those on the TV solidifies the statement that: “yes I’m a geek and if you don’t like it, I’m gonna punch you right in the balls (or corresponding female genitalia)”. As bad as it may be, I think the Power Glove is the perfect way to complete the cart.

So, in conclusion, one last pic:
