
Axunworks has just released a new “supergun”, he’s calling the ‘JAMMA Supergun Mini’. It comes with a power supply and outputs either RGB or Component Video via a dsub connector. The price is $90 for the supergun + PSU, but after shipping to the US and cables it came to about $130 when I purchased. Here’s the link and the full review is below:
Supergun Mini + PSU: http://www.axunworks.com/product-p669501.html
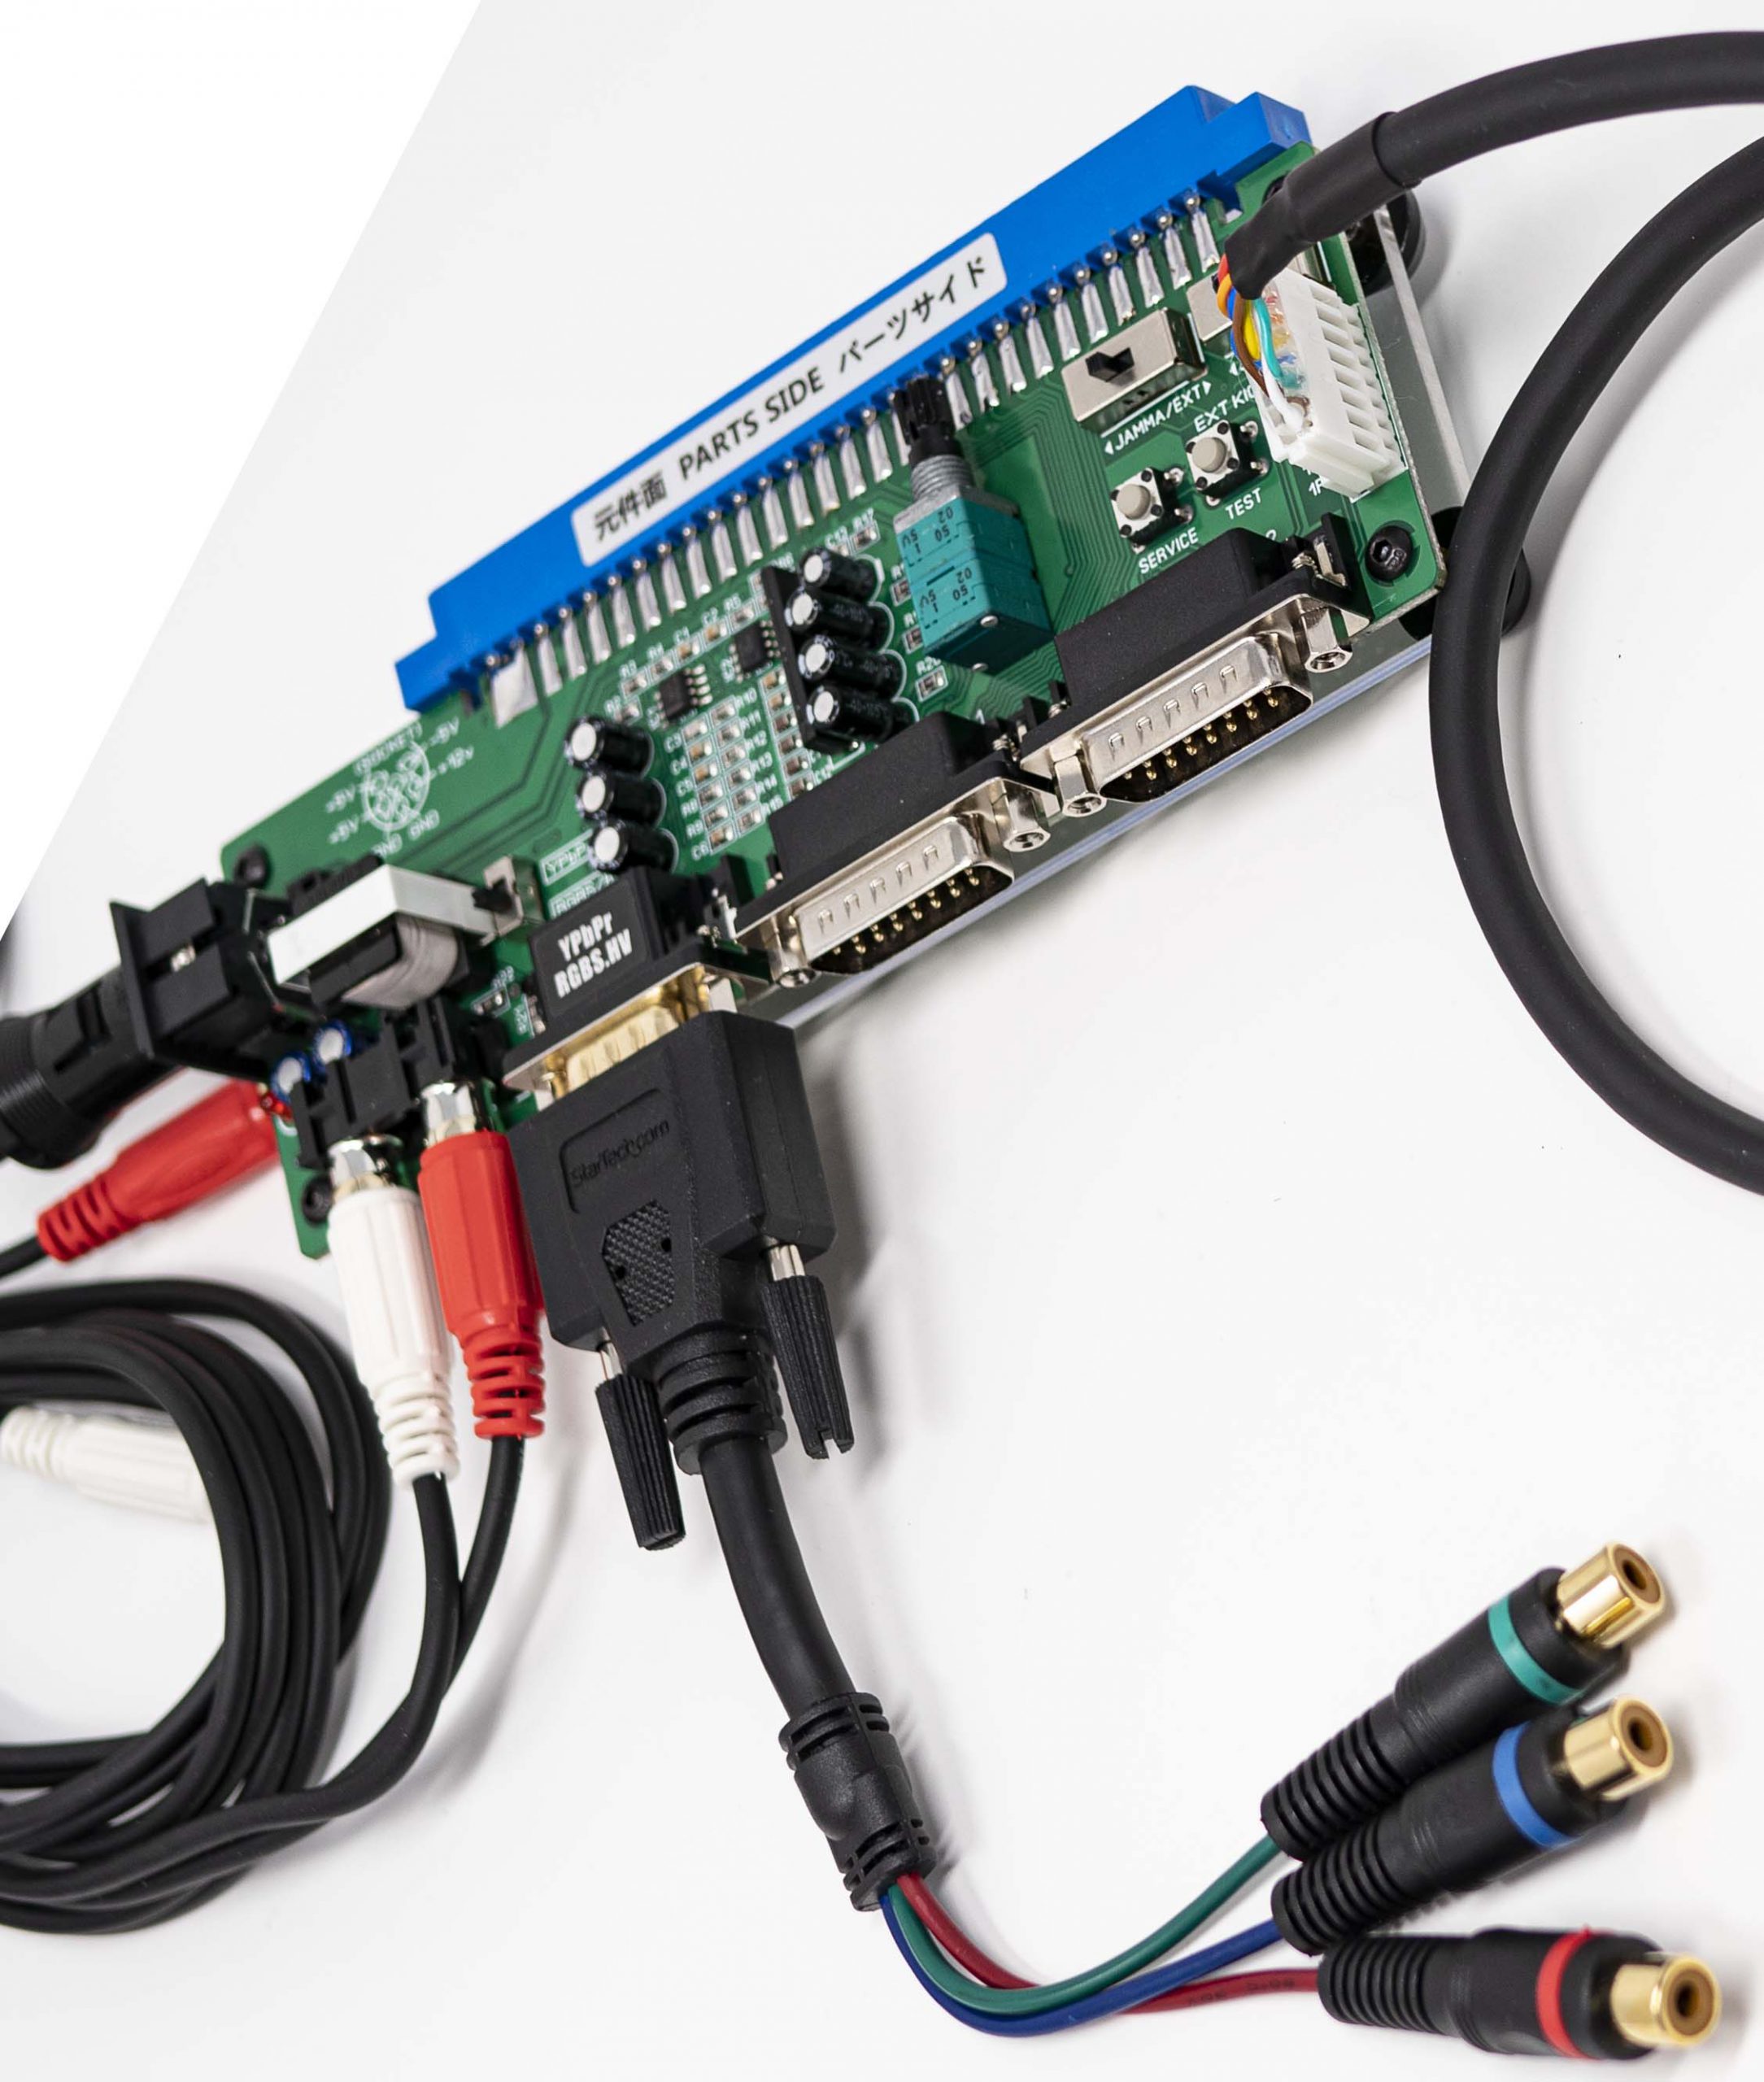
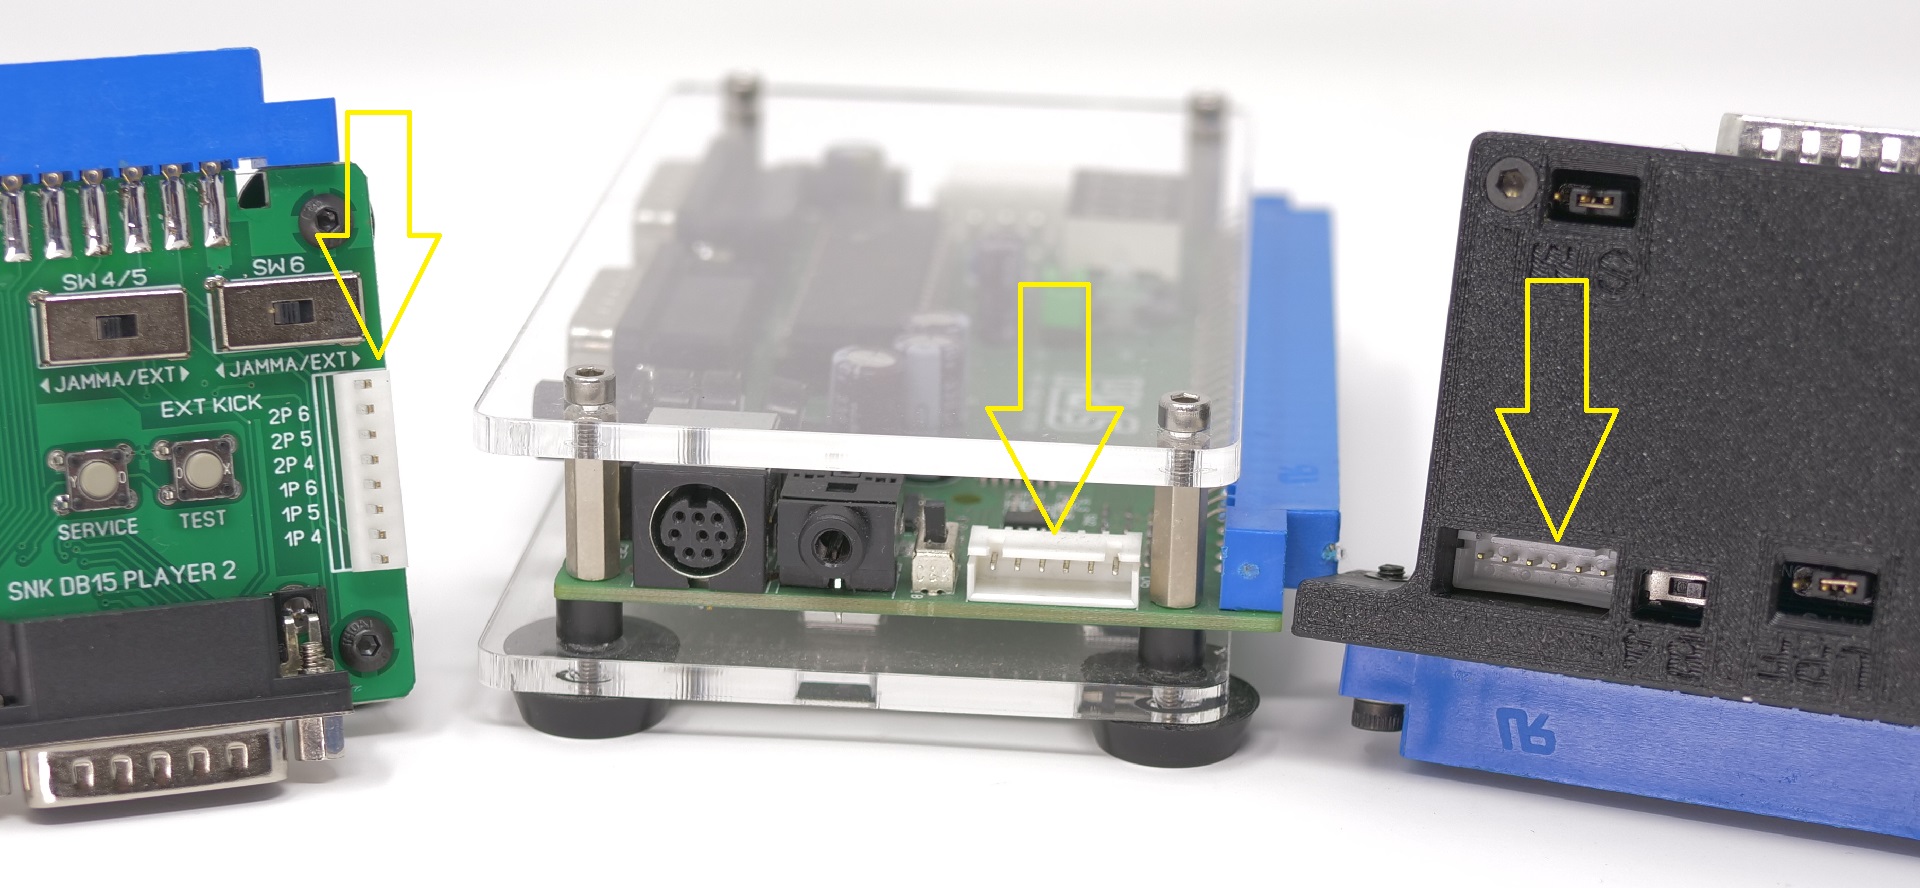
Let’s start with a basic overview of all the features available on the board, then I’ll go into detail on each: On the left is a power input, where you connect the included PSU. Just below that are the audio output RCA jacks. To the right is the dsub (VGA-style) video output jack, which can output either RGB or component video, toggled via the switch above. Next are two db15 inputs for controllers, just like you’d find on pretty much all other superguns, as well as the Neo Geo AES. There’s an RGB level control above those, buttons to access the service and test menu’s next to that, then the kick controls: A custom kick harness, with switches to toggle between allowing extra buttons to pass through JAMMA, or the external connector (click on each picture for full-sized views):

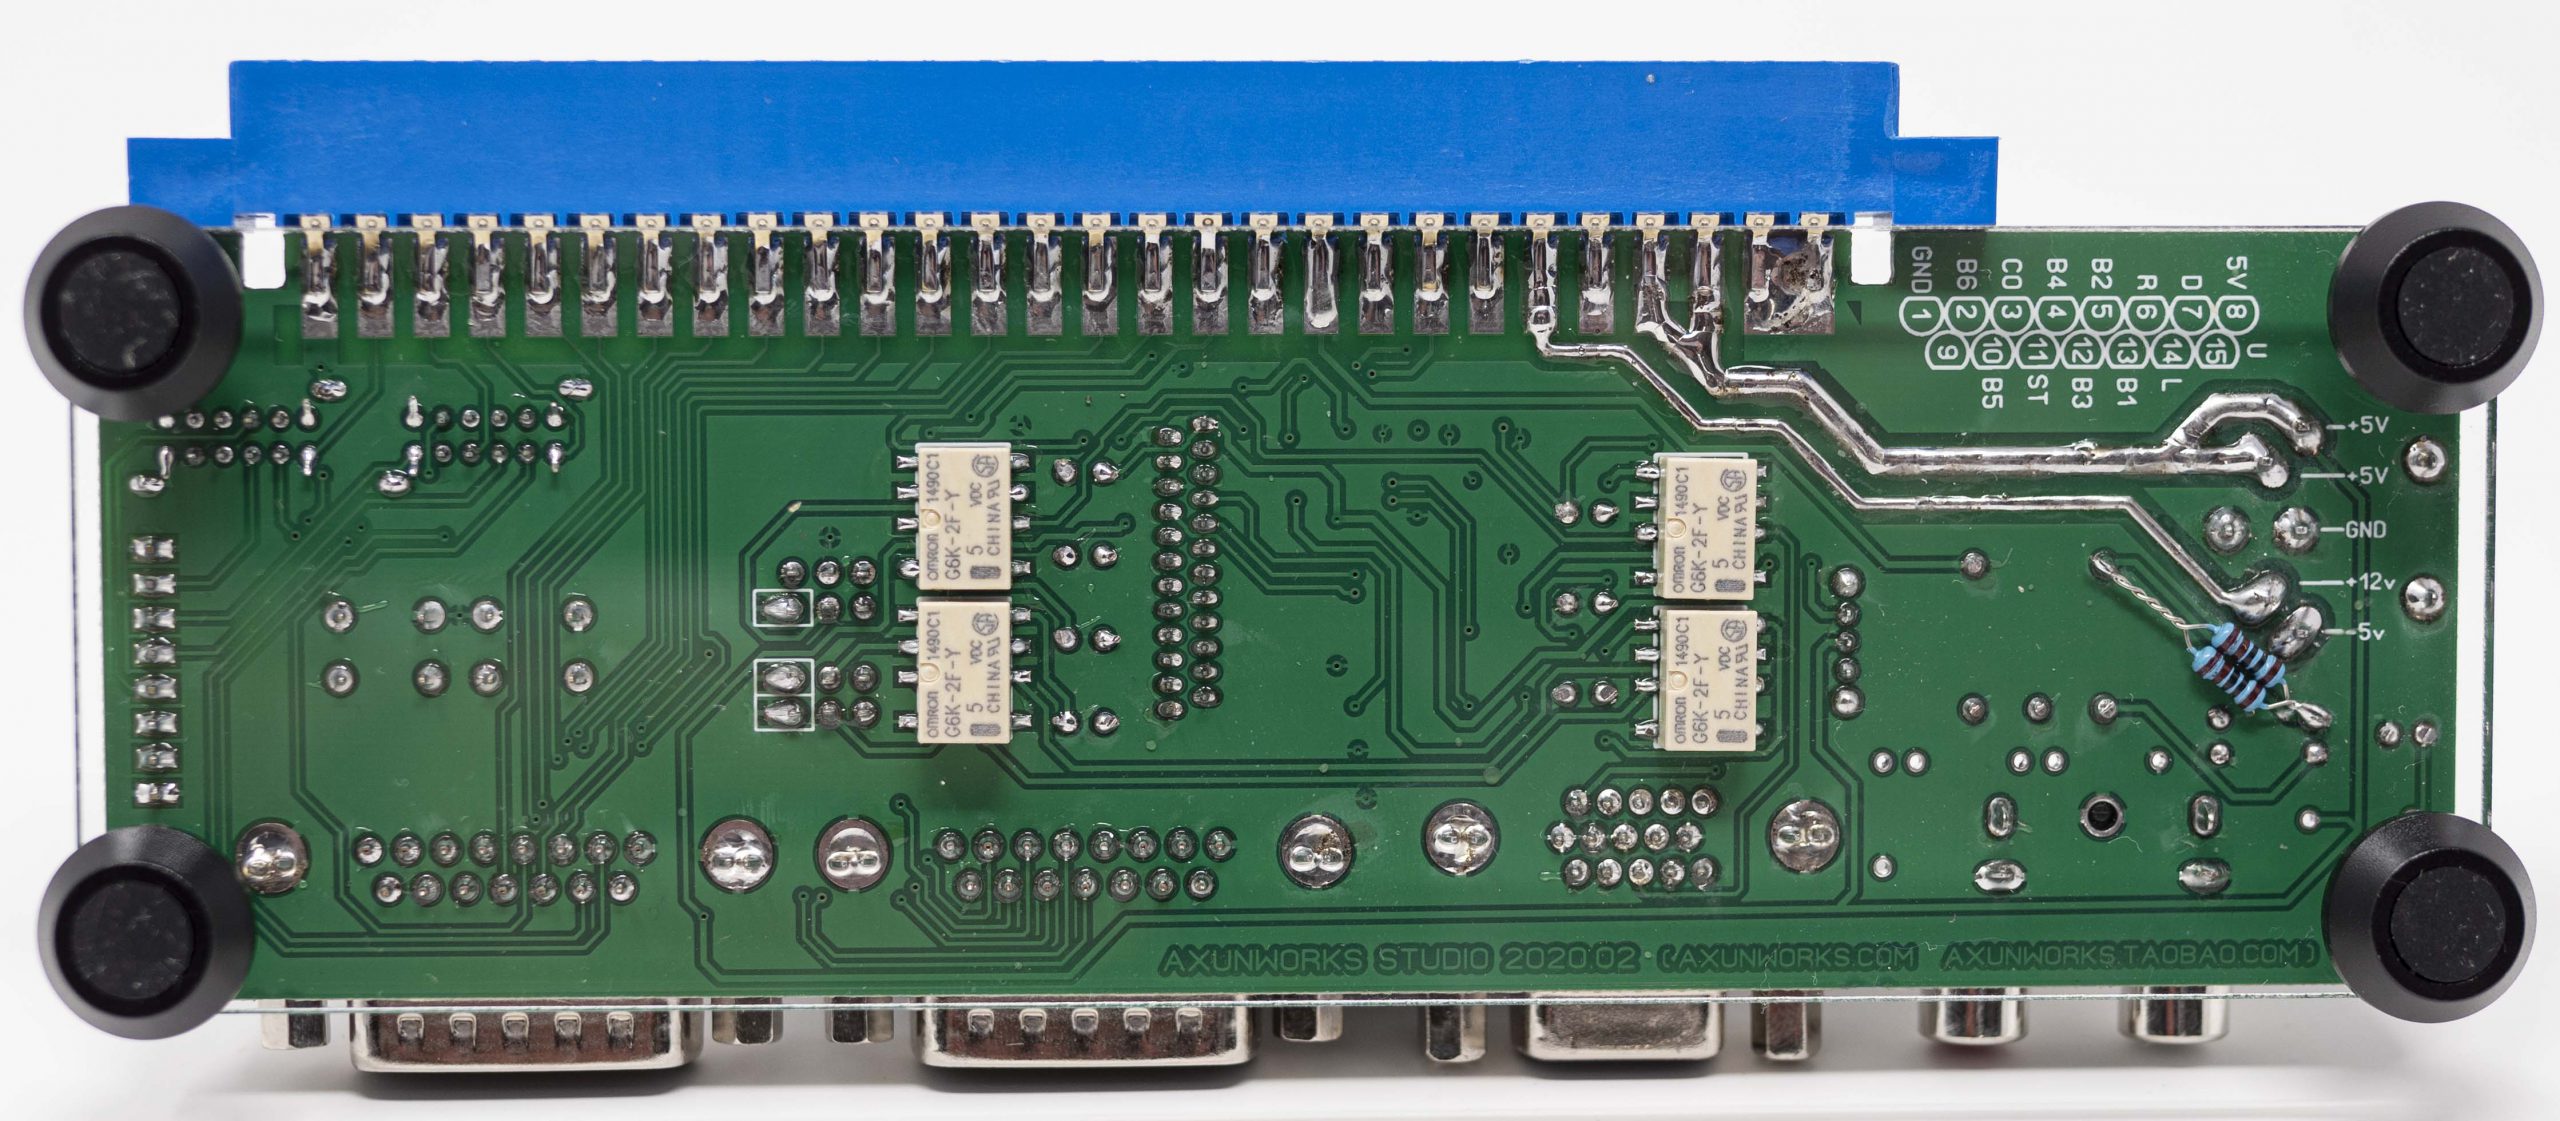
The bottom of the supergun is protected with a piece of plexiglass, plus rubber feet to hold it in place. It’s my opinion that protecting the bottom is extremely important, as you don’t want to put this on a metal surface and risk shorting anything out. While a fully-enclosed unit would be nice, that sometimes causes issues accessing the buttons and features, so I’m okay with Axun’s choice of only isolating the bottom:
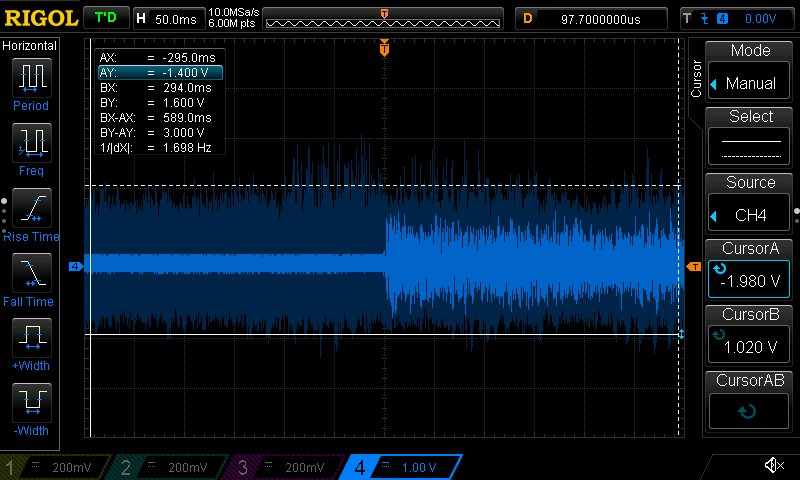
Okay, now on to the analysis! First, the video: The RGB levels of the dsub output are controlled by that main potentiometer (POT). The supergun arrived with the POT set to around the middle and the voltage output was safe. As with all supergun’s featuring POT’s, this could be potentially dangerous: If the supergun wasn’t calibrated before shipping – or if a beginner plays around with the knob, you can output voltage levels that might blow out any of your equipment. Here’s an example of what happens if you spike the voltage (this is NOT how it shipped, this is AFTER I turned the voltage all the way up):
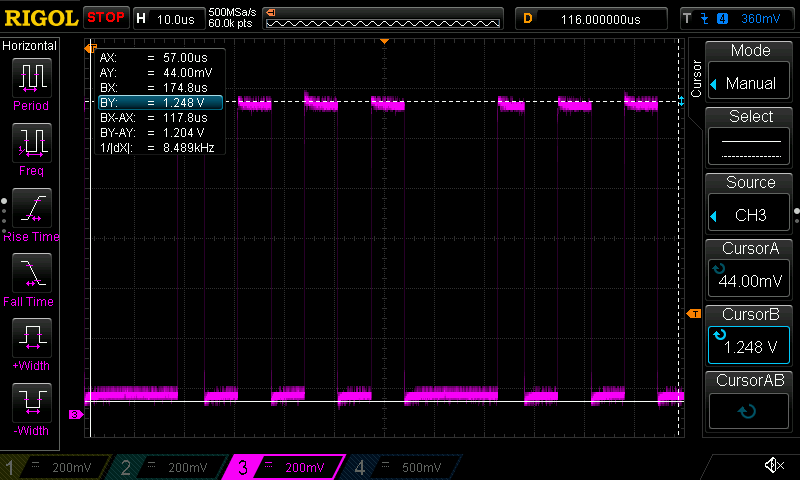
The scope output above shows 1.2v when the POT is turned all the way up with a Neo Geo MV1C connected. With the POT in this position, the image is so bright, it’s completely washed out, so no one would actually leave it set this way. It’s my cautious conclusion that if you get this supergun, start with the POT in the middle, then tweak the POT until the image is a tiny bit too dim, just to be safe. Even if you accidentally crank the voltage too bright for a second, then bring it back, your devices should be fine. Alternatively, if you leave it cranked to full like this (why would you?), expect your SCART equipment to be damaged.
When you switch to component video output, you can use a cheap adapter or cable to get standard YPbPr from the dsub connector; The conversion is done on the supergun, not the cable. Component video image quality seems good, but my voltage warning applies to both component video and RGB – Be careful!
A note for clarification: My thoughts on the POT / supergun voltage apply to any supergun with a POT. From an overall RGB voltage level standpoint, Axun’s supergun Mini seems equal in safety to the other most popular solutions with a POT out there, such as the MiniGun and HAS: Use them as intended and you’re fine. Use them badly and it’s dangerous.
The sync output of the supergun is high-voltage TTL. This isn’t necessarily a bad thing, as most devices in the retro gaming world with a dsub connector output TTL sync. You’ll either need to use a VGA to SCART cable with a 470ohm resistor on the sync like (exactly like with the MiSTer I/O board), or connect it directly to RGB monitors that can handle this voltage. The PVM’s I own all accept TTL voltage, so a cheap “VGA to BNC” cable is all I needed to connect this to my PVM; Definitely check your monitor’s service manual before trying though!!!
Another note: A “VGA2SCART” adapter is in the works that will completely alleviate any concern for sync: Using that device will allow you to connect a basic VGA cable from this (as well as the MiSTer, Dreamcast, etc) and you’ll never have to worry about sync voltage from consoles via either RGBs or RGBHV. If you’re connecting dsub signals to SCART equipment, I strongly recommend using the VGA2SCART, for both convenience and safety!
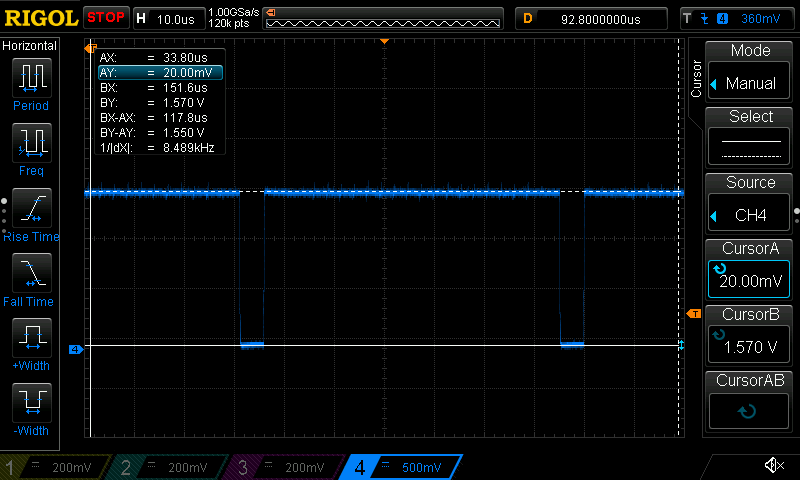
Another major concern of any supergun is the voltage of the audio output. Luckily, Axun’s Supergun Mini has voltage protection built in and there’s nothing to worry about: Speakers, SCART equipment, TV inputs…all are perfectly safe to connect! One thing to note is that while the voltage is safe, the audio can still “clip”, or distort if you turn it up too high (this is not a safety issue, just sound quality). Here’s a scope capture demonstrating what I mean – I cranked up the volume of The Simpsons all the way to max. If connected directly to the scope, it would show something insanely high like 15v, but through Axun’s voltage protection, its around a safe 3v:
The proper way to set audio with this supergun, is to start by turning the arcade board’s volume all the way down. Then slowly turn it up until you hear distortion or “clipping”. Then back it off a bit, so it’s clear. Then back it off a bit more, to compensate for loud sound effects. To be clear: There is NO safety issue, this procedure is just to help you get the clearest audio possible from your arcade boards.
You’d actually be surprised at how little you need to raise the volume of arcade boards to get line-level audio. Here’s a scope capture showing what that same arcade board sounded like after going through the procedure above, with the volume knob barely turned up. Nothing ever maxes out and the voltage is all under 3v:

One of the more appealing factors of this supergun over others, is it comes with a matching power supply. Classic console gamers (respectfully) might not understand why that’s important, but arcade gamers already feel the pain: Most superguns require arcade power supplies with custom wiring and a custom case. The JAMMA Supergun Mini comes with a smaller power supply that seemed to work well:
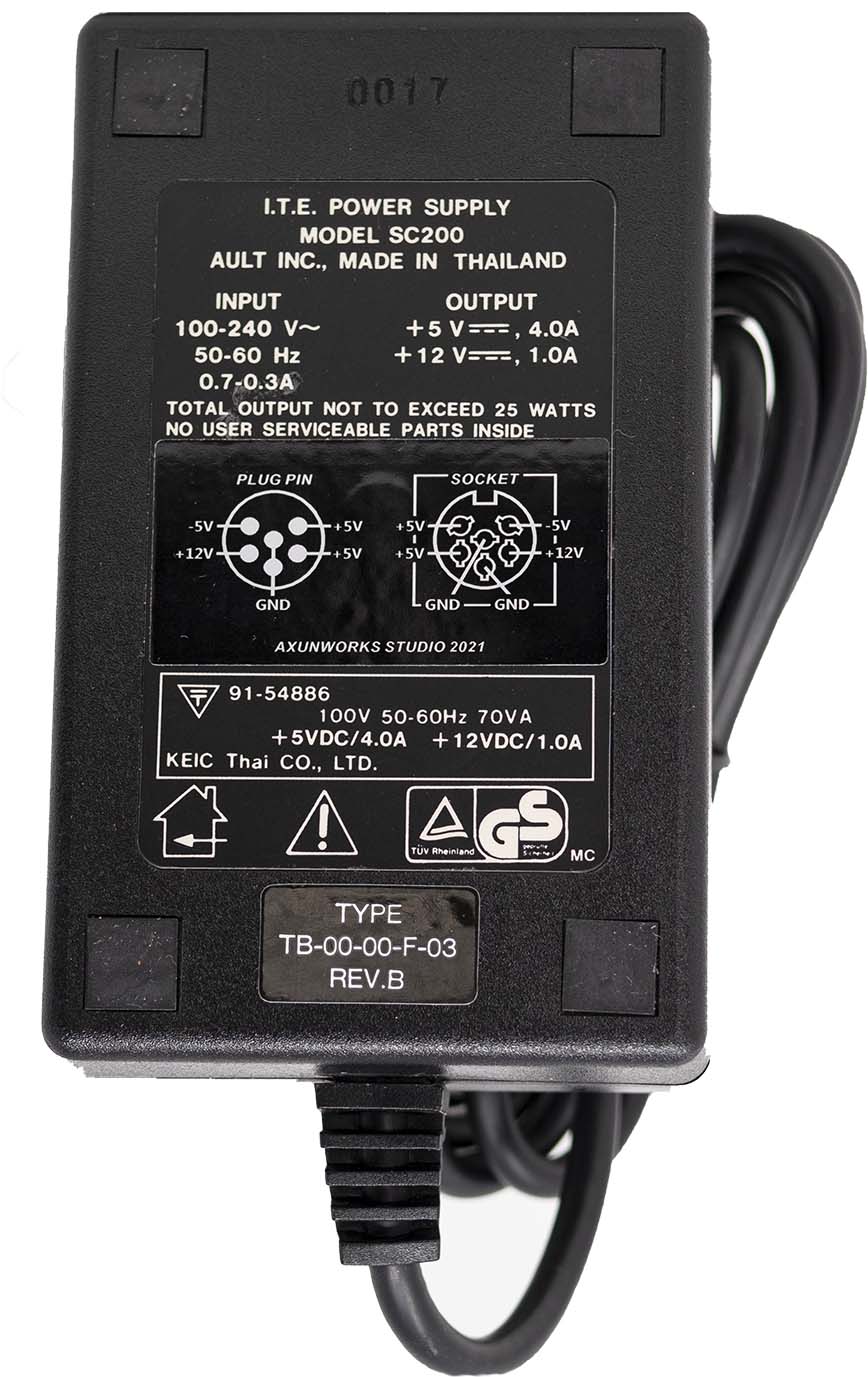
I didn’t put the power supply through stringent stress testing, however I did leave it connected to known power-hungry arcade boards for awhile and there were no noticeable issues. I’m definitely hesitant to make any definitive statements about this PSU, both because my previous PSU experience has given me trust issues (nightmarish stuff happened at a previous job) and because there’s such a wide variety of arcade boards out there. I’d much prefer to generalize with a statement of:
Make sure to check the specs of your JAMMA arcade board to see if this PSU is powerful enough, with its 5v, 4A output. If your board requires 3A or less, I’d be confident using this; An MV1B or C will definitely be fine. If your board is rated at 4A or higher (or if you have an odd-use-case), maybe check out Axun’s other PSU: AxunWorks Supergun Power Supply
The last thing to talk about is the support for buttons 4, 5 & 6, for games that support it. If your arcade game supports these buttons over the JAMMA connector, switch it to “JAMMA”. If you’re using something like a Capcom CPS1/2/3, or Mortal Kombat, switch to ext modes:

Axun offers multiple kick harnesses pre-made for different games and the connector itself offers all the pins you’d need, however there’s one issue: What if you already have a bunch of kick harnesses made for other superguns? Unfortunately, you’ll either have to make your own converter adapter, or just make (or buy) new kick harnesses from scratch.
This is obviously a non-issue for anyone just getting into using superguns, but people who already have HAS, MiniGun and other superguns should take note that you’ll need to make or buy new solutions for your kick harness.
So, overall I really like this supergun. I’d have definitely liked to see a TTL/75ohm switch for the RGB output…or just the lower voltage sync. If you use the proper SCART cable (with a resistor on the line), or the upcoming adapter there’s no worries, but I’d have liked to see it addressed on the board side.
It would also be cool to have some kind of kick harness adapter board or cable, for people who’ve already made their own. That’s one of those projects that’s pretty easy, but if you don’t already own any of the components for them, you’ll end up paying more in shipping than parts. I think purchasing an adapter pre-made would probably be cheaper overall.
The only other thing I’d like to see as a community is a wiki with a list of arcade boards that also include their power requirements. If we had a way to sort a spreadsheet of sorts by power requirements, we’d all have a clearer understanding of which arcade boards need bigger PSU’s. That’s on us though, not Axun! 🙂
EDIT: It look like someone started a wiki for this, but it definitely needs more contributors: https://wiki.arcadeotaku.com/w/PCB_Power_Consumption
