The best NES Mini console was hindered by its only video output option being RF. With the great RGB output mods on the market we really need a better way to get the video out of the system than hacking away at the stock back panel. 3D printing comes in to save the plastic once again with two new options for replacement rear panels (Well maybe just one new one ,the Din 8 was released before, but it is nice to have them in one place.)
As with most of my designs you can find the files to make your own here:
http://www.retrorgb.com/assets/3dprint/TopLoaderMultiOut1.4_2020-02-03.zip
http://www.retrorgb.com/assets/3dprint/ToploaderMiniDinPanel_2020-02-03.zip
Or purchase one manufactured by my company Laser Bear Industries to help fund future projects just like this (just select “multi-out for this version): https://laserbear.net/shop?olsPage=products%2Fnes-toploader-rgb-rear-panel
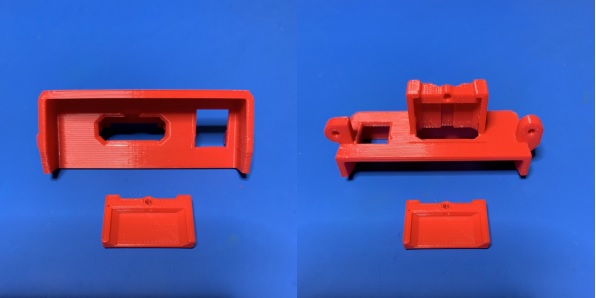
First up is the Multiout panel, mine is not the first to be made, many other options existed before my design came to be. My approach to the design sent me out to find a better Multiout PCB, the db Electronics Multiout PCB is a great design but had one small flaw, It was too long to have the Multiout flush with the back panel. The Real Phoenix @TRP_RetroMods trp-retromods.ca made a Multiout PCB that would be able to replace the stock SNES Multiout if it was damaged. This PCB was affordable and he stocked it with real hard gold fingers on his website. With this PCB as the target I got to work on a new printable Multiout Panel.


You will also need a M2.5x8mm screw to attach the PCB to the Multiout
Auto Amazon Links: No products found. http_request_failed: A valid URL was not provided. URL: https://ws-na.amazon-adsystem.com/widgets/q?SearchIndex=All&multipageStart=0&multipageCount=20&Operation=GetResults&Keywords=B012TE3LDM&InstanceId=0&TemplateId=MobileSearchResults&ServiceVersion=20070822&MarketPlace=US Cache: AAL_79bc14b827cc852cda0118fb46ba732a
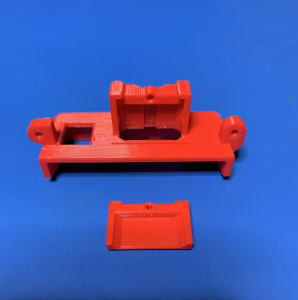
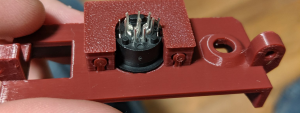
Next we have a din 8 multiout panel, as previously posted about. This panel will hold a din 8 connector like the one that comes with the Tim Worthington RGB mod. There is a slide lock that holds the connector in place and makes it easy to install the Din after it has been soldered.
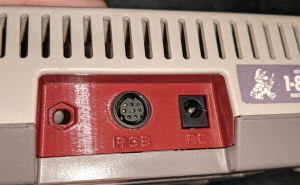
Both rear panels will need a new AC Jack. These can be found cheaply at Amazon or the like just find 5.5v2.1mm jack and look for one that sits on the PCB. I have a affiliate link below where you can grab the correct part. I just bend the side pin up and cut them off since it isn’t needed on the NES.
Auto Amazon Links: No products found. http_request_failed: A valid URL was not provided. URL: https://ws-na.amazon-adsystem.com/widgets/q?SearchIndex=All&multipageStart=0&multipageCount=20&Operation=GetResults&Keywords=B011HFLKI2&InstanceId=0&TemplateId=MobileSearchResults&ServiceVersion=20070822&MarketPlace=US Cache: AAL_158824c6884dca3c4148a6c2974af97b