Mike Chi has just released a new firmware for the RetroTINK 5x that includes by far the best fake scanlines I’ve ever seen. There are actually three new modes: “Slot Mask”, “Aperture Grille” and “PVM”, each including some vertical effects, rather than just horizontal lines across the screen. For the first time ever, I’m loving the look. More examples below and if you need help updating your RT5x firmware, check out the video above:
Download the latest RT5x firmware here: https://www.retrotink.com/post/retrotink-5x-pro-firmware-updates
Purchase all RetroTINK Products via multiple vendors worldwide here: https://www.retrorgb.com/retrotink.html
Now, before I continue, I need to set realistic expectations – In order to truly re-create the look of ‘three colors fired at the back of etched glass via an electron gun’, you’ll probably need 8K resolution. And you might even need different filters depending on the type of flat panel, as well as the size. Mike’s goal wasn’t a perfect re-creation, but something that captures the look and feel of a CRT when sitting a normal distance from the screen.
After some trial and error, I decided the best way to demonstrate these scanlines, was by taking a picture of each scanline option, using my Samsung 4K monitor, via my Panasonic Lumix GH5 camera (all the same manual settings). The RetroTINK 5x was set to 1080p5x (Over) mode and I used generic sampling for all, except the “LCD” style scanlines, as those won’t work unless you’re in the console’s optimal samplerate mode. I can’t stress enough that these look much different in person, but it’ll at least give you an idea; Click on the picture for a full-sized view and scroll across to see the different scanline types:

As a note, I wanted the comparison above to be a 1:1 comparison, so I didn’t change the brightness on my monitor to compensate for the different levels of scanline darkness. For the best performance, you might want to raise the brightness, or even try setting your TV to “vivid” mode. Yes, that’s right folks, there’s a post on RetroRGB that actually condones vivid mode. I’m as shocked as you are. As long as your TV is still in “game mode”, I’d recommend messing with different brightness and color combinations and see how it looks with the new scanline modes.
I also wanted to see how the new modes compared to a real CRT, but unfortunately, I don’t have access to all my equipment and monitors. I ended up using a picture I took last year of a 900TVL RGB monitor, a picture of an IBM CRT and a picture of my 13″ MiniMiSTerCade screen. A more fair comparison would be to use two 20″ consumer-grade CRT’s with component video inputs: One with a shadow mask, the other an aperture grille tube. I think this pic does a fairly good job…and once again, click for a full-sized view:
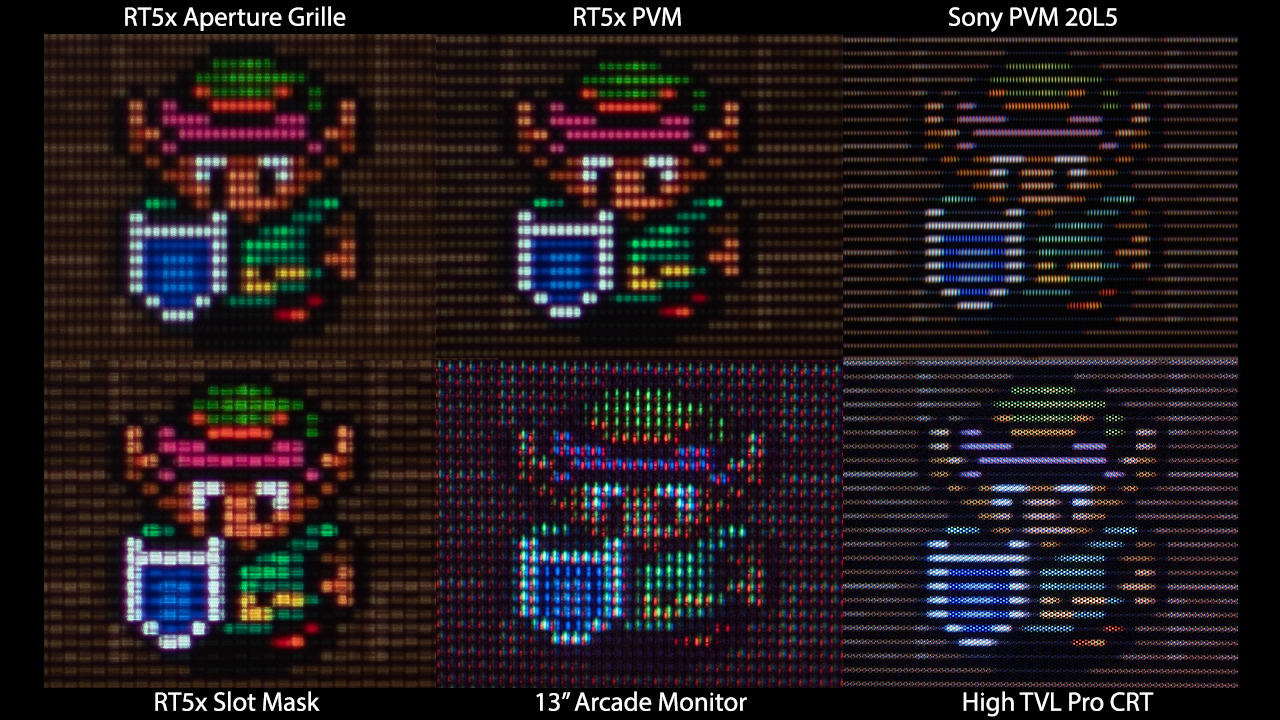
While I was playing, I ended up finding the aperture grille mode in 1080p5x to be the best overall look. The scanlines seemed to do a great job giving the images a similar look to a CRT, but I often forgot they were even turned on! I think that’s the goal of something like this: To have the image presented in a way that you don’t even know the scanlines are there. The horizontal + vertical mask cut through some of the sharper pixels and reduced flicker in the background of games like F-Zero. They also cut through the large, blocky pixels in a way that retained their sharpness, but gave the sense of more detail being there…just like what happens with a CRT.
Also, while the above picture shows less vertical detail than the 900TVL PVM, I’m not sure that much detail is necessary for artificial scanlines. I think once you get more vertical lines than this, they’ll be so close together that you might not be able to see the scanlines at all. Maybe it would look cool on future 100″, 8K TV’s, but on my 65″ OLED, it might just make the image darker. I guess we’ll find out someday when 8K scalers exist, but I’m certainly happy with it as-is.
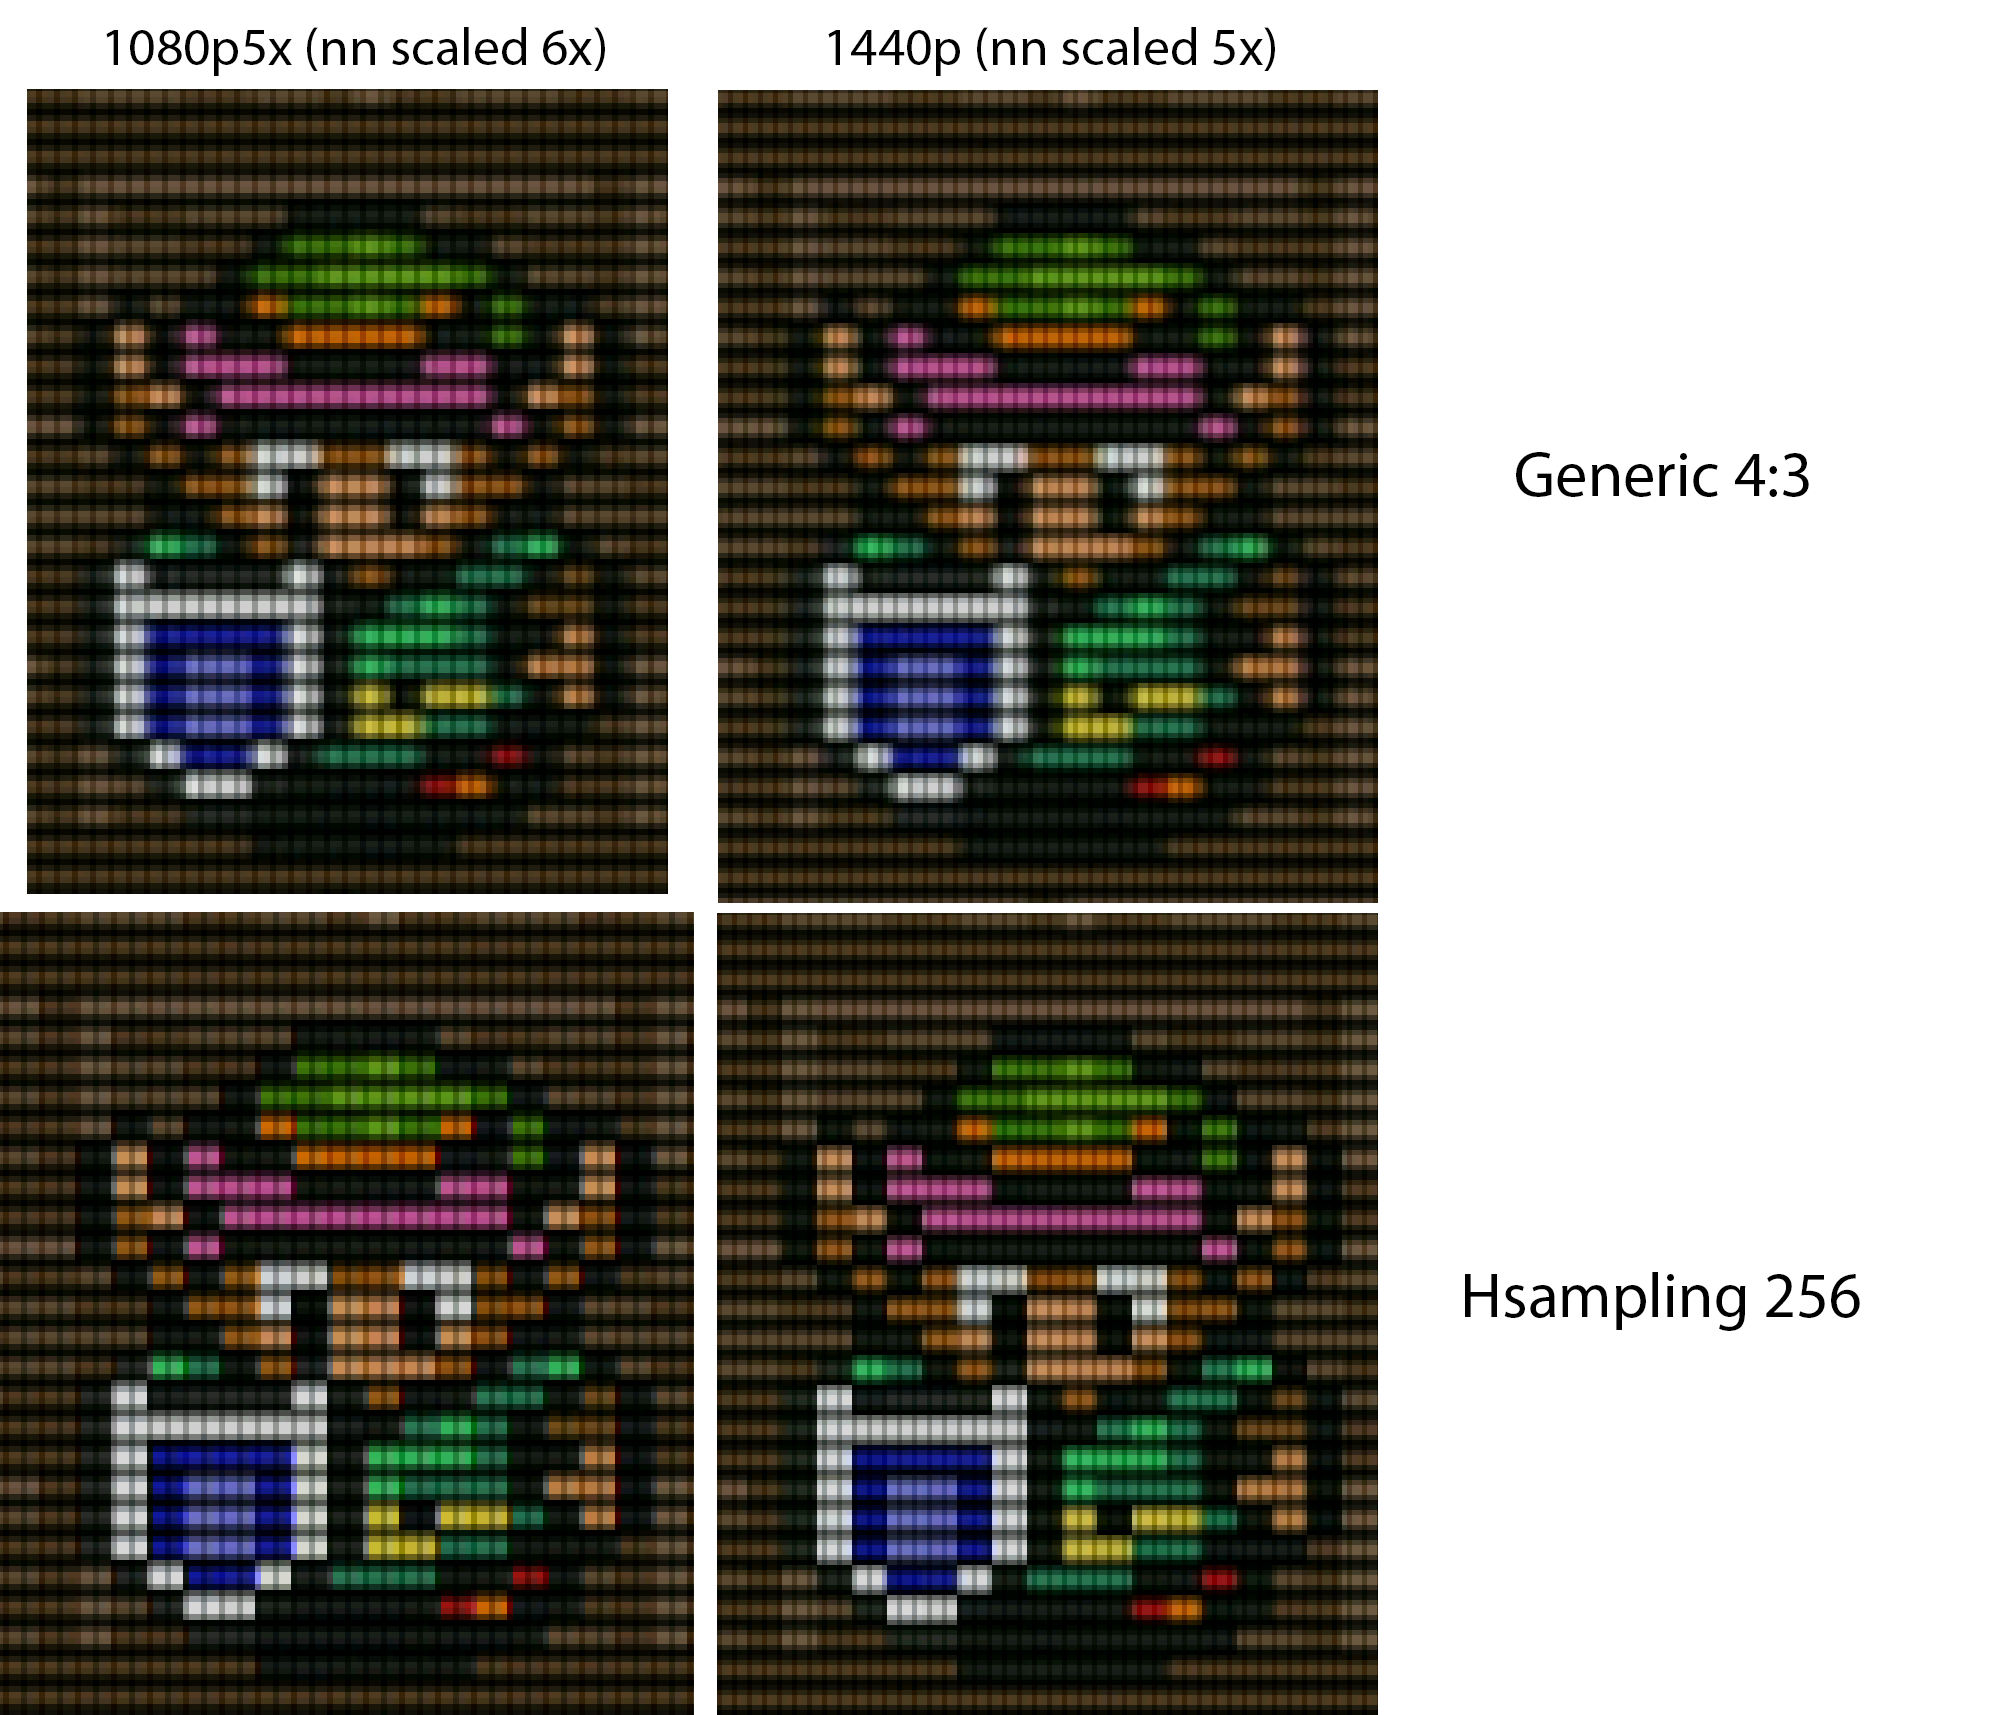
I also wanted to know what resolution and samplerate looked best with these new scanline options. As always, I really prefer the look of 1080p5x (Over) mode, as it fills the screen with almost the exact same overscan you’d see on a TV – Check out this video for all you’d need to know about 5x mode. I did see an increase in scanline detail when moving up to 1440p mode though; Count the ‘dots’ on the top of Link’s shield or hat in the pic below to see what I mean.
As for using generic mode vs optimal timings, you’ll see a tiny bit more sharpness with optimal, however the slight “blurring” of the generic mode creates a convincing effect that really does mimic the look of a CRT. Also, the scanlines might not line up right in every resolution when using optimal timings, as shown in the picture below. Once again, I recommend experimenting on your setup to see what’s best to your eyes:
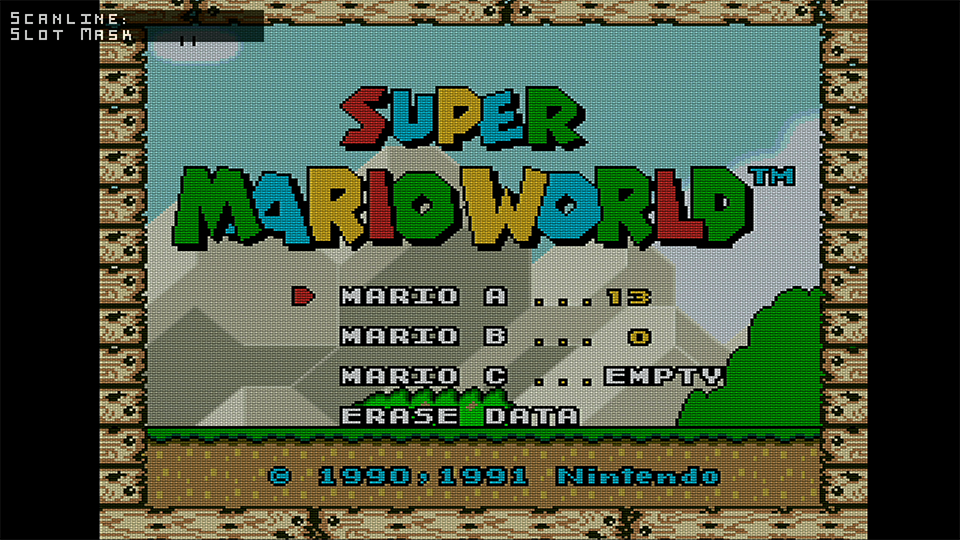
As a note, I took quite a few screenshots, as well as photos of the screen to demonstrate these comparisons. Both seemed like a decent representation for the aperture grille / PVM scanlines, but I could never get the “Slot Mask” captures to look the same as they did on my actual TV. That’s because your flat panel has it’s own sub-pixels that changes the look of the image and the total result can only truly be seen when sitting normal distance from your TV. Here’s an example of the word “Super” in the SMW title screen, showing what I mean:

That doesn’t even remotely represent what it looked like on my TV :/ In fact, even embedding the whole pic in this post doesn’t do it justice either, as whatever device you’re viewing this page on won’t scale it evenly:
I uploaded all the screenshots in case anyone wants to view them, but the only way to get a somewhat decent representation of how they really look, would be to open each in a fullscreen mode on the TV you’ll be gaming on, then sitting where you’d normally sit while gaming. It’s still not as good as seeing it in person, but the pics are here if you need them: http://retrorgb.com/assets/RetroTINK5xScanlineFirmwareDatapathCapturesAugust2021.zip
I also wanted to upload a video demonstrating the scanlines, but not only would the same “only look right in fullscreen” issues apply, but all video platforms compress the heck out of these uploads and scanlines always get ruined in the process. Maybe someone else with an RT5x will give it a try and have decent luck, but I didn’t want to accidentally misrepresent the RT5x’s new modes, if YouTube killed the look!
There’s a few more tweaks in this firmware update, but today was spent testing scanlines. Here’s the other additions:
-
Added “Pre-emphasis Filter” to soften or sharpen the image. The default value of “0” adds no processing. Negative values blur the image, and can be a good match with the CRT effects to create a soft look. Positive values sharpen the image and can be helpful with systems like the 2/3-Chip SNES.
-
PS1 320 optimal sampling is now a separate setting from Genesis since the timings differ enough to cause artifacts.
-
Added 540p output for use with HD-CRTs.
For more info and to download the firmware, check out Mike’s main RT5x firmware page: https://www.retrotink.com/post/retrotink-5x-pro-firmware-updates
