
After releasing a video about using the RetroTINK 5x/4K for 480i capture, I saw a comment from Ethan Nunn, claiming they contacted Avermedia about their Live Gamer 4K (GC573) not being able to record in interlaced formats. Ethan said they sent him a driver that would work and he forwarded it over to me, which I’ve confiremd works! I’ve contacted support1@avermedia.com and am trying to convince them to post this on their website as an official driver, but for now I’ve hosted it directly on RetroRGB for you all to try. Please note that this is only a driver, not a firmware file, so this will NOT void any warranty and if you have any negative effects after installing this, simply re-install the latest driver from their website and reboot (I’ve had zero issues so far though). Check out the full guide below the links:
Live Gamer 4K*: https://amzn.to/3eYDzZs
Used Live Gamer 4K*: https://ebay.us/3a4UYn
480i-Compatible Driver: https://www.retrorgb.com/assets/GC573_Win10Logo_Drv_x64_V2.2800.64.89_Install.exe.zip
Full Review: https://www.retrorgb.com/avermedia-live-gamer-4k-review.html
*Paid affiliate links
In order for this to work, you’ll still require some manual settings as shown in the TINK 480i video (embedded at the bottom of this post). I’ll walk you through everything else needed, but please note that I haven’t had a chance to test 1080i yet. That said, 480i seems to have worked great so far!
You’ll need to make sure your PC is set up and ready to go:
- Start by installing the driver linked above.
- Then download and install the Lagorith codec.
- You’ll also need VirtualDub for this, so download it and extract it to your PC.
- Then make sure to reboot!
Now I’ll run you through the capture process. If you have any issues, please reference the TINK 480i video below, as it shows every step, except the one trick needed to make these captures work (which I’ll highlight below).
- Open VirtualDub and go to Capture \ Capture AVI.
- Click on Device, then make sure AVerMedia HD Capture GC573 is selected.
- Go to Video \ Compression and make sure Lagorith is selected.
- Also hit the “Pixel Format” button (under compression) and make sure “No Change” is selected.
- Hit File \ Set Capture file and choose where the file is saved (and named).
Here’s where things differ from the TINK 480i video…
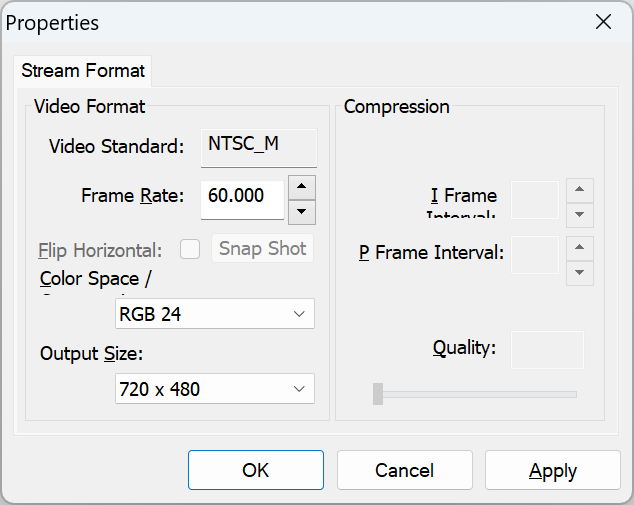
- Now go to Video \ Capture Pin
- Set the resolution to 720×480 (or 720×576 for PAL users)…and leave the Frame Rate at 60. I know that seems weird, but trust me. You can use a lower colorspace like YUY2 that will require less disk space, but I personally like to use the best colorspace the card allows, which is RGB24 for the Live Gamer 4K; We went over this in detail in the Podcast with Dan Mons if you’d like more info why. Then hit OK and do NOT re-enter this menu until your capture is complete.
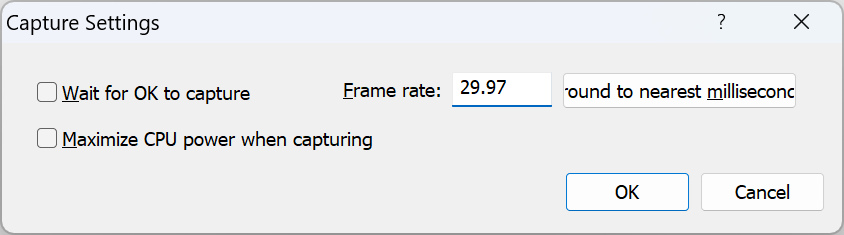
- Now for the final step – Go to Capture \ Capture Settings and set the Frame Rate to 29.97 (or the PAL equivalent). This is the setting that will force the true 480i capture. As a note, this will reset once VDub is closed and re-opened, so it shouldn’t affect future captures. You can always double check Capture Settings before the next recording, just to be safe:
- Now start playing your 480i source and hit Capture \ Capture Video to start recording. Then hit Esc when you’re done.
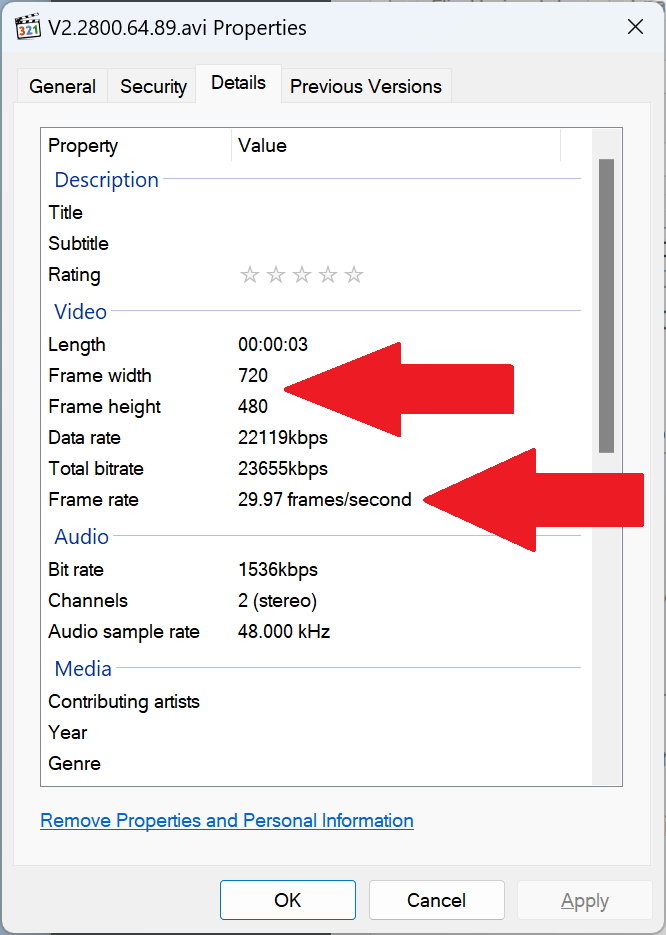
- The resulting file should look like a standard 480i .avi, with a 720×480 @29.97 frame information. As a note, I tested longer captures, but only saved this three second clip as a quick example:
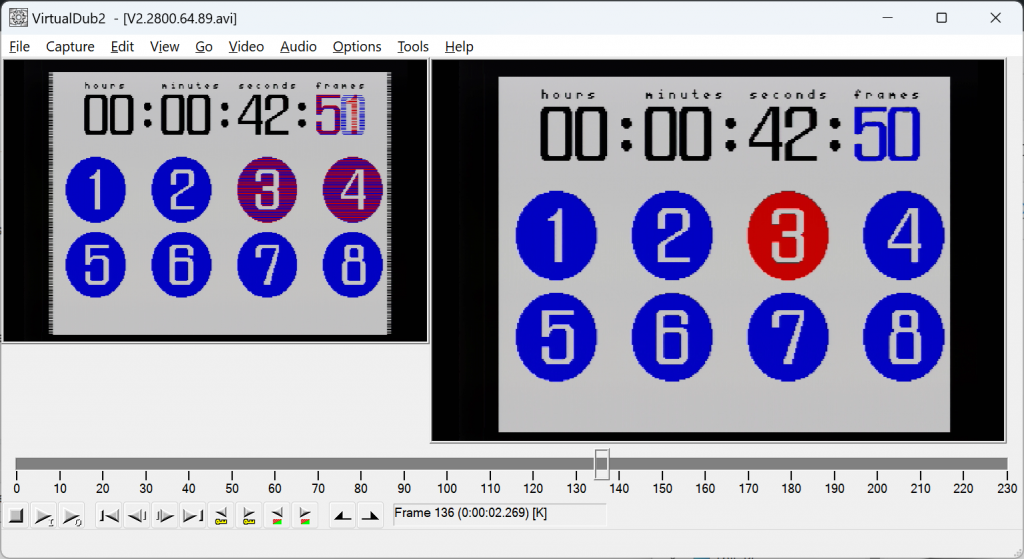
- I performed the 480i Field Counter test as shown in the video and as you can see here, after adding the TFF deinterlacing filter, each field is properly separated to its own frame. Also, since I used a game console for this test (not the DVD), this test also shows that the Live Gamer 4K is (as always) properly recording in the 4:4:4 colorspace we selected:

I also tested lossless 4K60 recording to make sure this driver didn’t change that and it worked exactly the same as when I tested with the previous driver for my original review. As far as I can tell, it’s the exact same, very reliable capture card, just now with the ability to record 480i. The only issue I ran into was with the first 1-3 seconds of the recorded 480i file. This may have been VDub-related, but when capturing in 480i, the file either showed a black screen, or duplicated frames for the first few seconds. I tested multiple recordings of varying lengths and never saw frame dropouts or errors in other parts of the file…only just the “first few seconds” issue. Personally, I’m totally fine with that. You should be buffering your recordings by more than two seconds anyway 🙂
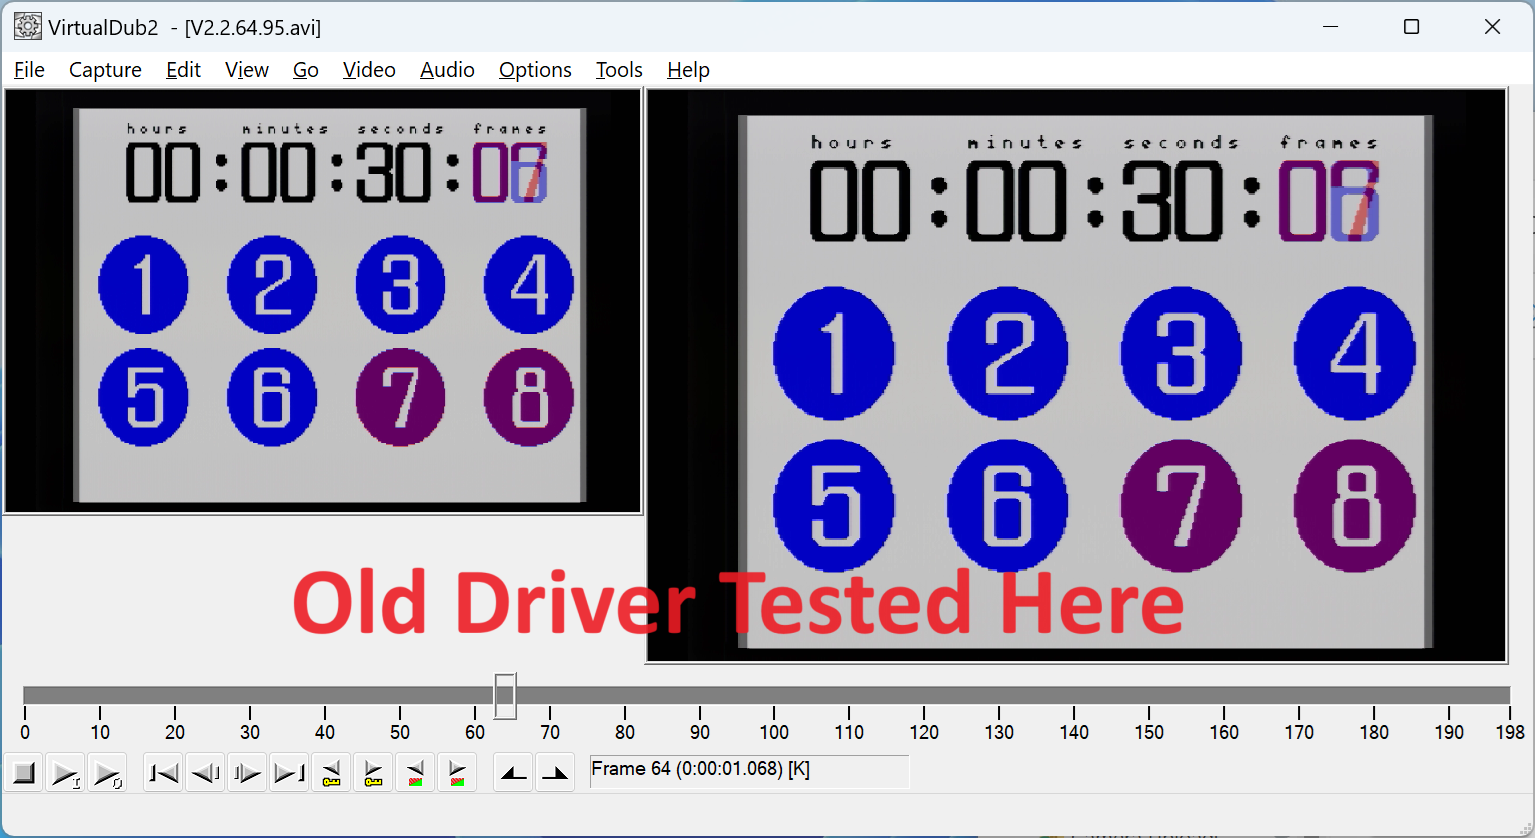
…and for the record, here’s what happens when you try the same trick on the older drivers – Nothing. Even though I forced 29.97 in Capture Settings, the file simply weaved each field together into a single frame. So this trick only works with the driver linked in this post:
If you’d like more info on how to test your own card and of course how to take advantage of 480i capture over HDMI, please check out the following video. Also, feel free to run this counter test along with forcing 29.97 in Capture Settings on your card. Maybe we’ll find other cards that work this way?:
